Lexmark 13H0180 Setup Sheet
Lexmark 13H0180 - X125 All-in-One Office Center Manual
 |
UPC - 734646375047
View all Lexmark 13H0180 manuals
Add to My Manuals
Save this manual to your list of manuals |
Lexmark 13H0180 manual content summary:
- Lexmark 13H0180 | Setup Sheet - Page 1
1 Before you begin, read the safety information on the back of this sheet. 2 Extend the paper exit tray and the paper support. www.lexmark.com 3 Attach and extend the document exit tray. 4 Load plain inkjet paper. 5 Open the cartridge access doors. 6 Remove the sticker and tape. 7 Install the - Lexmark 13H0180 | Setup Sheet - Page 2
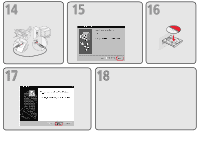
8 Close the cartridge access doors. 9 Wait for the alignment page to print. 10 Enter the best values from the alignment page. 11 Extend the document support. 12 Connect the telephone cord. 13 • If you are using your All-In-One with your computer, continue to the next step. • If you are - Lexmark 13H0180 | Setup Sheet - Page 3
14 Connect the USB cable. 15 Click Cancel. 16 Insert the CD. Click Next. Follow the steps on your computer to install: • Printer software, Quick Reference, and User's Guide • Photo editing software • OCR scanning software - Lexmark 13H0180 | Setup Sheet - Page 4
problem, first make sure: • The power cord is plugged into your All-In-One and into a properly grounded electrical outlet. • Your telephone cord is securely attached to the line jack on your All-In-One and to the wall jack. • Your telephone has a dial tone. • The cartridge 2002 Lexmark International
-
 1
1 -
 2
2 -
 3
3 -
 4
4
 |
 |

Attach and extend the document exit tray.
Load plain inkjet paper.
Before you begin, read the safety information on the back of this sheet.
Connect the power cord.
1
2
3
4
5
6
www.lexmark.com
Extend the paper exit tray and the paper support.
Open the cartridge access doors.
7
Remove the sticker and
tape.
1
2
X125 All-In-One
Install the cartridges.