Lexmark 2050 Color Jetprinter Service Manual - Page 52
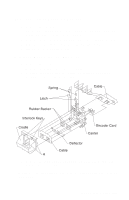
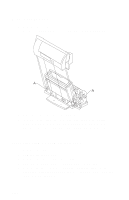
Rear Cover Removal, Right Side Frame Assembly Removal, Remove the carrier frame assembly.
 |
View all Lexmark 2050 Color Jetprinter manuals
Add to My Manuals
Save this manual to your list of manuals |
Page 52 highlights
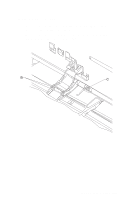
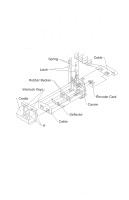
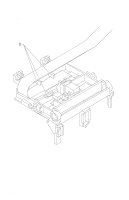
Rear Cover Removal 1. Remove the front cover. 2. Place a screwdriver in slot [A] and release the cover latches. 3. Slide the cover up and off the printer. 4. To reassemble, place the cover over the tabs in the bottom cover and press down until the cover latches. Be sure the parallel connector snaps do not get trapped behind the cover. Right Side Frame Assembly Removal 1. Remove the front cover. 2. Remove the rear cover. 3. Remove the carrier frame assembly. 4. Remove the paper load door and manual insert tray. 5. Remove the two screws securing the right side frame to the back plate. Slide the right side frame off the back plate. Note the relationship of the parts. 4-20
-
 1
1 -
2
-
3
-
4
-
5
-
6
-
7
-
8
-
9
-
10
-
11
-
12
-
13
-
14
-
15
-
16
-
17
-
18
-
19
-
20
-
21
-
22
-
23
-
24
-
25
-
26
-
27
-
28
-
29
-
30
-
31
-
32
-
33
-
34
-
35
-
36
-
37
-
38
-
39
-
40
-
41
-
42
-
43
-
44
-
45
-
46
-
 47
47 -
 48
48 -
 49
49 -
 50
50 -
 51
51 -
 52
52 -
 53
53 -
 54
54 -
 55
55 -
 56
56 -
 57
57 -
58
-
59
-
60
-
61
-
62
-
63
-
64
-
65
-
66
-
67
-
68
-
69
-
70
-
71
-
72
-
73
-
74
-
75
-
76
-
77
-
78
-
79
-
80
-
81
-
82
-
83
-
84
 |
 |

4-20
Rear Cover Removal
1. Remove the front cover.
2. Place a screwdriver in slot [A] and release the cover latches.
3. Slide the cover up and off the printer.
4. To reassemble, place the cover over the tabs in the bottom
cover and press down until the cover latches. Be sure the
parallel connector snaps do not get trapped behind the cover.
Right Side Frame Assembly Removal
1. Remove the front cover.
2. Remove the rear cover.
3. Remove the carrier frame assembly.
4. Remove the paper load door and manual insert tray.
5. Remove the two screws securing the right side frame to the
back plate. Slide the right side frame off the back plate. Note the
relationship of the parts.