Lexmark 654dn User's Guide - Page 47
Changing port settings after installing a new network Internal Solutions Port
 |
UPC - 734646315906
View all Lexmark 654dn manuals
Add to My Manuals
Save this manual to your list of manuals |
Page 47 highlights
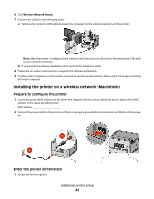
3 Click +. 4 Click AppleTalk. 5 Select the printer from the list. 6 Click Add. In Mac OS X version 10.4 and earlier 1 From the Finder desktop, choose Go > Applications. 2 Double-click Utilities. 3 Double-click Print Center or Printer Setup Utility. 4 From the Printer List, click Add. 5 Choose the Default Browser tab. 6 Click More Printers. 7 From the first pop-up menu, choose AppleTalk. 8 From the second pop-up menu, select Local AppleTalk zone. 9 Select the printer from the list. 10 Click Add. Note: If the printer doesn't show up in the list, you may need to add it using the IP address. Contact your system support person for assistance. Changing port settings after installing a new network Internal Solutions Port When a new network Lexmark Internal Solutions Port (ISP) is installed in the printer, the printer configurations on computers that access the printer must be updated because the printer will be assigned a new IP address. All computers that access the printer must be updated with this new IP address in order to print to it over the network. Notes: • If the printer has a static IP address that will stay the same, then you do not need to make any changes to the computer configurations. • If the computers are configured to print to the printer by a network name that will stay the same, instead of by IP address, then you do not need to make any changes to the computer configurations. • If you are adding a wireless ISP to a printer previously configured for a wired connection, then make sure the wired network is disconnected when you configure the printer to operate wirelessly. If the wired connection remains connected, then the wireless configuration will complete, but the wireless ISP will not be active. In the event that the printer was configured for a wireless ISP while still attached to a wired connection, disconnect the wired connection, turn the printer off, and then turn the printer back on again. This will enable the wireless ISP. • Only one network connection at a time is active. If you want to switch the connection type between wired and wireless, you must first turn the printer off, connect the cable (to switch to a wired connection) or disconnect the cable (to switch to a wireless connection), and then turn the printer back on again. For Windows users 1 Print a network setup page and make a note of the new IP address. 2 Click , or click Start and then click Run. Additional printer setup 47
-
 1
1 -
2
-
3
-
4
-
5
-
6
-
7
-
8
-
9
-
10
-
11
-
12
-
13
-
14
-
15
-
16
-
17
-
18
-
19
-
20
-
21
-
22
-
23
-
24
-
25
-
26
-
27
-
28
-
29
-
30
-
31
-
32
-
33
-
34
-
35
-
36
-
37
-
38
-
39
-
40
-
41
-
 42
42 -
 43
43 -
 44
44 -
 45
45 -
 46
46 -
 47
47 -
 48
48 -
 49
49 -
 50
50 -
 51
51 -
 52
52 -
53
-
54
-
55
-
56
-
57
-
58
-
59
-
60
-
61
-
62
-
63
-
64
-
65
-
66
-
67
-
68
-
69
-
70
-
71
-
72
-
73
-
74
-
75
-
76
-
77
-
78
-
79
-
80
-
81
-
82
-
83
-
84
-
85
-
86
-
87
-
88
-
89
-
90
-
91
-
92
-
93
-
94
-
95
-
96
-
97
-
98
-
99
-
100
-
101
-
102
-
103
-
104
-
105
-
106
-
107
-
108
-
109
-
110
-
111
-
112
-
113
-
114
-
115
-
116
-
117
-
118
-
119
-
120
-
121
-
122
-
123
-
124
-
125
-
126
-
127
-
128
-
129
-
130
-
131
-
132
-
133
-
134
-
135
-
136
-
137
-
138
-
139
-
140
-
141
-
142
-
143
-
144
-
145
-
146
-
147
-
148
-
149
-
150
-
151
-
152
-
153
-
154
-
155
-
156
-
157
-
158
-
159
-
160
-
161
-
162
-
163
-
164
-
165
-
166
-
167
-
168
-
169
-
170
-
171
-
172
-
173
-
174
-
175
-
176
-
177
-
178
-
179
-
180
-
181
-
182
-
183
-
184
-
185
-
186
-
187
-
188
-
189
-
190
-
191
-
192
-
193
-
194
-
195
-
196
-
197
-
198
-
199
-
200
-
201
-
202
-
203
-
204
-
205
-
206
-
207
-
208
-
209
-
210
-
211
-
212
-
213
-
214
-
215
-
216
 |
 |
