Lexmark 734DN Quick Reference - Page 2
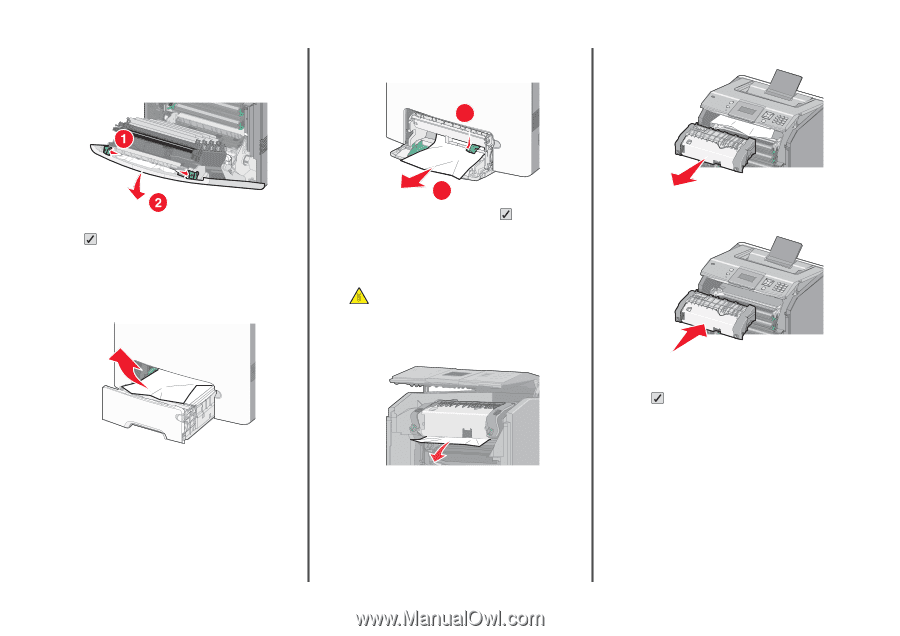
Clearing jams from paper trays, Clearing jams from the fuser area or, under the top cover
 |
UPC - 734646086059
View all Lexmark 734DN manuals
Add to My Manuals
Save this manual to your list of manuals |
Page 2 highlights
• If the jammed paper is between the front door and the transfer module, pull out on the release tabs to allow the front door to split, and then pull straight out to remove the paper. • If paper is jammed inthe multipurposetray, press the paper release lever, and then remove the jammed pages. 1 d Lift the fuser, and move it forward to remove it. 2 After clearing a paper jam, close the front door, and then press . Clearing jams from paper trays 1 Complete one or more of the following actions: • Open Tray 1, and then pull the jammed pages straight up and out. 2 2 Close the appropriate tray, and then press . Clearing jams from the fuser area or under the top cover 1 Open the front door, and then open the top cover. CAUTION-HOT SURFACE: The fuser and the inside of the printer near the fuser may be hot. Wait for the fuser to cool before clearing jams from this area. 2 Determine where the jam is located: a If paper is visible under the fuser, then grasp it on each side and pull it forward. • If paper is jammed in one of the optional trays, then open the specified optional tray, and pull the jammed pages out. b If paper is not visible, then you will need to remove the fuser. c Turn the screws on the fuser to the left. e Pull the paper gently out of the printer or up toward the standard exit bin to remove it. f Align the fuser, and place it back into the printer. g Turn the screws to the right to fasten it securely. 3 Close the top cover, and then close the front door. 4 Press . 2
-
 1
1 -
 2
2
 |
 |