Lexmark 854e User's Guide - Page 103
Understanding jam numbers, Clearing jams, 250 Jam, 202 Jams
 |
UPC - 734646257688
View all Lexmark 854e manuals
Add to My Manuals
Save this manual to your list of manuals |
Page 103 highlights
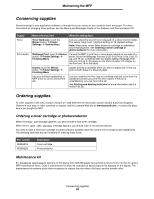
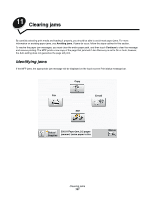
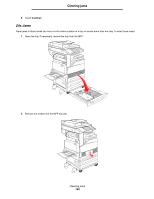
Clearing jams Understanding jam numbers The following table lists the jams that can occur and the action necessary to clear the message. The jam number indicates the area where the jam occurred. However, it is best to clear the entire paper path to ensure you have cleared all possible jams. Jam 200-202 Jams 203 Jam 230 Jam 231 Jam 24x Jams 250 Jam 280-288 Jams 289 Jam 290, 291, 292, and 294 Jams 293 Jam What to do Open Door A, and remove the jam. Open the Door A and Door E, and remove the jam. Open Door D, and remove the jam. Open the Door A and Door E, and remove the jam. Open Door D, and remove the jam. Open the Door A and Door E, and remove the jam. Open each tray, and remove any jammed media. Remove all media from the multipurpose feeder, flex and stack the media, reload the multipurpose feeder, and adjust the guide. As directed by the message, check area F, G, or H, then remove the jam. Remove the staple cartridge, then remove any jammed staples. Open the ADF cover and the scanner cover, and remove any jammed media. Select the location of your original document, finish your job without further scanning, restart scanning, or cancel the job and clear the message. Clearing jams Although there are several places a jam can occur, clearing the paper path is straightforward. The jam number shown in the message indicates the jam location. Note: The following clearing jam instructions may seem out of sequence. However, they have been grouped to help you quickly clear the print path. 250 Jam 1 Remove the paper from the multipurpose feeder. 2 Flex, fan, and restack the media, and place it into the multipurpose feeder. 3 Load the print media. 4 Slide the side guide toward the inside of the tray until it lightly rests against the edge of the media. Understanding jam numbers 103
-
 1
1 -
2
-
3
-
4
-
5
-
6
-
7
-
8
-
9
-
10
-
11
-
12
-
13
-
14
-
15
-
16
-
17
-
18
-
19
-
20
-
21
-
22
-
23
-
24
-
25
-
26
-
27
-
28
-
29
-
30
-
31
-
32
-
33
-
34
-
35
-
36
-
37
-
38
-
39
-
40
-
41
-
42
-
43
-
44
-
45
-
46
-
47
-
48
-
49
-
50
-
51
-
52
-
53
-
54
-
55
-
56
-
57
-
58
-
59
-
60
-
61
-
62
-
63
-
64
-
65
-
66
-
67
-
68
-
69
-
70
-
71
-
72
-
73
-
74
-
75
-
76
-
77
-
78
-
79
-
80
-
81
-
82
-
83
-
84
-
85
-
86
-
87
-
88
-
89
-
90
-
91
-
92
-
93
-
94
-
95
-
96
-
97
-
 98
98 -
 99
99 -
 100
100 -
 101
101 -
 102
102 -
 103
103 -
 104
104 -
 105
105 -
 106
106 -
 107
107 -
 108
108 -
109
-
110
-
111
-
112
-
113
-
114
-
115
-
116
-
117
-
118
-
119
-
120
-
121
-
122
-
123
-
124
-
125
-
126
-
127
-
128
-
129
-
130
-
131
-
132
-
133
-
134
-
135
-
136
-
137
-
138
-
139
-
140
-
141
-
142
-
143
-
144
-
145
-
146
-
147
-
148
-
149
-
150
-
151
-
152
-
153
-
154
-
155
-
156
-
157
-
158
-
159
-
160
-
161
-
162
 |
 |