Lexmark CX310 Quick Reference
Lexmark CX310 Manual
 |
View all Lexmark CX310 manuals
Add to My Manuals
Save this manual to your list of manuals |
Lexmark CX310 manual content summary:
- Lexmark CX310 | Quick Reference - Page 1
multipurpose feeder and manual feeder. • The largest supported Universal size is 215.9 x 359.9 mm (8.5 x 14.17 inches) and is loaded only in the multipurpose feeder and manual feeder. 1 From the printer control panel, navigate to: > Settings > > Paper Menu > > Universal Setup > 2 Press the up - Lexmark CX310 | Quick Reference - Page 2
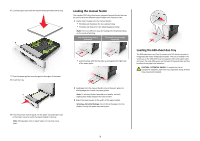
‑sheet tray The printer has a 250-sheet tray (Tray 1) with an integrated manual feeder. The 250-sheet tray and the 650-sheet duo tray support the same paper the paper size indicators on the bottom of the tray to help position the guides. 5 Flex the sheets back and forth to loosen them, and then fan - Lexmark CX310 | Quick Reference - Page 3
the paper guides. Note: To achieve the best possible print quality, use only high‑quality media designed for laser printers. 3 Adjust the paper guides to the as the 250‑sheet tray and supports the same paper types and sizes. The only differences are the look of the guide tabs and the location of the - Lexmark CX310 | Quick Reference - Page 4
size indicator 3 Width guide tab Loading the multipurpose to scratch them. 3 Pull the multipurpose feeder extender. Note: Guide the extender gently so that the multipurpose feeder is fully extended and , snaps, windows, coated linings, or self‑stick adhesives. These envelopes may severely - Lexmark CX310 | Quick Reference - Page 5
recommend giving all unique paper, such as letterhead and different colored plain papers, a different custom type name so that the trays they are in will not automatically link. Linking and unlinking trays Note: This feature applies only in network printers. 1 Open a Web browser, and then type the - Lexmark CX310 | Quick Reference - Page 6
and Max Yield let you choose between a faster print speed and a higher toner yield. Max Yield is the factory default setting. • Max Speed-This lets you print in either black or color depending on the setting in the printer driver. The printer prints in color unless Black Only is selected in the - Lexmark CX310 | Quick Reference - Page 7
. 4 Click Delete. For Macintosh users 1 From the Apple Menu, navigate to either of the following: • System Preferences > Print & Scan > select a printer > Open Print Queue • System Preferences > Print & Fax > select a printer > Open Print Queue 2 From the printer window, select the print job you - Lexmark CX310 | Quick Reference - Page 8
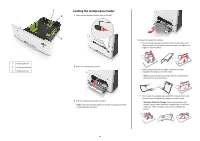
If you are loading a document into the ADF tray, then adjust the paper guides. 3 From the printer control panel, press #, and then enter the FTP shortcut number. 4 Press . Scanning to an FTP address using the printer control panel 1 Load an original document faceup, short edge first into the ADF - Lexmark CX310 | Quick Reference - Page 9
scanned output file. 5 Type a scan name. The scan name is the name that appears in the Scan Profile list on the display. 6 Click Submit. 7 Review the instructions on the Scan document into the ADF tray, then adjust the paper guides. c From the printer control panel, press #, and then type the - Lexmark CX310 | Quick Reference - Page 10
the jam location and information to clear the jam appears on the printer display. Open the doors, covers, and trays indicated on the display lift the paper rollers, and then remove the jammed paper. 8 Manual feeder [x]‑page jam, clear manual feeder [251.xx] Remove the jammed paper. [x]‑page jam, - Lexmark CX310 | Quick Reference - Page 11
. 3 Open the front door. CAUTION-HOT SURFACE: The inside of the printer might be hot. To reduce the risk of injury from a hot component to cool before touching. 4 Slide and hold the release latch on the right side of the printer, and then slowly close the top door. 1 2 a If there is a jammed paper - Lexmark CX310 | Quick Reference - Page 12
then press to confirm. [x]-page jam, open front door to clear fuser [202.xx] 1 Open the front door. CAUTION-HOT SURFACE: The inside of the printer might be hot. To reduce the risk of injury from a hot component, allow the surface to cool before touching. 4 Hold down the fuser cover, and - Lexmark CX310 | Quick Reference - Page 13
, press OK, and then press to confirm. [x]-page jam, open front door [20y.xx] 1 Open the front door. CAUTION-HOT SURFACE: The inside of the printer might be hot. To reduce the risk of injury from a hot component, allow the surface to cool before touching. 2 Firmly grasp the jammed paper on - Lexmark CX310 | Quick Reference - Page 14
xx] 1 Pull out the standard 250-sheet tray (Tray 1) and manual feeder. 2 Firmly grasp the jammed paper on each side, and then gently pull it out. Note: Make sure all paper fragments are removed. 3 Insert the tray. 4 From the printer control panel, touch to clear the message and continue printing - Lexmark CX310 | Quick Reference - Page 15
them, and then fan them. Do not fold or crease the paper. Straighten the edges on a level surface. 15 4 Slide the paper guide until it rests lightly against the edge of the paper stack. 1 2 5 From the printer control panel, touch to clear the message and continue printing. For non‑touch‑screen - Lexmark CX310 | Quick Reference - Page 16
are removed. 4 Close the ADF cover. 5 Straighten the edges of the original documents, then load the documents into the ADF, and then adjust the paper guide. 6 From the printer control panel, touch to clear the message and continue printing. For non‑touch‑screen
-
 1
1 -
 2
2 -
 3
3 -
 4
4 -
 5
5 -
 6
6 -
 7
7 -
8
-
9
-
10
-
11
-
12
-
13
-
14
-
15
-
16
 |
 |
Quick Reference
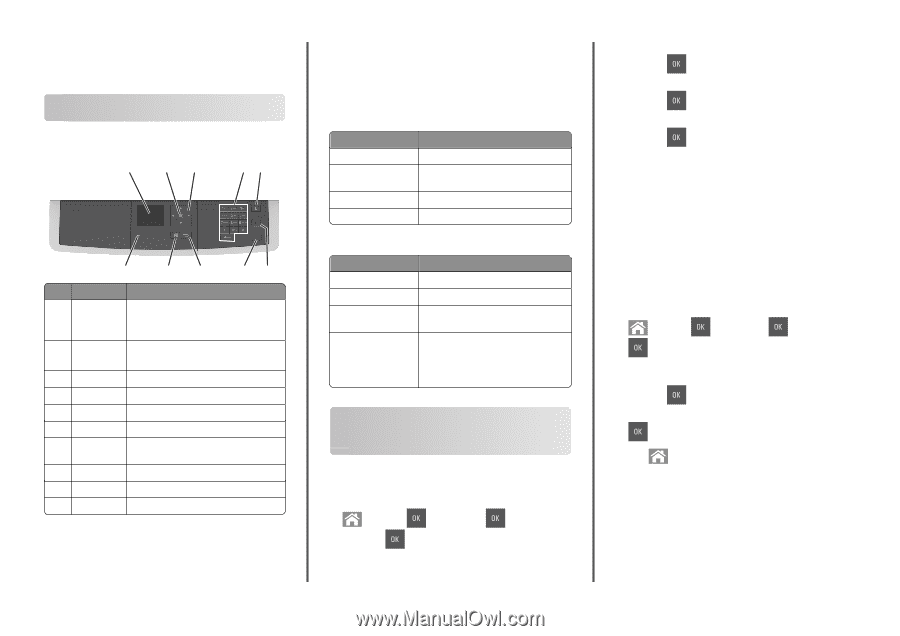
Learning about the printer
Using the printer control panel
1
2
3
4
5
6
7
8
9
10
Use the
To
1
Display
•
View printing, copying, e
‑
mailing, and
scanning options.
•
View printer status and error messages.
2
Select button
•
Select menu options.
•
Save settings.
3
Arrow buttons
Scroll through menus or settings on the display.
4
Keypad
Enter numbers, letters, or symbols.
5
Sleep button
Enable Sleep mode or Hibernate mode.
6
Cancel button
Stop all printer activity.
7
Start button
Start a job, depending on which mode is
selected.
8
Back button
Return to the previous screen.
9
Home button
Go to the home screen.
10
Indicator light
Check the status of the printer.
Understanding the colors of the indicator
and Sleep button lights
The colors of the indicator and Sleep button lights on the printer control
panel signify a certain printer status or condition.
Indicator light color and its corresponding printer status
Indicator light
Printer status
Off
The printer is off or in Hibernate mode.
Blinking green
The printer is warming up, processing data,
or printing.
Solid green
The printer is on, but idle.
Blinking red
The printer requires user intervention.
Sleep button light color and its corresponding printer status
Sleep button light
Printer status
Off
The printer is off, idle or in Ready state.
Solid amber
The printer is in Sleep mode.
Blinking amber
The printer is entering or waking from
Hibernate mode.
Blinking amber for 0.1
second, then goes
completely off for 1.9
seconds in a slow, pulsing
pattern
The printer is in Hibernate mode.
Loading paper and specialty
media
Setting the paper size and type
1
From the printer control panel, navigate to:
>
Settings
>
>
Paper Menu
>
>
Paper
Size/Type
>
2
Press the up or down arrow button to select the tray or feeder, and
then press
.
3
Press the up or down arrow button to select the paper size, and
then press
.
4
Press the up or down arrow button to select the paper type, and
then press
to change the settings.
Configuring Universal paper settings
The Universal paper size is a user
‑
defined setting that lets you print on
paper sizes that are not preset in the printer menus.
Notes:
•
The smallest supported Universal size is 76 x 127 mm (3 x 5
inches) and is loaded only in the multipurpose feeder and
manual feeder.
•
The largest supported Universal size is 215.9 x 359.9 mm
(8.5 x 14.17 inches) and is loaded only in the multipurpose
feeder and manual feeder.
1
From the printer control panel, navigate to:
>
Settings
>
>
Paper Menu
>
>
Universal Setup
>
2
Press the up or down arrow buttons to scroll to
Units of
Measure
,
Portrait Height
, or
Portrait Width
, and
then press
.
3
Enter the preferred settings using the keypad, and then press
.
4
Press
.
1