Lexmark CX310 Quick Reference - Page 14
jam, open tray [x] [24y.xx], jam, clear manual feeder [251.xx]
 |
View all Lexmark CX310 manuals
Add to My Manuals
Save this manual to your list of manuals |
Page 14 highlights
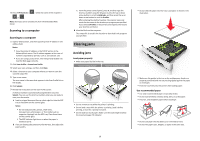
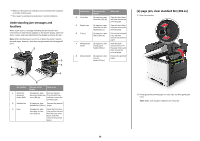
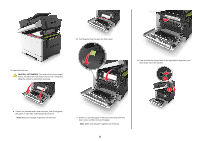
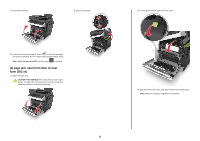
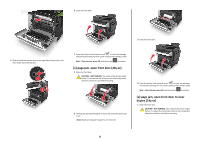
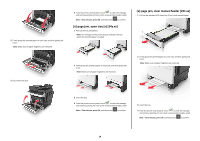
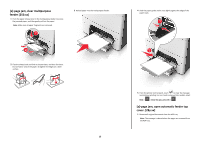
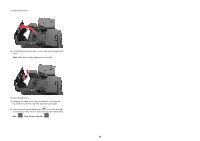
2 Firmly grasp the jammed paper on each side, and then gently pull it out. Note: Make sure all paper fragments are removed. 3 Close the front door. 4 From the printer control panel, touch to clear the message and continue printing. For non‑touch‑screen printer models, select Next > Clear the jam, press OK, and then press to confirm. [x]‑page jam, open tray [x] [24y.xx] 1 Pull out the tray completely. Note: The message on the printer display indicates the tray where the jammed paper is located. 2 Firmly grasp the jammed paper on each side, and then gently pull it out. Note: Make sure all paper fragments are removed. [x]‑page jam, clear manual feeder [251.xx] 1 Pull out the standard 250-sheet tray (Tray 1) and manual feeder. 2 Firmly grasp the jammed paper on each side, and then gently pull it out. Note: Make sure all paper fragments are removed. 3 Insert the tray. 4 From the printer control panel, touch to clear the message and continue printing. For non‑touch‑screen printer models, select Next > Clear the jam, press OK, and then press to confirm. 3 Insert the tray. 4 From the printer control panel, touch to clear the message and continue printing. For non‑touch‑screen printer models, select Next > Clear the jam, press OK, and then press to confirm. 14
-
 1
1 -
2
-
3
-
4
-
5
-
6
-
7
-
8
-
 9
9 -
 10
10 -
 11
11 -
 12
12 -
 13
13 -
 14
14 -
 15
15 -
 16
16
 |
 |
