Lexmark CX410 Color quality guide
Lexmark CX410 Manual
 |
View all Lexmark CX410 manuals
Add to My Manuals
Save this manual to your list of manuals |
Lexmark CX410 manual content summary:
- Lexmark CX410 | Color quality guide - Page 1
guide Page 1 of 6 Color quality guide The Color quality guide helps users understand how operations available on the printer can be used to adjust and customize color output. Quality menu Use Print Mode Color Black Only Color Correction Auto Off Manual Print Resolution 1200 dpi 4800 CQ Toner - Lexmark CX410 | Color quality guide - Page 2
to 5 Yellow ‑5 to 5 Black ‑5 to 5 Reset Defaults Color Samples sRGB Display sRGB Vivid Display-True Black Vivid Off-RGB US CMYK Euro CMYK Vivid CMYK Off-CMYK Color quality guide Page 2 of 6 To Reduce the amount of toner used for graphics and images. The amount of toner used for text is not reduced - Lexmark CX410 | Color quality guide - Page 3
Use Manual Color RGB Image RGB Text RGB Graphics Manual Color (continued) CMYK Image CMYK Text CMYK Graphics Spot Color Replacement Color Adjust Color quality guide Page 3 of 6 To Customize the RGB color conversions. Select from the following options: Vivid sRGB Display Display-True Black sRGB - Lexmark CX410 | Color quality guide - Page 4
yellow, and black inks or toners can be printed in various amounts to produce a large range of colors observed in nature. For example, cyan and yellow can be combined to create green. Printing presses, inkjet printers, and color laser printers create colors in this manner. CMYK color is a method of - Lexmark CX410 | Color quality guide - Page 5
samples sets are available only through the Embedded Web Server of a network printer. A detailed Color Samples set contains a range of shades that are similar to a user‑defined RGB or CMYK value. The likeness of the colors in the set is dependent on the value entered in the RGB or CMYK Increment - Lexmark CX410 | Color quality guide - Page 6
Color quality guide Page 6 of 6 • View the information on the printer home screen, or in the TCP/IP section in the Networks/Ports menu. • Print a network setup page or menu settings page, and then locate the information in the TCP/IP section. 2 Click Configuration > Color Samples > Detailed Options.
-
 1
1 -
 2
2 -
 3
3 -
 4
4 -
 5
5 -
 6
6
 |
 |
Color quality guide
The Color quality guide helps users understand how operations available on the printer can be used to adjust and customize
color output.
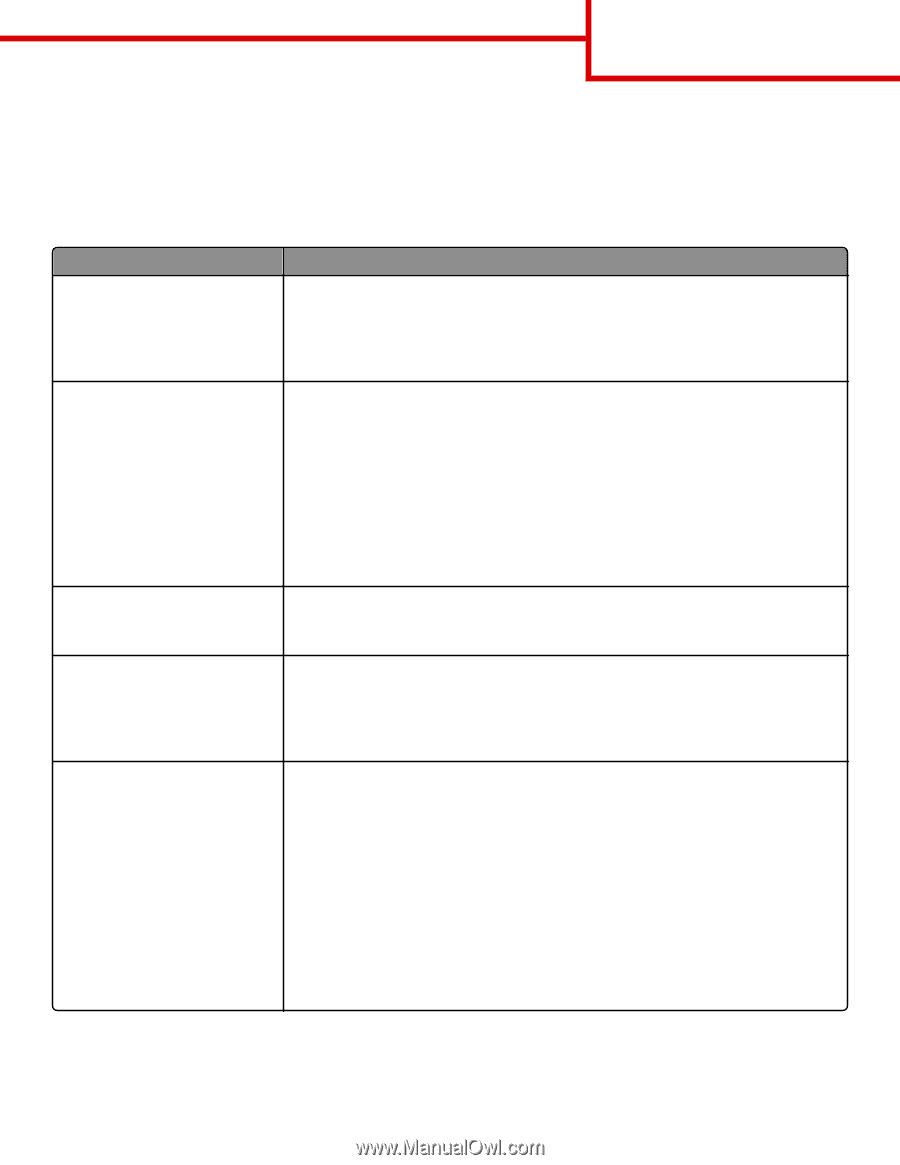
Quality menu
Use
To
Print Mode
Color
Black Only
Specify whether images are printed in black and white or in color.
Notes:
•
Color is the factory default setting.
•
The printer driver is capable of overriding this setting.
Color Correction
Auto
Off
Manual
Adjust the color output on the printed page.
Notes:
•
Auto is the factory default setting. This applies different color conversion tables to each
object on the printed page.
•
Off turns off color correction.
•
Manual allows customization of the color tables using the settings available from the
Manual Color menu.
•
Due to the differences in additive and subtractive colors, certain colors that appear on
computer monitors are impossible to duplicate on the printed page.
Print Resolution
1200 dpi
4800 CQ
Specify the printed output resolution in dots per inch or in color quality (CQ).
Note:
4800 CQ is the factory default setting.
Toner Darkness
1–5
Lighten or darken the printed output.
Notes:
•
4 is the factory default setting.
•
Selecting a smaller number can help conserve toner.
Enhance Fine Lines
On
Off
Enable a print mode preferable for files such as architectural drawings, maps, electrical circuit
diagrams, and flow charts.
Notes:
•
Off is the factory default setting.
•
To set this option using the Embedded Web Server, type the network printer IP address
in the Web browser address field.
•
You can set this option from the software program.
For Windows users:
Click
File
>
Print
, and then click
Properties
,
Preferences
,
Options
, or
Setup
.
For Macintosh users:
Choose
File
>
Print
, and then adjust the settings from the Print dialog and pop
‑
up menus.
Color quality guide
Page 1 of 6