Lexmark MC2640 Embedded Web Server Administrator s Guide - Page 36
Managing login methods
 |
View all Lexmark MC2640 manuals
Add to My Manuals
Save this manual to your list of manuals |
Page 36 highlights
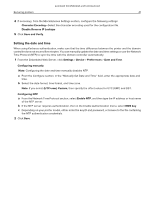
Lexmark Confidential until announced Securing printers 36 Managing login methods Restricting public access to functions, applications, printer management, and security options The guest account can use the printer without logging in. To control the access of guest account users, restrict the functions, applications, printer management, and security options for the guest account. 1 From the Embedded Web Server, click Settings > Security > Login Methods. 2 From the Public section, click Manage Permissions. 3 Select the access controls that the guest account can access. For more information, see "Understanding access controls" on page 45. 4 Click Save. Using local accounts Local accounts are stored in the printer memory and provide authentication‑level security. Creating local accounts 1 From the Embedded Web Server, click Settings > Security > Login Methods. 2 From the Local Accounts section, click Add User. 3 Select the type of authentication method that you want the account to use when logging in to the printer. • User Name/Password-Add an account with a user name and password. • User Name-Add an account with a user name only. • Password-Add an account with a password only. • PIN-Add an account with a personal identification number (PIN) only. 4 From the User Information section, type the user information and authentication credentials. 5 From the Permission Groups section, select one or more groups. Note: To create a group for the user, select Add New Group. For more information, see "Creating local account groups" on page 37. 6 Click Save. Editing and deleting local accounts 1 From the Embedded Web Server, click Settings > Security > Login Methods. 2 From the Local Accounts section, click the authentication method where the user account belongs to. 3 Click the user account that you want to edit or delete. 4 Do either of the following: • To edit the user account, update the user information, and then click Save. • To delete the user account, click Delete User.
-
 1
1 -
2
-
3
-
4
-
5
-
6
-
7
-
8
-
9
-
10
-
11
-
12
-
13
-
14
-
15
-
16
-
17
-
18
-
19
-
20
-
21
-
22
-
23
-
24
-
25
-
26
-
27
-
28
-
29
-
30
-
 31
31 -
 32
32 -
 33
33 -
 34
34 -
 35
35 -
 36
36 -
 37
37 -
 38
38 -
 39
39 -
 40
40 -
 41
41 -
42
-
43
-
44
-
45
-
46
-
47
-
48
-
49
-
50
-
51
-
52
-
53
-
54
-
55
-
56
-
57
-
58
-
59
-
60
-
61
-
62
-
63
-
64
-
65
-
66
-
67
-
68
-
69
-
70
-
71
 |
 |