Lexmark MS510 Quick Reference
Lexmark MS510 Manual
 |
View all Lexmark MS510 manuals
Add to My Manuals
Save this manual to your list of manuals |
Lexmark MS510 manual content summary:
- Lexmark MS510 | Quick Reference - Page 1
the settings. Configuring Universal paper settings The Universal paper size is a user‑defined setting that lets you print on paper sizes that are not preset in the printer menus. Notes: • The smallest Universal paper size is 6 x 127 mm (3 x 5 inches), and is supported only from the multipurpose - Lexmark MS510 | Quick Reference - Page 2
press . Adjusting toner darkness Using the Embedded Web Server 1 Open a Web browser, and then type the IP address of the printer in the address field. Notes: • View the printer IP address in the TCP/IP section in the Network/Ports menu. The IP address appears as four sets of numbers separated by - Lexmark MS510 | Quick Reference - Page 3
page 1. Warning-Potential Damage: Paper loaded in the tray should match the paper type name assigned in the printer. The temperature of the fuser varies according to the specified paper type. Printing issues may occur if settings are not properly configured. Using the 4.3-inch display printer model - Lexmark MS510 | Quick Reference - Page 4
available only when the printer is in ready state. • Show the current printer status such as Ready or Busy. • Show printer conditions such as Imaging unit low or Cartridge Low. • Show intervention messages and the instructions on how to clear them. • Show a printer warning or error message whenever - Lexmark MS510 | Quick Reference - Page 5
a tray > select the paper size or type > Configuring Universal paper settings The Universal paper size is a user‑defined setting that lets you print on paper sizes that are not preset in the printer menus. Notes: • The smallest Universal paper size is 6 x 127 mm (3 x 5 inches), and is supported only - Lexmark MS510 | Quick Reference - Page 6
the printer. 1 Obtain the printer IP address: • From the printer control panel home screen • From the TCP/IP section in the Network/Ports menu • By printing a network setup page or menu settings page, and then finding the TCP/IP section Note: An IP address appears as four sets of numbers separated - Lexmark MS510 | Quick Reference - Page 7
for forms based on a form number, name, or description. Understanding Eco‑Settings Icon Description The application lets you easily manage energy consumption, noise, toner, and paper usage settings to help reduce the environmental impact of your printer. Setting up Remote Operator Panel This - Lexmark MS510 | Quick Reference - Page 8
. 1 Pull out the tray completely. Note: Do not remove trays while a job prints or while Busy appears on the printer display. Doing so may cause a jam. A4 LTR EXEC B5 A5 A6 2 Squeeze and then slide the width guide tab to the correct position for the size of the paper you are loading. 1 LGLLTR - Lexmark MS510 | Quick Reference - Page 9
. For more information, contact customer support. • If you are loading A6-size paper in the standard tray, then squeeze and then slide the length guide tab toward the center of the tray to the A6‑size position. • Make sure the width and length guides are aligned with the paper size indicators on the - Lexmark MS510 | Quick Reference - Page 10
A4 EXEC LTR B5 A5 6 Insert the tray. 7 From the printer control panel, set the paper size and paper type in the Paper menu to match the paper loaded in the tray. Note: Set the correct paper size and paper type to avoid paper jams and print quality problems. Loading the multipurpose feeder Use the - Lexmark MS510 | Quick Reference - Page 11
located on the paper guides. Overfilling may cause paper jams. 3 Prepare the paper or specialty media for loading. • Flex sheets of paper back and forth to loosen them, and then fan them. Do not fold or crease the paper. Straighten the edges on a level surface. the printer first. For more - Lexmark MS510 | Quick Reference - Page 12
facedown with the bottom edge entering the printer first. Clearing jams Avoiding jams Load paper properly • Make sure paper lies flat in the tray. Correct loading of paper Incorrect loading of paper • Do not slide the paper into the tray. Load paper as shown in the illustration. • Load - Lexmark MS510 | Quick Reference - Page 13
] feeder, and then remove the jammed paper. 6 Front door [x]‑page jam, open front door. [20y.xx] Open the front door, then remove the toner cartridge, imaging unit, and jammed paper. [x]‑page jam, open front door. [20y.xx] CAUTION-HOT SURFACE: The inside of the printer might be hot. To reduce - Lexmark MS510 | Quick Reference - Page 14
touch the shiny blue photoconductor drum under the imaging unit. Doing so may affect the quality of future print jobs. 6 Firmly grasp the jammed paper on each side, and then gently pull it out. Note: Make sure all paper fragments are removed. 8 Insert the toner cartridge by aligning the side rails - Lexmark MS510 | Quick Reference - Page 15
open rear door. [20y.xx] 1 Open the front door. 1 Note: Make sure all paper fragments are removed. [x]‑page jam, remove tray 1 to clear duplex. [23y.xx] CAUTION-HOT SURFACE: The inside of the printer might be hot. To reduce the risk of injury from a hot component, allow the surface to cool before - Lexmark MS510 | Quick Reference - Page 16
‑touch‑screen printer models, select Next > > Clear the jam, press OK > . [x]‑page jam, open tray [x]. [24y.xx] 1 Pull the tray completely out of the printer. Note: The message on the printer display indicates the tray where the jammed paper is located. 2 Firmly grasp the jammed paper on each - Lexmark MS510 | Quick Reference - Page 17
‑screen printer models, select Next > > Clear the jam, press OK > . 2 Flex the sheets of paper back and forth to loosen them, and then fan them. Do not fold or crease the paper. Straighten the edges on a level surface. 3 Reload paper into the multipurpose feeder. Note: Make sure the paper guide
-
 1
1 -
 2
2 -
 3
3 -
 4
4 -
 5
5 -
 6
6 -
 7
7 -
8
-
9
-
10
-
11
-
12
-
13
-
14
-
15
-
16
-
17
 |
 |

Quick Reference
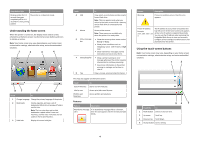
Using the 2.4-inch display printer
model
Learning about the printer
Using the printer control panel
1
2
3
4
5
6
7
8
9
10
11
12
13
Use the
To
1
Display
View the printer status and messages.
Set up and operate the printer.
2
Left arrow
button
Scroll to the left.
3
Select button
Select menu options.
Save settings.
4
Up arrow
button
Scroll up.
5
Right arrow
button
Scroll to the right.
6
Keypad
Enter numbers, letters, or symbols.
Use the
To
7
Sleep button
Enable Sleep mode or Hibernate mode.
The following actions wake the printer from
Sleep mode:
•
Pressing any hard button
•
Opening a tray or the front door
•
Sending a print job from the computer
•
Performing a power
‑
on reset using the
main power switch
•
Attaching a device in the USB port
8
USB port
Connect a flash drive to the printer.
Notes:
•
Only the front USB port supports flash
drives.
•
This feature is available only in select
printer models.
9
Stop or cancel
button
Stop all printer activities.
10
Back button
Return to the previous screen.
11
Down arrow
button
Scroll down.
12
Home button
Go to the home screen.
13
Indicator light
Check the status of the printer.
Understanding the colors of the Sleep button
and indicator lights
The colors of the Sleep button and indicator lights on the printer control
panel signify a certain printer status or condition.
Indicator light color and its corresponding printer status
Indicator light
Printer status
Off
The printer is off or in Hibernate mode.
Blinking green
The printer is warming up, processing data,
or printing.
Solid green
The printer is on, but idle.
Blinking red
The printer requires user intervention.
Sleep button light color and its corresponding printer status
Sleep button light
Printer status
Off
The printer is off, idle or in Ready state.
Solid amber
The printer is in Sleep mode.
Blinking amber
The printer is entering or waking from
Hibernate mode.
Blinking amber for 0.1
second, then goes
completely off for 1.9
seconds in a slow, pulsing
pattern
The printer is in Hibernate mode.
Setting the paper size and type
1
From the printer control panel, navigate to:
>
Settings
>
>
Paper Menu
>
>
Paper
Size/Type
>
2
Press the up or down arrow button to select the tray or feeder, and
then press
.
3
Press the up or down arrow button to select the paper size, and
then press
.
4
Press the up or down arrow button to select the paper type, and
then press
to change the settings.
Configuring Universal paper settings
The Universal paper size is a user
‑
defined setting that lets you print on
paper sizes that are not preset in the printer menus.
Notes:
•
The smallest Universal paper size is 6 x 127 mm (3 x 5 inches),
and is supported only from the multipurpose feeder.
•
The largest Universal paper size is 216 x 355.6 mm (8.5
x 14 inches), and is supported from all paper sources.
1
From the printer control panel, navigate to:
1