Lexmark MX6500e 6500e Scan to Network Administrator's Guide
Lexmark MX6500e 6500e Manual
 |
View all Lexmark MX6500e 6500e manuals
Add to My Manuals
Save this manual to your list of manuals |
Lexmark MX6500e 6500e manual content summary:
- Lexmark MX6500e 6500e | Scan to Network Administrator's Guide - Page 1
Scan to Network and Scan to Network Premium Administrator's Guide Important: This guide is intended for MX6500e. March 2013 www.lexmark.com - Lexmark MX6500e 6500e | Scan to Network Administrator's Guide - Page 2
4 Configuring a destination...4 Configuring destination settings...4 Configuring LDAP...11 Using Scan to Network 13 Scanning documents...13 Troubleshooting 14 Scan to Network troubleshooting...14 The application icon is missing from the home screen 14 An application error has occurred ...14 - Lexmark MX6500e 6500e | Scan to Network Administrator's Guide - Page 3
all pages. When Advanced Scan Preview is enabled, the user has additional options available from the preview screen, such as automatic and manual crop, page rotation, contrast, darkness, and page addition or removal. • Custom prompting-Administrators can enter custom prompts that will appear on the - Lexmark MX6500e 6500e | Scan to Network Administrator's Guide - Page 4
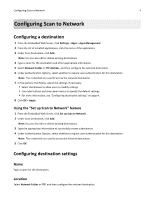
Configuring Scan to Network 4 Configuring Scan to Network Configuring a destination 1 From the Embedded Web Server, click Settings > Apps > Apps Management. 2 From the list of installed applications, click the name of the application. 3 Under Scan Destination, click Add. Note: You can also edit - Lexmark MX6500e 6500e | Scan to Network Administrator's Guide - Page 5
to use access controls and a security template has been assigned to the "Device Apps" access control. For more information, see the Embedded Web Server Administrator's Guide at www.lexmark.com. - Lexmark MX6500e 6500e | Scan to Network Administrator's Guide - Page 6
Configuring Scan to Network 6 Use Prompt for username and password Use static username and password To Prompt the user to enter authentication credentials. Note: Do not select this option if your scanner has been configured to use access controls. Use the authentication credentials for the - Lexmark MX6500e 6500e | Scan to Network Administrator's Guide - Page 7
Configuring Scan to Network Select Format Resolution Color Custom Job Edge to Edge Contrast Darkness Shadow Detail Background Removal 7 To Specify the output for the scanned image. Note: The Secure PDF file format is not available on devices running the Embedded Solutions Framework (eSF) version - Lexmark MX6500e 6500e | Scan to Network Administrator's Guide - Page 8
page or not (Off). If Advanced Scan Preview is enabled, then the user has additional options available from the preview screen, such as automatic and manual crop, rotate pages, contrast, and darkness. Custom Prompts With custom prompts, you can require input from users, or deliver messages to them - Lexmark MX6500e 6500e | Scan to Network Administrator's Guide - Page 9
Configuring Scan to Network 9 Select Multiple Select Single Select Boolean To Allow users to make multiple selections from a list of options. • Name-This is the name of the prompt. This will not appear on the scanner display. • Prompt Text-This is the text that will appear on the scanner display. - Lexmark MX6500e 6500e | Scan to Network Administrator's Guide - Page 10
a default base name for the scan file. The file extension is generated automatically according to the value of the Format field in the Scan want them to appear. Other Options Select To Enable basic XML index file Generate a basic XML index file in the destination folder. The index lists - Lexmark MX6500e 6500e | Scan to Network Administrator's Guide - Page 11
Configuring Scan to Network 11 Select To Allow user to create folder Let users create a subfolder within the destination folder and save their scan job. Start in username folder Save each user's scanned documents in a subfolder named for their user name within the (create if it doesn't exist) - Lexmark MX6500e 6500e | Scan to Network Administrator's Guide - Page 12
Configuring Scan to Network 12 • Search Timeout-This can be from 5 to 300 seconds. • Use user credentials-Make sure the check box is cleared. 4 Click Submit to save changes or Reset Form to clear all fields. Device Credentials 1 From the Embedded Web Server, click Settings > Security > Security - Lexmark MX6500e 6500e | Scan to Network Administrator's Guide - Page 13
information on the different methods of loading documents, see the User's Guide that came with the scanner. 2 From the scanner home screen, application has been configured. Follow the instructions on the screen to update the options. Contact your system support person for more information on each - Lexmark MX6500e 6500e | Scan to Network Administrator's Guide - Page 14
Troubleshooting 14 Troubleshooting Scan to Network troubleshooting The application icon is missing from the home screen For the application to the Scan Color menu. CONTACT YOUR SOLUTIONS PROVIDER If you still cannot isolate the problem, then contact your solutions provider for additional help. - Lexmark MX6500e 6500e | Scan to Network Administrator's Guide - Page 15
Troubleshooting . For information on networking the scanner, see the Networking Guide on the Software and Documentation CD that came with the scanner of the computer where your source file resides, then consult your system support person. You can also add the domain name to the Domain Search - Lexmark MX6500e 6500e | Scan to Network Administrator's Guide - Page 16
Troubleshooting on the same subnet as the scanner. For more information, contact your system support person. MAKE SURE A FILE WITH THE DEFAULT FILE NAME DOES NOT ALREADY EXIST For information on networking the scanner, see the Networking Guide on the Software and Documentation CD that came with the - Lexmark MX6500e 6500e | Scan to Network Administrator's Guide - Page 17
Troubleshooting 17 An error occurs when opening a secure PDF file MAKE SURE THE PDF VERSION FOR THE DEVICE IS NOT SET TO A‑1A 1 From the Embedded Web Server, click Settings > E‑mail/FTP Settings > E‑mail Settings. 2 Under E‑mail Settings, select a PDF version other than A‑1a. - Lexmark MX6500e 6500e | Scan to Network Administrator's Guide - Page 18
Appendix 18 Appendix Configuring applications using the Embedded Web Server The application can be manually configured using the Embedded Web Server of a device. However, the setup procedure has to be completed for each device running the application. Setting up the - Lexmark MX6500e 6500e | Scan to Network Administrator's Guide - Page 19
want to configure. 3 Click Configure, and then do one of the following: • To export a configuration to a file, click Export, and then follow the instructions on the computer screen to save the configuration file. Notes: - If a JVM Out of Memory error occurs, then repeat the export process until the - Lexmark MX6500e 6500e | Scan to Network Administrator's Guide - Page 20
1 From the Embedded Web Server, click Settings or Configuration. 2 Click E‑mail/FTP Settings > E‑mail Settings. 3 Under E‑mail Settings, select the PDF version. Supported bar codes • Code 11 • Code 128 • Code 32 • Code 39 • Code 93 • Data Matrix • EAN-13 • EAN-8 • Interleaved 2 of 5 • ITF-14 • Patch - Lexmark MX6500e 6500e | Scan to Network Administrator's Guide - Page 21
and verification of operation in conjunction with other products, programs, or services, except those expressly designated by the manufacturer, are the user's responsibility. For Lexmark technical support, visit http://support.lexmark.com. For information on supplies and downloads, visit www - Lexmark MX6500e 6500e | Scan to Network Administrator's Guide - Page 22
accessing 18 application error 14 B bar codes configuring 9 supported 20 C configuring custom prompts 8 FTP destination 4 network 3 scanner cannot scan to selected destination 16 scanning documents 13 T troubleshooting a network destination stopped working or is invalid 15 an application error
-
 1
1 -
 2
2 -
 3
3 -
 4
4 -
 5
5 -
 6
6 -
 7
7 -
8
-
9
-
10
-
11
-
12
-
13
-
14
-
15
-
16
-
17
-
18
-
19
-
20
-
21
-
22
 |
 |

Scan to Network and Scan to Network
Premium
Administrator's Guide
Important:
This guide is intended for MX6500e.
March 2013
www.lexmark.com