Lexmark MX6500e 6500e Scan to Network Administrator's Guide - Page 10
Other Options
 |
View all Lexmark MX6500e 6500e manuals
Add to My Manuals
Save this manual to your list of manuals |
Page 10 highlights
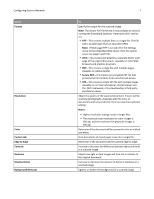
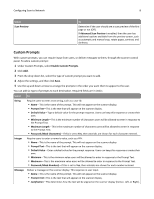
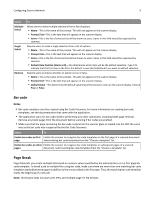
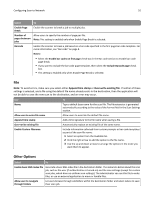
Configuring Scan to Network 10 Select To Enable Page Break Enable the scanner to break a job to multiple jobs. Number of Allow users to specify the number of page per file. pages between Note: This setting is enabled only when Enable Page Break is selected. jobs Barcode Enable the scanner to break a job based on a bar code specified in the first page bar code template. For more information, see "Bar code" on page 9. Notes: • Select the Enable bar codes on first page check box in the Bar code section to enable bar code page break. • If you want to include the bar code page template, then select the Include Barcode page check box. • This setting is enabled only when Enable Page Break is selected. File Note: To avoid errors, make sure you select either Append time stamp or Over‑write existing file. If neither of these settings is selected, and a file using the default file name already exists in the destination, then the application will not be able to save the new scan to the destination, and an error may occur. Use Name Allow user to enter file name Append time stamp Over‑write existing file Enable Custom Filename To Type a default base name for the scan file. The file extension is generated automatically according to the value of the Format field in the Scan Settings section. Allow users to override the default file name. Add a time signature to the file name when saving a file. Automatically replace an existing file of the same name. Include information collected from custom prompts or bar code templates as part of the scan file name. 1 Select an option from the Available list. 2 Click the right arrow to add the option to the file name. 3 Use the up and down arrows to arrange the options in the order you want them to appear. Other Options Select To Enable basic XML index file Generate a basic XML index file in the destination folder. The index lists details about the scan job, such as the user (if authentication is turned on) and the scan settings (except for custom scan jobs, which have no uniform scan settings). The administrator can use this file to write files, or use an external application to move or handle files. Allow user to navigate through folders Let users browse through subfolders within the destination folder and select where to save their scan job.
-
 1
1 -
2
-
3
-
4
-
 5
5 -
 6
6 -
 7
7 -
 8
8 -
 9
9 -
 10
10 -
 11
11 -
 12
12 -
 13
13 -
 14
14 -
 15
15 -
16
-
17
-
18
-
19
-
20
-
21
-
22
 |
 |
