Lexmark Monochrome Laser Clearing Jams Guide - Page 1
Lexmark Monochrome Laser Manual
 |
View all Lexmark Monochrome Laser manuals
Add to My Manuals
Save this manual to your list of manuals |
Page 1 highlights
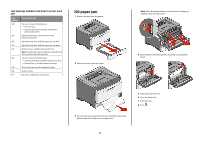
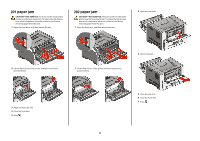
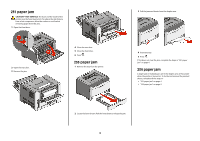
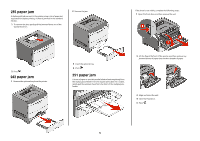
Lexmark™ E360 Clearing Jams Guide Clearing jams Avoiding jams The following hints can help you avoid jams: • Use only recommended paper or specialty media. For more information, see the User's Guide. • Do not load too much paper. Make sure the stack height does not exceed the indicated maximum heig's ht. • Do not load wrinkled, creased, damp, bent, or curled paper. • Flex, fan, and straighten paper before loading it. • Do not use paper that has been cut or trimmed by hand. • Do not mix paper sizes, weights, or types in the same stack. • Do not feed envelopes that: - Have excessive curl or twist - Have windows, holes, perforations, cutouts, or embossing - Have metal clasps, string ties, or folding bars - Have an interlocking design - Have postage stamps attached - Have any exposed adhesive when the flap is in the sealed or closed position - Have bent corners - Have rough, cockle, or laid finishes - Are stuck together or damaged in any way • Store the paper in an appropriate environment. • Do not remove trays while the printer is printing. • Do not load the multipurpose feeder while the printer is printing. Load the multipurpose feeder prior to printing, or wait for a prompt to load it. • Push all trays in firmly after loading paper. • Make sure the guides in the trays are properly positioned and are not pressing too tightly against the paper. • Make sure all sizes and types are set correctly in the printer control panel menu. • Make sure all printer cables are attached correctly. For more information, see the setup documentation. Identifying jams in the paper path The following illustration shows the path that paper travels through the printer. The path varies depending on the input source (tray or feeder) and depending on whether a duplex (two-sided) print job is being sent. When a jam occurs, a jam message appears, indicating the region of the jam or the number of jammed sheets. The three-digit jam prefix numbers are given in the following illustration to show where each jam occurs. Understanding jam messages and locations Note: To resolve any message, all paper or specialty media must be cleared from the entire paper path. 1 Open doors and covers, and remove trays to access jam locations. The following illustration and table indicate these locations. See "Jam message numbers and how to access each jam" on page 2 for a list of jam numbers and instructions for how to access each jam. 1 Standard exit bin 2 Front door 3 Multipurpose feeder door 4 Tray 1 5 Optional 250- or 550-sheet tray (Tray 2) 6 Rear door
-
 1
1 -
 2
2 -
 3
3 -
 4
4 -
 5
5
 |
 |