Lexmark Multifunction Laser Clearing Jams Guide - Page 2
/292 Scanner Jam
 |
View all Lexmark Multifunction Laser manuals
Add to My Manuals
Save this manual to your list of manuals |
Page 2 highlights
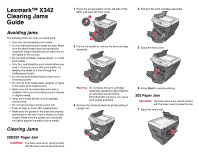
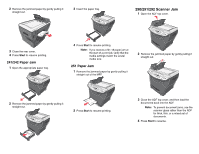
2 Remove the jammed paper by gently pulling it straight out. 3 Insert the paper tray. 290/291/292 Scanner Jam 1 Open the ADF top cover. 3 Close the rear cover. 4 Press Start to resume printing. 241/242 Paper Jam 1 Open the appropriate paper tray. 4 Press Start to resume printing. Note: If you receive a 241.18 paper jam at the start of a print job, verify that the media settings match the acutal media size. 251 Paper Jam 1 Remove the jammed paper by gently pulling it straight out of the MFP. 2 Remove the jammed paper by gently pulling it straight out. 2 Remove the jammed paper by gently pulling it straight out. 2 Press Start to resume printing. 3 Close the ADF top cover, and then load the documents back into the ADF. Note: To prevent document jams, use the scanner glass rather than the ADF for thick, thin, or a mixed set of documents. 4 Press Start to resume.
-
 1
1 -
 2
2
 |
 |
