Lexmark Optra T610 User's Guide (2 MB)
Lexmark Optra T610 Manual
 |
View all Lexmark Optra T610 manuals
Add to My Manuals
Save this manual to your list of manuals |
Lexmark Optra T610 manual content summary:
- Lexmark Optra T610 | User's Guide (2 MB) - Page 1
Output Stacker Installation Instructions Use this document when you have questions about the Lexmark Optra™ T printer or encounter a problem when using it. This document contains information on loading print material, clearing jams, and using your printer. The online Administrator's Guide on this - Lexmark Optra T610 | User's Guide (2 MB) - Page 2
details about the MarkVision printer management software. • MarkNet™ Print Servers to open documents containing information about configuring MarkNet print servers. Access our site on the World Wide Web for updated printer drivers, utilities, and documentation: www.lexmark.com User's Guide 2 - Lexmark Optra T610 | User's Guide (2 MB) - Page 3
. Operation ReSource is a service mark of Lexmark International, Inc. PCL® is a registered trademark of the Hewlett-Packard Company. PCL 6 is Hewlett-Packard Company's designation of a set of printer commands (language) and functions included in its printer products. This printer is intended to be - Lexmark Optra T610 | User's Guide (2 MB) - Page 4
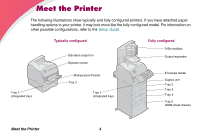
and fully configured printers. If you have attached paper handling options to your printer, it may look more like the fully configured model. For information on other possible configurations, refer to the Setup Guide. Tray 1 (integrated tray) Typically configured Standard output bin Operator - Lexmark Optra T610 | User's Guide (2 MB) - Page 5
control include: • Choosing paper sources • Changing page orientation • Choosing different sizes and types of media • Adjusting the quality of print jobs • Resetting printer defaults • Multipage printing • Changing duplex settings • Print and Hold functions You can open the printer driver from most - Lexmark Optra T610 | User's Guide (2 MB) - Page 6
. You can change most printer settings from your software application or printer driver. Settings you change from the application or printer driver apply only to the job you are preparing to send to the printer. NOTE: Changes made to printer settings from a software application override changes made - Lexmark Optra T610 | User's Guide (2 MB) - Page 7
. LCD 1 Menu 2 Select 3 Return 4 Light Go 5 Stop 6 Printer indicator light The printer indicator light gives information about the status of your printer. If the light is: • Off - the printer is off • On - the printer is on, but idle • Blinking - the printer is on and is busy Using the - Lexmark Optra T610 | User's Guide (2 MB) - Page 8
on the operator panel). • Exit printer menus and return to the Ready state. • Clear operator panel error messages. If you've changed printer settings from the operator panel menus, press Go before sending a job to print. The printer must display Ready for jobs to print. Using the Operator Panel and - Lexmark Optra T610 | User's Guide (2 MB) - Page 9
menu in the menus. • When Busy displays, to take the printer to the JOB MENU. • When the printer is offline: - Press Menu> to go to the next item setting. • Save the displayed menu item as the default setting. The printer displays the Saved message and returns to the menu item. • Clear certain - Lexmark Optra T610 | User's Guide (2 MB) - Page 10
menu item. Press the Stop button at the Ready, Busy, or Waiting message to temporarily stop all activity and take the printer offline. The operator panel status message changes to Not Ready. Press Go to return the printer to the Ready, Busy, or Waiting state. Using the Operator Panel and Menus 10 - Lexmark Optra T610 | User's Guide (2 MB) - Page 11
messages that give more information about printer status and possible intervention conditions. The Busy message identifies the printer language (PCL emulation) used for the print job. The Toner Low message warns you that the print cartridge is low on toner. Using the Operator Panel and Menus - Lexmark Optra T610 | User's Guide (2 MB) - Page 12
Attendance messages 201 Paper Jam Remove Cartridge Attendance messages help you solve printer problems. For example, if print material is jammed in the printer, the message 201 Paper Jam displays. Service messages 917 Service Transfer Roll A service message indicates a printer failure that may - Lexmark Optra T610 | User's Guide (2 MB) - Page 13
to run your print jobs successfully. You can also use the panel to alter the setup and operating environment of the printer. See "Operator until you reach the menu you need. Refer to the Administrator's Guide for more information on specific menu items and values. 3 Press Select to select the menu - Lexmark Optra T610 | User's Guide (2 MB) - Page 14
to set new default settings. Press Go if this is the last printer setting to change. User default settings remain in effect until you save new settings or restore the factory defaults. Settings you choose from your software application can also change or override the user default settings you - Lexmark Optra T610 | User's Guide (2 MB) - Page 15
Press Select to select Print Menus. The message, Printing Menu Settings, displays and remains until the page prints the current settings for the menus and a list of installed options. If an error message displays, refer to the Administrator's Guide for more information. The printer returns to Ready - Lexmark Optra T610 | User's Guide (2 MB) - Page 16
The printer has standard menus that let you configure the printer: • Paper • Finishing • Utilities • Job • Quality • Setup • PCL Emul • PostScript Additional menus display if: a language is available for the model or is activated; options, network adapters, and attachments are installed; or a Print - Lexmark Optra T610 | User's Guide (2 MB) - Page 17
item in the UTILITIES MENU. Refer to the Administrator's Guide for more information. When you select a new setting from printer memory. Once stored, these settings remain active until new ones are stored or the factory defaults are restored. NOTE: Be aware that settings you choose from your software - Lexmark Optra T610 | User's Guide (2 MB) - Page 18
default that has been set by the person managing the printer. You can still clear messages and select items from the Job Menu when printing a job, but you cannot change other printer settings. You can, however, use your printer driver to override printer defaults and select settings for individual - Lexmark Optra T610 | User's Guide (2 MB) - Page 19
CONFIDENTIAL JOB HELD JOBS Reset Printer Print Buffer Reset Active Bin QUALITY MENU Print Resolution Toner Darkness PQET PictureGrade SETUP MENU Printer Language Power Saver Resource Save Download Target Print Timeout Wait Timeout Auto Continue Jam Recovery Page Protect Print Area Display Language - Lexmark Optra T610 | User's Guide (2 MB) - Page 20
Guide, located on the Drivers, MarkVision and Utilities CD. Always print samples on the print material you are considering before buying large quantities. Paper specifications The following tables give information on standard and optional paper sources, as well as output options, for your printer - Lexmark Optra T610 | User's Guide (2 MB) - Page 21
T616(n) standard tray T614(n) standard tray T612(n) standard tray T610(n) standard tray 250-sheet drawer 500-sheet drawer Multipurpose tray 2000-sheet drawer Envelope feeder Duplex unit Standard output Output expander 5-bin mailbox High-capacity output stacker Paper Sizes and Types Paper Sizes A4 - Lexmark Optra T610 | User's Guide (2 MB) - Page 22
size is specified by the software application. 2 Label applications require a special label fuser cleaner which precludes duplexing; the label fuser cleaner is included with a special label cartridge for label applications. Refer to the Administrator's Guide for information on obtaining a label - Lexmark Optra T610 | User's Guide (2 MB) - Page 23
(37 to 39 lb bond) Labels-upper limit6 Laser printer transparencies Paper Dual-web paper Polyester Vinyl 7, 8 Media Weight for Paper Sources - Integrated tray5 - Multipurpose feeder Envelope - bond) N/A 220 g/m2 (69 lb bond) N/A 260 g/m2 (78 lb liner) N/A Choosing Print Materials 23 - Lexmark Optra T610 | User's Guide (2 MB) - Page 24
types as the printer, except for transparencies and envelopes. 6 Dedicated label printing requires a special label fuser cleaner which precludes duplex printing. 7 Vinyl labels are not supported by Optra T616(n). 8 Information on whether your vinyl label converter has passed Lexmark's criteria is - Lexmark Optra T610 | User's Guide (2 MB) - Page 25
or business paper Output expander supported by Optra T616(n). 3 Information on whether your vinyl label converter has passed Lexmark's criteria is available at Lexmark's web site (www.Lexmark.com); search for "converter listing'. Or use Lexmark's Automated FAX system (LEXFAX). Choosing Print - Lexmark Optra T610 | User's Guide (2 MB) - Page 26
the Card Stock & Label Guide located on the Drivers, MarkVision and Utilities CD. The following paper characteristics affect print quality and reliability. We recommend that you keep these guidelines in mind when evaluating new paper stock. The printer can automatically feed paper weights from 60 to - Lexmark Optra T610 | User's Guide (2 MB) - Page 27
Fiber content The amount of moisture in the paper affects both print quality and the ability of the printer to feed the paper properly. Leave the paper in its original wrapper until you are ready to use it. This limits the exposure of the paper to moisture changes that can degrade its performance - Lexmark Optra T610 | User's Guide (2 MB) - Page 28
mixing results in paper jams. • Do not use coated papers. • Do not forget to change the Paper Size setting when you use a source that does not support auto size sensing. • Make sure the Paper Type, Paper Texture, and Paper Weight settings are correct (refer to the Administrator's Guide for detailed - Lexmark Optra T610 | User's Guide (2 MB) - Page 29
of 212oC (414oF). Use only papers that are able to withstand these temperatures without discoloring, bleeding, or releasing hazardous emissions. Check with the manufacturer or vendor to determine whether the paper you've chosen is acceptable for laser printers. Choosing Print Materials 29 - Lexmark Optra T610 | User's Guide (2 MB) - Page 30
surfaces. • Use papers printed with heat-resistant inks designed for use in xerographic copiers. The ink must withstand temperatures of 212oC (414oF) without melting or releasing hazardous emissions. Use inks that are not affected by the resin in the toner or the silicone in the fuser. Inks that are - Lexmark Optra T610 | User's Guide (2 MB) - Page 31
with your software application to successfully print on these forms. • Preprinted papers with chemicals that may contaminate the printer • Preprinted papers that can be affected by the temperature in the printer fuser • Rough-edged or curled papers • Synthetic papers • Thermal papers • Less than - Lexmark Optra T610 | User's Guide (2 MB) - Page 32
Properly storing the paper you buy helps ensure trouble-free printing. Use the following guidelines: • For best results, store paper in an environment where the temperature is approximately 21oC (70oF) and the relative humidity is 40%. • Store cartons of paper on a pallet or shelf, rather than - Lexmark Optra T610 | User's Guide (2 MB) - Page 33
Env Feeder or MP Feeder as the paper source and set the correct envelope size. The laser printing process heats envelopes to a temperature of 200oC supplier. For best performance, use envelopes made from 75 g/m2 (20 lb bond) paper. You can use up to 105 g/m2 (28 lb bond) weight for the multipurpose - Lexmark Optra T610 | User's Guide (2 MB) - Page 34
To minimize jams, do not use envelopes that: • Have excessive curl or twist • Are stuck together • Are damaged in any way • Contain windows, holes, perforations is in the sealed or closed position • Have nicked edges or bent corners • Have rough, cockle, or laid finishes Choosing Print Materials 34 - Lexmark Optra T610 | User's Guide (2 MB) - Page 35
jam and contamination of your printer and your cartridge with adhesive, and could void your printer and cartridge warranties. • Avoid using labels that may release hazardous emissions when heated. NOTE: Labels are one of the most difficult print materials for laser printers. A special fuser cleaner - Lexmark Optra T610 | User's Guide (2 MB) - Page 36
printer feeding reliability: 1 Print 5 sheets of paper. 2 Wait approximately 5 seconds. 3 Print 5 more sheets of paper. For detailed information on label printing, characteristics, and design, refer to the Card Stock & Label Guide, available on the Drivers, MarkVision and Utilities CD or the Lexmark - Lexmark Optra T610 | User's Guide (2 MB) - Page 37
Card Stock in the PAPER TYPE menu in the PAPER MENU (refer to the Administrator's Guide for detailed information about these settings). • Be aware that preprinting, perforation, and creasing can significantly affect the print quality and cause paper handling or jamming problems. • Avoid using card - Lexmark Optra T610 | User's Guide (2 MB) - Page 38
you replace the print cartridge), complete the following steps to maintain printer feeding reliability: 1 Print 5 sheets of paper. 2 Wait approximately 5 seconds. 3 Print 5 more sheets of paper. For more information, refer to the Card Stock & Label Guide, available on the Drivers, MarkVision and - Lexmark Optra T610 | User's Guide (2 MB) - Page 39
in laser printers. Print quality and durability depend on the transparency used. Always print samples on the transparencies you are considering before buying large quantities. The Paper Type setting should be set to Transparency to help prevent jams (refer to the Administrator's Guide for detailed - Lexmark Optra T610 | User's Guide (2 MB) - Page 40
other tray since the printer sees the trays as linked. If you use different print material in the trays, each source with a different print material must have the PAPER TYPE set to a unique value to disable the automatic linking feature (refer to the Administrator's Guide for detailed information - Lexmark Optra T610 | User's Guide (2 MB) - Page 41
loading Proper paper loading helps prevent paper jams and ensure troublefree printing. Do not remove paper trays while a job is printing or Busy is displayed on the operator panel. Doing so may cause a paper jam. Before loading paper, you need to know the recommended print side of the paper you're - Lexmark Optra T610 | User's Guide (2 MB) - Page 42
avoid most paper jams. If jams do occur, follow the steps outlined in "Clearing Jams" starting on page 69. If jams occur frequently, make sure you are following these tips to avoid jams. • See "Loading Print Materials" on page 43 to load paper properly. Make sure the adjustable guides are positioned - Lexmark Optra T610 | User's Guide (2 MB) - Page 43
Print Materials This section provides information about loading the various input options. For information on a particular option, click the option name: • "Paper tray" on page 44 • "Multipurpose feeder" on page 47 • "Envelope feeder" on page 61 • "2000-sheet drawer" on page 68 Loading Print - Lexmark Optra T610 | User's Guide (2 MB) - Page 44
Length guide lever Paper tray Squeeze here Length guide Complete these instructions to load print materials into any of the standard or optional trays. All paper trays are loaded the same way. 1 Remove the paper tray. 2 Squeeze the width guide lever and slide the width guide to the far right side - Lexmark Optra T610 | User's Guide (2 MB) - Page 45
guide to the left until it lightly rests against the edge of the paper stack. 6 Adjust the knob to show the size of the paper currently loaded. NOTE: This setting serves as a visual reminder only; it has no effect on the operation of the printer. 7 Reinstall the tray. Knob Loading Print Materials - Lexmark Optra T610 | User's Guide (2 MB) - Page 46
face up with the top of the page nearest the length guide. NOTE: The printer has a Paper Loading menu setting that allows simplex (single-sided) printing on letterhead (or other preprinted media) that has been loaded specifically for duplex printing. For more information, refer to the Administrator - Lexmark Optra T610 | User's Guide (2 MB) - Page 47
, such as transparencies, post cards, note cards, and envelopes. It is useful for single page printing on letterhead, colored paper, or other special paper. Capacity The maximum stack height for any print material is 10 mm (0.4 in.). The multipurpose feeder can hold about: • 100 sheets of 75 g/m2 - Lexmark Optra T610 | User's Guide (2 MB) - Page 48
that is designed for use in laser printers. For more guidelines on paper, see "Print materials" on page 20. • To prevent paper jams, do not add paper when there is still paper in the multipurpose feeder. This applies to other types of print materials, too. • Print material should be loaded face up - Lexmark Optra T610 | User's Guide (2 MB) - Page 49
and stops in place. 2 Locate the metal bar in the recessed area on the multipurpose feeder and pull it out far enough to accomodate the paper you will be using. Loading Print Materials 49 - Lexmark Optra T610 | User's Guide (2 MB) - Page 50
prevent paper jams and ensure trouble-free printing. Do not remove any paper tray while a job is printing from the multipurpose feeder or Busy is displayed on the operator panel. Doing so may cause a paper jam. Never add print materials to the multipurpose feeder while the printer is printing from - Lexmark Optra T610 | User's Guide (2 MB) - Page 51
simplex and duplex printing. NOTE: The printer has a Paper Loading menu setting that allows simplex (single-sided) printing on letterhead (or other preprinted media) that has been loaded specifically for duplex printing. For more information, refer to the Administrator's Guide. 2 Slide the colored - Lexmark Optra T610 | User's Guide (2 MB) - Page 52
material for loading. . - For paper and envelopes: Flex paper or fan envelopes back and forth. Do not fold or crease the paper. Straighten the edges on a level surface. NOTE: If envelopes jam while printing, try reducing the number of envelopes in the multipurpose feeder. - For transparencies - Lexmark Optra T610 | User's Guide (2 MB) - Page 53
material in the multipurpose feeder. Do not mix types. See the following directions to load each type of print material. - "Paper" on page 54 - "Envelopes" on page 55 - "Transparencies" on page 56 - "Letterhead (Single-sided printing)" on page 57 - "Letterhead (Duplex printing)" on page 57 Loading - Lexmark Optra T610 | User's Guide (2 MB) - Page 54
Paper Load paper with the left edge of the stack against the stack height limiter and with the recommended print side face up. For information on selecting paper, see "Paper guidelines" on page 28. Loading Print Materials 54 - Lexmark Optra T610 | User's Guide (2 MB) - Page 55
is shown for placement only. WARNING: Never use envelopes with clasps, snaps, windows, coated linings, or self-stick adhesives. These envelopes may severely damage the printer. For information on printing on envelopes, see "Envelope guidelines" on page 33. Loading - Lexmark Optra T610 | User's Guide (2 MB) - Page 56
Transparencies Load transparencies with the left edge of the stack against the stack height limiter. For information on printing on transparencies, see "Transparency guidelines" on page 39. Loading Print Materials 56 - Lexmark Optra T610 | User's Guide (2 MB) - Page 57
on selecting types of print materials. NOTE: The printer has a Paper Loading menu setting that allows simplex (single-sided) printing on letterhead (or other preprinted media) that has been loaded specifically for duplex printing. For more information, refer to the Administrator's Guide. 57 - Lexmark Optra T610 | User's Guide (2 MB) - Page 58
material. 7 Make sure you have not loaded too much print material. The stack should fit loosely under the stack height limiter. The print material buckles if you load a stack that is too deep or push the stack in too far. 8 Slide the paper width guide to the left until it lightly touches the stack - Lexmark Optra T610 | User's Guide (2 MB) - Page 59
both your software application and from the printer operator panel. To set the printer operator panel: 1 Make sure the PAPER SIZE for the multipurpose feeder (MP Feeder Size) is set to the correct size paper, envelope, or other print material you are loading (refer to the Administrator's Guide for - Lexmark Optra T610 | User's Guide (2 MB) - Page 60
Closing the multipurpose feeder 1 Remove print material from the multipurpose feeder. 2 Push the metal bar straight back to collapse the multipurpose feeder to its short-length position. 3 Close the multipurpose feeder door. Loading Print Materials 60 - Lexmark Optra T610 | User's Guide (2 MB) - Page 61
• Load only one size of envelopes at a time in the envelope feeder. • To achieve the best possible print quality, use only high-quality print material that is designed for use in laser printers. For more information, see "Envelope guidelines" on page 33. • Do not place objects on the envelope feeder - Lexmark Optra T610 | User's Guide (2 MB) - Page 62
support has three positions: • Fully closed (pushed in toward printer) for short envelopes • Extended to the middle position for medium-length envelopes • Fully open (extended to its full length) for long envelopes 1 Gently adjust the envelope support for the size you are loading. Loading Print - Lexmark Optra T610 | User's Guide (2 MB) - Page 63
2 Slide the attached envelope weight up. 3 Flip the envelope weight over and back toward the printer. It stays in place. 4 Slide the envelope edge guide to the far right. Loading Print Materials 63 - Lexmark Optra T610 | User's Guide (2 MB) - Page 64
not exceed the maximum stack height of 64.7 mm (2.55 in.). The envelope feeder holds a maximum of 85 envelopes (75 g/m2, 20 lb bond). Loading Print Materials 64 - Lexmark Optra T610 | User's Guide (2 MB) - Page 65
the top of the stack. NOTE: Do not try to load more envelopes by forcing them under the envelope feeder weight. This results in jams. NOTE: Do not feed stamped envelopes. WARNING: Never use envelopes with clasps, snaps, windows, coated linings, or self-stick adhesives. These envelopes may severely - Lexmark Optra T610 | User's Guide (2 MB) - Page 66
8 Slide the envelope edge guide to the left until it lightly touches the side of the stack. Make sure the envelopes do not buckle. 9 Rotate the envelope weight back toward you and lower it to the stack. Loading Print Materials 66 - Lexmark Optra T610 | User's Guide (2 MB) - Page 67
are loading (refer to the Administrator's Guide for detailed information about this setting). 2 Press Go to return to Ready. NOTE: Software settings may override operator panel settings. If the printer experiences an envelope jam while printing, see "260 Paper Jam Check Env Feeder" on page 96 for - Lexmark Optra T610 | User's Guide (2 MB) - Page 68
2000-sheet drawer For information on loading the 2000-sheet drawer, refer to the 2000-Sheet Drawer User's Guide. Loading Print Materials 68 - Lexmark Optra T610 | User's Guide (2 MB) - Page 69
frequently, make sure you see "Tips for avoiding paper jams" on page 42. To resolve the paper jam attendance messages, you must clear all paper from the paper path. Press Go to resume printing. The printer prints a new copy of the page that jammed if Jam Recovery is set to On or Auto; however, the - Lexmark Optra T610 | User's Guide (2 MB) - Page 70
2 or 3 trays, on the incline surface of a tray, or between a tray, the duplex unit, and the printers integrated tray. 260 Paper Jam 250 Paper Jam 230 Paper Jam 24x Paper Jam Clearing Jams 70 Note: 27x Paper Jam may occur in any output option: output expanders (shown in illustration), 5-bin - Lexmark Optra T610 | User's Guide (2 MB) - Page 71
front door is opened. See the following illustration for the location of paper sources and possible paper jam areas. Rear door of: 5-bin mailbox, output expander, high-capacity output stacker (not shown) Printer rear door Duplex rear door Lower front door (down when envelope feeder is installed - Lexmark Optra T610 | User's Guide (2 MB) - Page 72
200 and 201 Paper Jam Remove Cartridge A 200 attendance message indicates the paper is jammed in the area under the print cartridge. This requires removing the print cartridge from the printer. With a 201 attendance message, the jam is farther back in the printer, so you need to reach in farther to - Lexmark Optra T610 | User's Guide (2 MB) - Page 73
up and toward you. Reinstall the print cartridge. 5 Close the upper and lower front doors. NOTE: If there is resistance to the paper, and it does not move immediately when you pull, stop pulling. You need to access the paper from the rear door. See "202 Paper Jam Open Rear Door" on page 74 for more - Lexmark Optra T610 | User's Guide (2 MB) - Page 74
the printer rear door. See the appropriate area for the paper jam: • "Before reaching the standard output bin" on page 75 • "While exiting to the standard output bin" on page 77 NOTE: To resolve the paper jam attendance messages, you must clear all paper from the paper path. Clearing Jams 74 - Lexmark Optra T610 | User's Guide (2 MB) - Page 75
bin The paper jammed before it exited into the standard output bin or when it entered the duplex unit to print on the second side of a page. 1 Locate the rear door handle and pull it toward you. The rear door opens and drops back toward you. 2 Determine how to remove the paper based on what part of - Lexmark Optra T610 | User's Guide (2 MB) - Page 76
fuser rollers and free the paper for removal. If the end of the paper is visible - Pull the paper straight out toward you. If there is resistance to the paper - If the paper does not move immediately when you pull, stop pulling. Remove the print cartridge, and then return to the back of the printer - Lexmark Optra T610 | User's Guide (2 MB) - Page 77
upper front door to release the fuser rollers. Clearing Jams 3 Pull the paper straight out. NOTE: Usually with a jam located in this area, there is another jam behind the rear door of the printer. See "Before reaching the standard output bin" on page 75 for instructions on how to remove this type - Lexmark Optra T610 | User's Guide (2 MB) - Page 78
for the paper jam: • "Paper path area in front of duplex unit" on page 79 • "Inside the duplex unit" on page 81 • "Back of the duplex unit" on page 82 (The page may be entering the duplex unit, inside the duplex unit, or exiting the duplex unit to go back to the printer to exit after printing.) NOTE - Lexmark Optra T610 | User's Guide (2 MB) - Page 79
area in front of duplex unit This type of jam can occur under an error number different from 230 Paper Jam, but you must open the duplex front access cover. The leading edge of the paper is jammed in the pass-through area where paper crosses in the front of the duplex unit. 1 Locate the recessed - Lexmark Optra T610 | User's Guide (2 MB) - Page 80
3 Pull the paper straight up and out. Since you already have the duplex front access cover pulled out, continue with the following section. Clearing Jams 80 - Lexmark Optra T610 | User's Guide (2 MB) - Page 81
the printer to give you more clearance. 2 Locate sheets of paper lying in the duplex front access cover and pull the paper out toward you. 3 Slide the duplex front access cover back into the duplex unit. Make sure it snaps into place. 4 Slide the integrated tray back into the printer. Clearing Jams - Lexmark Optra T610 | User's Guide (2 MB) - Page 82
the duplex unit" on page 81 for instructions. - If only a short piece of paper is visible toward the rear of the printer, do not pull it out; it may be easier to access from inside the printer. See "200 and 201 Paper Jam Remove Cartridge" on page 72 for instructions to remove the paper. However - Lexmark Optra T610 | User's Guide (2 MB) - Page 83
- Pull the paper up and out toward you if the paper is in this position. - Pull down and out if the paper is in this position. Clearing Jams 83 - Lexmark Optra T610 | User's Guide (2 MB) - Page 84
4 Close the duplex rear door by pressing the center of the door. Make sure it snaps into place. Clearing Jams 84 - Lexmark Optra T610 | User's Guide (2 MB) - Page 85
"Between tray, duplex unit, and integrated tray" on page 90 • "2000-sheet drawer" on page 94 To avoid tearing print materials when opening trays, pull the trays out gently and slowly. NOTE: To resolve the paper jam attendance messages, you must clear all paper from the paper path. Clearing Jams 85 - Lexmark Optra T610 | User's Guide (2 MB) - Page 86
. You see the difference as soon as you pull the tray out. 1 Pull the paper tray half way out of the support unit. 2 Look for paper in the paper tray and remove it based on how it is jammed: - If the paper is lying on the incline or wall surface at the front of the tray - Lexmark Optra T610 | User's Guide (2 MB) - Page 87
you pull the tray out of the support unit, the top edge of the paper springs out toward you. Pull the paper straight up, and then out. 3 Slide the paper tray back into the support unit. NOTE: If you do not see one end of the print material, the jam has occurred between three trays. See "Between - Lexmark Optra T610 | User's Guide (2 MB) - Page 88
Between three trays This type of jam may occur if you are using legal-size paper in the trays or if you have a 250-sheet drawer installed with other optional drawers. 1 Pull the paper tray out of the support unit. If only a short piece of the paper is visible, do not pull down to remove the - Lexmark Optra T610 | User's Guide (2 MB) - Page 89
easily one way, try the other way. 6 Slide the paper tray back into the support unit. NOTE: With this type of jam, there may be another jam under the print cartridge. Remove the print cartridge and look for a paper jam. Remove any jammed paper and reinstall the print cartridge. Clearing Jams 89 - Lexmark Optra T610 | User's Guide (2 MB) - Page 90
integrated tray NOTE: To avoid tearing paper when opening the duplex front access cover, pull the duplex front access cover out gently and slowly. 1 Pull the paper tray out of the support unit. If only a short piece of the paper is visible, do not pull down to remove the paper. Clearing Jams 90 - Lexmark Optra T610 | User's Guide (2 MB) - Page 91
the paper in the integrated tray: a Pull the paper down and out. b Slide the paper tray all the way into the printer. In this case the paper is not trapped in the printer feed rollers. c Slide the duplex front access cover back into the duplex unit. Make sure it snaps into place. Clearing Jams 91 - Lexmark Optra T610 | User's Guide (2 MB) - Page 92
the printer. b Open the upper and lower front doors of the printer. c Remove the print cartridge. You should see the leading edge of the paper now. d Locate and gently push the feed roller release lever back to release the pressure on the paper. . e Pull the paper up and toward you. Clearing Jams - Lexmark Optra T610 | User's Guide (2 MB) - Page 93
the slots on the print cartridge cradle and use the colored arrows inside the printer for placement. Guide the print car- tridge down as it drops and snaps into place. g Close the upper and lower front doors of the printer. h Slide the paper tray all the way into the printer. Clearing Jams 93 - Lexmark Optra T610 | User's Guide (2 MB) - Page 94
down button. 3 Remove the paper jam and clear all paper from the paper path of the drawer and printer. 4 Check to see if the stack of paper is neat and aligned. 5 Close the door. 6 Allow a few seconds for the elevator to reach the top. 7 Select Go to resume printing. Elevator down button Clearing - Lexmark Optra T610 | User's Guide (2 MB) - Page 95
250 Paper Jam Check MP Feeder To avoid tearing print materials, pull the jammed print material out gently and slowly. NOTE: To resolve the paper jam attendance messages, you must clear all paper from the paper path. Pull the jammed print material straight out of the multipurpose feeder toward you. - Lexmark Optra T610 | User's Guide (2 MB) - Page 96
may occur in two ways to result in a 260 attendance message. See the appropriate area for the paper jam: • "At entry into the envelope feeder" on page 97 • "Between the envelope feeder and the printer" on page 98 To avoid tearing envelopes, pull envelopes out gently and slowly. NOTE: To resolve the - Lexmark Optra T610 | User's Guide (2 MB) - Page 97
over and back toward the printer. 3 Remove the stack of envelopes from the envelope feeder. 4 Pull the jammed envelope straight out toward you. envelope edge guide if needed. 7 Rotate the envelope weight and lower it to the stack. NOTE: If you perform the above steps and envelope jams continue to - Lexmark Optra T610 | User's Guide (2 MB) - Page 98
Between the envelope feeder and the printer 1 Slide the attached envelope weight up. 2 Flip the envelope weight over and back toward the printer. 3 Remove the stack of envelopes from the envelope feeder. 4 Push the envelope support to the closed position. Clearing Jams 98 - Lexmark Optra T610 | User's Guide (2 MB) - Page 99
Clearing Jams 5 Open the upper front door of the printer. 6 Pull the envelope feeder up slightly and straight out of the printer. Set it aside. 7 Pull the envelope straight out toward you. NOTE: You may have to remove the print cartridge to get the envelope out. See page page 93 for instructions on - Lexmark Optra T610 | User's Guide (2 MB) - Page 100
, but there is resistance (page 104) To avoid tearing print materials, pull the jammed print material out gently and slowly. NOTE: To resolve the paper jam attendance messages, you must clear all paper from the paper path. If more than one paper jam occurs and you have more than one output option - Lexmark Optra T610 | User's Guide (2 MB) - Page 101
In an output option tray Paper jams as it exits to an output option tray and a long portion of the paper is visible. 1 Pull the paper straight out. If there is more than minimal resistance to the paper, and it does not give immediately when you pull, stop pulling. Continue with the next step. - Lexmark Optra T610 | User's Guide (2 MB) - Page 102
rear door latches in toward the center. The rear door(s) opens and drops down. NOTE: Open both rear doors if the jam occurs in a high- capacity output stacker. 3 Loosen the paper if it is caught in the feeder rollers. Pull the paper straight out. 4 Close the output option rear door(s). Clearing - Lexmark Optra T610 | User's Guide (2 MB) - Page 103
Between output options You should be able to remove the paper jam from the output option indicated by the message; however, in this case you may need to open the rear door of another output option to remove the jam. 1 Open the output option rear door for the output option installed above it. Locate - Lexmark Optra T610 | User's Guide (2 MB) - Page 104
, but if you are not successful, complete the following steps. 1 Locate the paper jam that is visible from an output option tray. 2 Open the output option rear The rear doors open and drop down. NOTE: If the jam occurs in a high-capacity output stacker, it may be necessary to open both of its rear - Lexmark Optra T610 | User's Guide (2 MB) - Page 105
3 Pull the paper from the back area of the output option straight out toward you. Pull the paper from the output option with more clearance space. 4 Close all output option rear doors. Make sure all rear door latches are closed. Clearing Jams 105 - Lexmark Optra T610 | User's Guide (2 MB) - Page 106
and a hard disk. When sending a job to the printer, you can specify in the driver that you want the printer to hold the job in memory and not print it immediately. When you are ready to print the job, you must go to the printer and use the operator panel menus to identify which held job - Lexmark Optra T610 | User's Guide (2 MB) - Page 107
Delete All Jobs from the Held Jobs menu item, you will delete all Repeat Print, Reserve Print, and Verify Print jobs stored in printer memory, whether they are jobs you sent to the printer or jobs others in your network group sent to the printer. Use caution when selecting this option. Using the - Lexmark Optra T610 | User's Guide (2 MB) - Page 108
panel 1 To access held jobs from the operator panel: - If the printer is Busy, press Menu> to display the JOB MENU. - If the printer is Ready, continue to step 2. 2 Press Menu> or - Lexmark Optra T610 | User's Guide (2 MB) - Page 109
and - Lexmark Optra T610 | User's Guide (2 MB) - Page 110
job. Be aware, however, that only part of the job may print. • Delete the job. You may want to free up additional printer memory by scrolling through the list of held jobs and deleting others you have sent to the printer. If formatting errors are a recurring problem with held jobs, it may indicate - Lexmark Optra T610 | User's Guide (2 MB) - Page 111
job remains stored in memory. NOTE: Repeat Print jobs are automatically deleted from printer memory when the printer requires extra memory to process additional held jobs. Reserve print If you send a Reserve Print job, the printer stores the job in memory so you can print the job later. The job is - Lexmark Optra T610 | User's Guide (2 MB) - Page 112
If you send a Verify Print job, the printer prints one copy and holds the remaining copies you requested from the driver in printer memory. Use Verify Print to examine the first copy to see if it is satisfactory before printing the remaining copies. See "Printing and deleting held jobs" on page - Lexmark Optra T610 | User's Guide (2 MB) - Page 113
each digit (1-6). As you enter the PIN, asterisks display on the operator panel to ensure confidentiality. Enter PIN =**** 1 Menu 2 Select 3 Return 4 Go 5 Stop 6 Using the Print and Hold Function 113 - Lexmark Optra T610 | User's Guide (2 MB) - Page 114
A JOB, Delete All Jobs, DELETE A JOB, and PRINT COPIES menu items. You can then choose to print or delete jobs matching the PIN you entered. (See "Printing and deleting held jobs" on page 107 for more information.) After printing the job, the printer deletes the confidential job from memory. Using - Lexmark Optra T610 | User's Guide (2 MB) - Page 115
into the outlet is working. • You try turning the printer off, then wait for about 10 seconds, and turn the printer on. This often fixes the problem. • Your printer driver settings are correct. For all other printer problems, refer to the Administrator's Guide or contact your administrator. Solving - Lexmark Optra T610 | User's Guide (2 MB) - Page 116
Guide that came with your printer. Electronic Emission Notices With a Network Cable Installed Federal Communications Commission (FCC) Compliance Information Statement The Lexmark Optra T laser printer and used in accordance with the instruction manual, may cause harmful interference to radio - Lexmark Optra T610 | User's Guide (2 MB) - Page 117
Printer Notices The manufacturer is not responsible for any radio or television interference interference for a Class A computing device, use a properly shielded and grounded cable such as Lexmark part number 1329605. Use of a substitute cable not properly shielded and grounded may result in a - Lexmark Optra T610 | User's Guide (2 MB) - Page 118
to take adequate measures. Without a Network Cable Installed Federal Communications Commission (FCC) Compliance Information Statement The Lexmark Optra T laser printer, Type 4069, has been tested and found to comply with the limits for a Class B digital device, pursuant to Part 15 of the FCC Rules - Lexmark Optra T610 | User's Guide (2 MB) - Page 119
Printer Notices • Reorient or relocate the receiving antenna. • Increase the separation between the equipment and receiver. • Connect the equipment into an outlet on a circuit different from that to which the receiver is connected. • Consult your point of purchase or service as Lexmark part number - Lexmark Optra T610 | User's Guide (2 MB) - Page 120
the requirements of the Directive has been signed by the Director of Manufacturing and Technical Support, Lexmark International, S.A., Boigny, France. This product satisfies the Class B limits of EN connections to the public telecommunications systems in the United Kingdom. Printer Notices 120 - Lexmark Optra T610 | User's Guide (2 MB) - Page 121
Optra T616(n) 53 30 6.8 4.5 Optra T614(n) 51 30 6.5 4.5 Optra T612(n) 48 29 6.3 4.4 Optra in this program introduce personal computers, printers, monitors, or fax machines that power . Lexmark is proud to be a participant in this program. As an Energy Star Partner, Lexmark International - Lexmark Optra T610 | User's Guide (2 MB) - Page 122
gallium arsenide laser operating in the wavelength region of 770-795 nanometers. The laser system and printer are designed so there is never any human access to laser radiation above a Class I level during normal operation, user maintenance, or prescribed service condition. Printer Notices 122 - Lexmark Optra T610 | User's Guide (2 MB) - Page 123
technical inaccuracies or typographical errors. Changes are periodically made services, except those expressly designated by the manufacturer, are the user's responsibility. © Copyright 1999 Lexmark International, Inc. All rights reserved. UNITED STATES GOVERNMENT RESTRICTED RIGHTS This software
-
 1
1 -
 2
2 -
 3
3 -
 4
4 -
 5
5 -
 6
6 -
 7
7 -
8
-
9
-
10
-
11
-
12
-
13
-
14
-
15
-
16
-
17
-
18
-
19
-
20
-
21
-
22
-
23
-
24
-
25
-
26
-
27
-
28
-
29
-
30
-
31
-
32
-
33
-
34
-
35
-
36
-
37
-
38
-
39
-
40
-
41
-
42
-
43
-
44
-
45
-
46
-
47
-
48
-
49
-
50
-
51
-
52
-
53
-
54
-
55
-
56
-
57
-
58
-
59
-
60
-
61
-
62
-
63
-
64
-
65
-
66
-
67
-
68
-
69
-
70
-
71
-
72
-
73
-
74
-
75
-
76
-
77
-
78
-
79
-
80
-
81
-
82
-
83
-
84
-
85
-
86
-
87
-
88
-
89
-
90
-
91
-
92
-
93
-
94
-
95
-
96
-
97
-
98
-
99
-
100
-
101
-
102
-
103
-
104
-
105
-
106
-
107
-
108
-
109
-
110
-
111
-
112
-
113
-
114
-
115
-
116
-
117
-
118
-
119
-
120
-
121
-
122
-
123
 |
 |

1
User’s Guide
User’s Guide
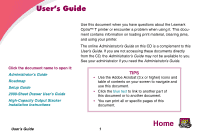
Use this document when you have questions about the Lexmark
Optra™ T printer or encounter a problem when using it. This docu-
ment contains information on loading print material, clearing jams,
and using your printer.
The online
Administrator’s Guide
on this CD is a complement to this
User’s Guide
. If you are not accessing these documents directly
from the CD, the
Administrator’s Guide
may not be available to you.
See your administrator if you need the
Administrator’s Guide
.
Click the document name to open it:
Administrator’s Guide
Roadmap
Setup Guide
2000-Sheet Drawer User’s Guide
High-Capacity Output Stacker
Installation Instructions
Home
TIPS
•
Use the Adobe Acrobat (3.x or higher) icons and
table of contents on your screen to navigate and
use this document.
•
Click the
blue text
to link to another part of
this document or to another document.
•
You can print all or specific pages of this
document.