Lexmark T632dtn Setup Guide - Page 31
Rotate the tray up until the upper, the lower slots on the output
 |
UPC - 734646538404
View all Lexmark T632dtn manuals
Add to My Manuals
Save this manual to your list of manuals |
Page 31 highlights
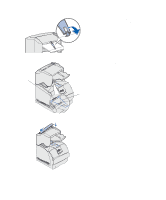
Slots Tabs 4 If you are mounting the output expander on the printer or another output expander, attach the wire bail. Place the tips of the wire bail into the ends of the plastic bracket so that the bail curves downward. The wire bail rests in the output bin of the output expander below it, or in the standard output bin. 5 Slide the lower tabs on the tray into the lower slots on the output expander. 6 Rotate the tray up until the upper tabs snap into the upper slots. 7 If you are not attaching any more print media handling options, attach the top cover to the output expander. Set up the printer and print media handling options 26
-
 1
1 -
2
-
3
-
4
-
5
-
6
-
7
-
8
-
9
-
10
-
11
-
12
-
13
-
14
-
15
-
16
-
17
-
18
-
19
-
20
-
21
-
22
-
23
-
24
-
25
-
 26
26 -
 27
27 -
 28
28 -
 29
29 -
 30
30 -
 31
31 -
 32
32 -
 33
33 -
 34
34 -
 35
35 -
 36
36 -
37
-
38
-
39
-
40
-
41
-
42
-
43
-
44
-
45
-
46
-
47
-
48
-
49
-
50
-
51
-
52
-
53
-
54
-
55
-
56
-
57
-
58
-
59
-
60
-
61
-
62
-
63
-
64
-
65
-
66
-
67
 |
 |

26
Set up the printer and print media handling options
4
If you are mounting the output
expander on the printer or another
output expander, attach the wire
bail. Place the tips of the wire bail
into the ends of the plastic bracket
so that the bail curves downward.
The wire bail rests in the output bin
of the output expander below it, or
in the standard output bin.
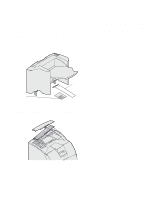
5
Slide the lower tabs on the tray into
the lower slots on the output
expander.
6
Rotate the tray up until the upper
tabs
snap
into the upper slots.
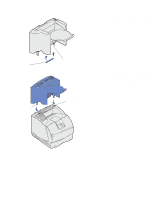
7
If you are not attaching any more
print media handling options,
attach the top cover to the output
expander.
Slots
Tabs