Lexmark X264dn User's Guide - Page 27
Setting up wireless printing, Information you will need to set up the printer on a wireless network - driver
 |
UPC - 734646140584
View all Lexmark X264dn manuals
Add to My Manuals
Save this manual to your list of manuals |
Page 27 highlights
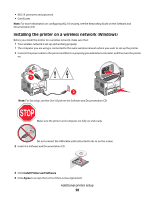
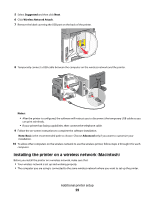
4 Click Driver, and then add any installed hardware options. 5 Click OK. In Mac OS X version 10.4 and earlier 1 From the Finder desktop, choose Go > Applications. 2 Double-click Utilities, and then double-click Print Center or Printer Setup Utility. 3 Select the printer, and then from the Printers menu, choose Show Info. 4 From the pop-up menu, choose Installable Options. 5 Add any installed hardware options, and then click Apply Changes. Setting up wireless printing Note: Wireless printing is available on select printer models only. Information you will need to set up the printer on a wireless network Note: Do not connect the installation or network cables until prompted to do so by the setup software. • SSID-The SSID is also referred to as the network name. • Wireless Mode (or Network Mode)-The mode will be either infrastructure or ad hoc. • Channel (for ad hoc networks)-The channel defaults to auto for infrastructure networks. Some ad hoc networks will also require the auto setting. Check with your system support person if you are not sure which channel to select. • Security Method-There are three basic options for Security Method: - WEP key If your network uses more than one WEP key, enter up to four in the provided spaces. Select the key currently in use on the network by selecting the Default WEP Transmit Key. or - WPA or WPA2 passphrase WPA includes encryption as an additional layer of security. The choices are AES or TKIP. Encryption must be set for the same type on the router and on the printer, or the printer will not be able to communicate on the network. - No security If your wireless network does not use any type of security, then you will not have any security information. Note: Using an unsecured wireless network is not recommended. If you are installing the printer on an 802.1X network using the Advanced method, then you may need the following: • Authentication type • Inner authentication type Additional printer setup 27
-
 1
1 -
2
-
3
-
4
-
5
-
6
-
7
-
8
-
9
-
10
-
11
-
12
-
13
-
14
-
15
-
16
-
17
-
18
-
19
-
20
-
21
-
 22
22 -
 23
23 -
 24
24 -
 25
25 -
 26
26 -
 27
27 -
 28
28 -
 29
29 -
 30
30 -
 31
31 -
 32
32 -
33
-
34
-
35
-
36
-
37
-
38
-
39
-
40
-
41
-
42
-
43
-
44
-
45
-
46
-
47
-
48
-
49
-
50
-
51
-
52
-
53
-
54
-
55
-
56
-
57
-
58
-
59
-
60
-
61
-
62
-
63
-
64
-
65
-
66
-
67
-
68
-
69
-
70
-
71
-
72
-
73
-
74
-
75
-
76
-
77
-
78
-
79
-
80
-
81
-
82
-
83
-
84
-
85
-
86
-
87
-
88
-
89
-
90
-
91
-
92
-
93
-
94
-
95
-
96
-
97
-
98
-
99
-
100
-
101
-
102
-
103
-
104
-
105
-
106
-
107
-
108
-
109
-
110
-
111
-
112
-
113
-
114
-
115
-
116
-
117
-
118
-
119
-
120
-
121
-
122
-
123
-
124
-
125
-
126
-
127
-
128
-
129
-
130
-
131
-
132
-
133
-
134
-
135
-
136
-
137
-
138
-
139
-
140
-
141
-
142
-
143
-
144
-
145
-
146
-
147
-
148
-
149
-
150
-
151
-
152
-
153
-
154
-
155
-
156
-
157
-
158
-
159
-
160
-
161
-
162
-
163
-
164
-
165
-
166
-
167
-
168
-
169
-
170
-
171
-
172
-
173
-
174
-
175
-
176
-
177
-
178
-
179
-
180
-
181
-
182
-
183
-
184
-
185
-
186
-
187
-
188
-
189
-
190
-
191
-
192
-
193
-
194
-
195
-
196
-
197
-
198
-
199
-
200
-
201
-
202
-
203
-
204
-
205
-
206
-
207
-
208
-
209
-
210
-
211
-
212
-
213
-
214
-
215
-
216
-
217
-
218
-
219
-
220
-
221
-
222
-
223
-
224
-
225
-
226
-
227
-
228
-
229
-
230
-
231
-
232
-
233
-
234
 |
 |