Lexmark X466 Common Criteria Installation Supplement and Administrator Guide - Page 28
Creating user accounts through the EWS
 |
View all Lexmark X466 manuals
Add to My Manuals
Save this manual to your list of manuals |
Page 28 highlights
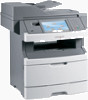
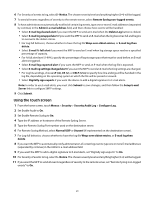
Creating user accounts through the EWS Creating internal (device) accounts for use with the evaluated configuration involves not only assigning a user ID and password to each user, but also segmenting users into groups. You will select one or more of these groups when configuring security templates, and then apply a security template to each device function, to control access to that function. The MFP supports a maximum of 250 user accounts and 32 user groups. Example: Employees in the warehouse will be given access to black and white printing only; administrative office staff will be able to print in black and white, and send faxes; and employees in the marketing department will have access to black and white printing, color printing, and faxing. Scenario 1: Creating groups based on department Security template basic_user Groups included in template • Warehouse • Office • Marketing Template will be applied to Copy Function color_user Marketing Copy Color Printing fax_user • Office • Marketing Fax Function When creating internal accounts in Scenario 1, you would select the group that corresponds to the user's department. Scenario 2: Creating groups based on device function Security template Groups included in template Template will be applied to basic_user black_and_white Copy Function color_user color Copy Color Function fax_user fax Fax Function When creating internal accounts in Scenario 2, you would select the following groups for each type of user: • Warehouse employee-Black_and_white group only. • Office employee-Black_and_white group, fax group. • Marketing employee-Black_and_white group, color group, fax group. Step 1: Defining groups 1 From the EWS, click Settings > Security > Security Setup. Note: For information about accessing the EWS, see "Using the Embedded Web Server" on page 15. Be sure to disable HTTP and HTTPS access after you have finished using the EWS. 2 Under Advanced Security Setup, Step 1, select Internal Accounts. 3 Select Setup groups for use with internal accounts. 4 Type a Group Name. 5 Click Add. 6 Repeat steps as needed to add more groups. 28
-
 1
1 -
2
-
3
-
4
-
5
-
6
-
7
-
8
-
9
-
10
-
11
-
12
-
13
-
14
-
15
-
16
-
17
-
18
-
19
-
20
-
21
-
22
-
 23
23 -
 24
24 -
 25
25 -
 26
26 -
 27
27 -
 28
28 -
 29
29 -
 30
30 -
 31
31 -
 32
32 -
 33
33 -
34
-
35
-
36
-
37
-
38
-
39
-
40
-
41
-
42
-
43
-
44
-
45
-
46
-
47
-
48
-
49
-
50
-
51
-
52
-
53
-
54
-
55
-
56
-
57
-
58
 |
 |