Lexmark X500n User's Guide - Page 22
Connecting to an answering machine, An answering machine
 |
View all Lexmark X500n manuals
Add to My Manuals
Save this manual to your list of manuals |
Page 22 highlights
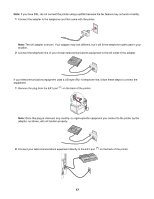
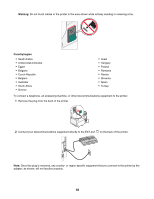
3 Remove the protective plug from the EXT port of the printer. 4 Connect the other telephone cord to a telephone, and then plug it into the EXT port of the printer. Connecting to an answering machine Connect an answering machine to the printer to receive both incoming voice messages and faxes. Note: Setup steps may vary depending on your country or region. 1 Make sure you have the following: • A telephone • An answering machine • Three telephone cords • A telephone wall jack 22
-
 1
1 -
2
-
3
-
4
-
5
-
6
-
7
-
8
-
9
-
10
-
11
-
12
-
13
-
14
-
15
-
16
-
 17
17 -
 18
18 -
 19
19 -
 20
20 -
 21
21 -
 22
22 -
 23
23 -
 24
24 -
 25
25 -
 26
26 -
 27
27 -
28
-
29
-
30
-
31
-
32
-
33
-
34
-
35
-
36
-
37
-
38
-
39
-
40
-
41
-
42
-
43
-
44
-
45
-
46
-
47
-
48
-
49
-
50
-
51
-
52
-
53
-
54
-
55
-
56
-
57
-
58
-
59
-
60
-
61
-
62
-
63
-
64
-
65
-
66
-
67
-
68
-
69
-
70
-
71
-
72
-
73
-
74
-
75
-
76
-
77
-
78
-
79
-
80
-
81
-
82
-
83
-
84
-
85
-
86
-
87
-
88
-
89
-
90
-
91
-
92
-
93
-
94
-
95
-
96
-
97
-
98
-
99
-
100
-
101
-
102
-
103
-
104
-
105
-
106
-
107
-
108
-
109
-
110
-
111
-
112
-
113
-
114
-
115
-
116
-
117
-
118
-
119
-
120
-
121
-
122
-
123
-
124
-
125
-
126
-
127
-
128
-
129
-
130
-
131
-
132
-
133
-
134
-
135
-
136
-
137
-
138
-
139
-
140
-
141
-
142
-
143
-
144
-
145
-
146
-
147
-
148
-
149
-
150
 |
 |

3
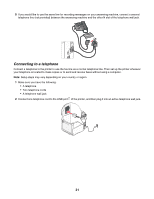
Remove the protective plug from the EXT port
of the printer.
4
Connect the other telephone cord to a telephone, and then plug it into the EXT port
of the printer.
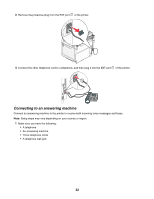
Connecting to an answering machine
Connect an answering machine to the printer to receive both incoming voice messages and faxes.
Note:
Setup steps may vary depending on your country or region.
1
Make sure you have the following:
•
A telephone
•
An answering machine
•
Three telephone cords
•
A telephone wall jack
22