Lexmark X5410 User's Guide - Page 62
Creating and viewing a slideshow, Print Now, E-mail your Photo Greeting Card, Create E-mail
 |
UPC - 734646093705
View all Lexmark X5410 manuals
Add to My Manuals
Save this manual to your list of manuals |
Page 62 highlights
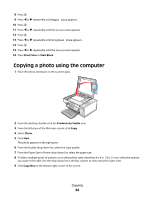
12 Click Print Now. 13 If you want to e-mail your photo greeting card, click E-mail your Photo Greeting Card from the Share tab. 14 From the Send Quality and Speed area of the screen, select the image size. 15 Click Create E-mail to create an e-mail message with your photo greeting card(s) attached. Creating and viewing a slideshow 1 From the Productivity Studio Welcome Screen, click Work with Documents and Photos. 2 Select the folder that contains the photos you want to include in the slideshow. Thumbnails of the photos in the folder will appear in a preview pane. 3 Click to select the photos you want to include in the slideshow, and then select Slideshow. If you want additional photos to appear in specific order, click the photos in the order you want them to appear, and then drag them into the "Photos in Your Slideshow" area. 4 Click the Slideshow Settings tab to adjust the amount of time between each photo in the slideshow. You can also modify the setting that lets the slideshow replay automatically (loop). 5 Click the Share tab to save or print your slideshow. 6 Click View Show in the lower-right corner of the window to start the slideshow. Note: You can exit the slideshow any time by moving your cursor to the bottom center of the screen and clicking Exit Slideshow. Working with photos 62
-
 1
1 -
2
-
3
-
4
-
5
-
6
-
7
-
8
-
9
-
10
-
11
-
12
-
13
-
14
-
15
-
16
-
17
-
18
-
19
-
20
-
21
-
22
-
23
-
24
-
25
-
26
-
27
-
28
-
29
-
30
-
31
-
32
-
33
-
34
-
35
-
36
-
37
-
38
-
39
-
40
-
41
-
42
-
43
-
44
-
45
-
46
-
47
-
48
-
49
-
50
-
51
-
52
-
53
-
54
-
55
-
56
-
 57
57 -
 58
58 -
 59
59 -
 60
60 -
 61
61 -
 62
62 -
 63
63 -
 64
64 -
 65
65 -
 66
66 -
 67
67 -
68
-
69
-
70
-
71
-
72
-
73
-
74
-
75
-
76
-
77
-
78
-
79
-
80
-
81
-
82
-
83
-
84
-
85
-
86
-
87
-
88
-
89
-
90
-
91
-
92
-
93
-
94
-
95
-
96
-
97
-
98
-
99
-
100
-
101
-
102
-
103
-
104
-
105
-
106
-
107
-
108
-
109
-
110
-
111
-
112
-
113
-
114
-
115
-
116
-
117
-
118
-
119
-
120
-
121
-
122
-
123
-
124
-
125
-
126
-
127
-
128
-
129
-
130
-
131
-
132
-
133
-
134
-
135
-
136
-
137
-
138
-
139
 |
 |