Lexmark X5450 User's Guide - Page 55
Working with photos, Retrieving and managing photos, Inserting a memory card
 |
View all Lexmark X5450 manuals
Add to My Manuals
Save this manual to your list of manuals |
Page 55 highlights
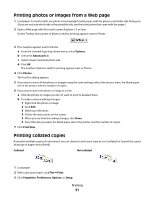
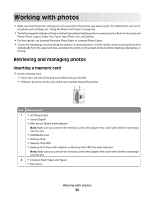
Working with photos • Make sure that the printer settings are set correctly for the photos you wish to print. For information on how to set photo print settings, see "Using the Photo Card menu" on page 28. • The following print settings will return to the factory default settings when a memory card or flash drive is removed: Photo Effects, Layout, Paper Size, Paper Type, Photo Size, and Quality. • For best results, use Lexmark Premium Photo Paper or Lexmark Photo Paper. • To prevent smudging, avoid touching the surface of a printed photo. For best results, remove each printed sheet individually from the paper exit tray, and allow the prints to dry at least 24 hours before stacking, displaying, or storing. Retrieving and managing photos Inserting a memory card 1 Insert a memory card. • Insert the card with the brand name label facing to the left. • If there is an arrow on the card, make sure it points toward the printer. 12 Slot Memory card 1 • xD Picture Card • Secure Digital • Mini Secure Digital (with adapter) Note: Make sure you connect the memory card to the adapter that came with it before inserting it into the slot. • MultiMedia Card • Memory Stick • Memory Stick PRO • Memory Stick Duo (with adapter) or Memory Stick PRO Duo (with adapter) Note: Make sure you connect the memory card to the adapter that came with it before inserting it into the slot. 2 • Compact Flash Type I and Type II • Microdrive Working with photos 55
-
 1
1 -
2
-
3
-
4
-
5
-
6
-
7
-
8
-
9
-
10
-
11
-
12
-
13
-
14
-
15
-
16
-
17
-
18
-
19
-
20
-
21
-
22
-
23
-
24
-
25
-
26
-
27
-
28
-
29
-
30
-
31
-
32
-
33
-
34
-
35
-
36
-
37
-
38
-
39
-
40
-
41
-
42
-
43
-
44
-
45
-
46
-
47
-
48
-
49
-
 50
50 -
 51
51 -
 52
52 -
 53
53 -
 54
54 -
 55
55 -
 56
56 -
 57
57 -
 58
58 -
 59
59 -
 60
60 -
61
-
62
-
63
-
64
-
65
-
66
-
67
-
68
-
69
-
70
-
71
-
72
-
73
-
74
-
75
-
76
-
77
-
78
-
79
-
80
-
81
-
82
-
83
-
84
-
85
-
86
-
87
-
88
-
89
-
90
-
91
-
92
-
93
-
94
-
95
-
96
-
97
-
98
-
99
-
100
-
101
-
102
-
103
-
104
-
105
-
106
-
107
-
108
-
109
-
110
-
111
-
112
-
113
-
114
-
115
-
116
-
117
-
118
-
119
-
120
-
121
-
122
-
123
-
124
-
125
-
126
-
127
-
128
-
129
-
130
-
131
-
132
-
133
-
134
-
135
-
136
-
137
 |
 |