Lexmark X7170 Setup Sheet - Page 2
Install the print cartridges., Install the software., Windows, Macintosh
 |
View all Lexmark X7170 manuals
Add to My Manuals
Save this manual to your list of manuals |
Page 2 highlights
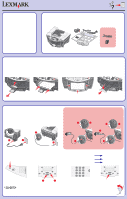
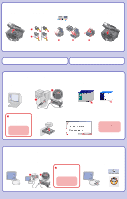
4 Install the print cartridges. 1 Open the scanner unit. 2 Remove the sticker and tape from the print cartridges. 3 Insert the print cartridges. Left Right 1 2 1 2 4 Close the scanner unit. 3 If you are using your All-In-One with a computer, continue with the following step. If you are using your All-In-One without a computer, you are finished. Windows 5 Install the software. 1 Make sure your computer is on. 2 Connect the USB cable. 2 3 Click Cancel on all New Hardware Screens. 1 ! To prevent errors during installation: 1 Close all open programs. 2 Temporarily disable any anti-virus software. For help, refer to your program documentation, or contact the software manufacturer for support. Important: After installation is complete, remember to enable your anti-virus software. 4 Insert CD1. 5 Click Install. If this install screen does not appear, click Start Æ Run and then type D:\setup, where D is the letter of your CD-ROM drive. Macintosh 5 Install the software. 1 Make sure your computer is on. 2 Connect the USB cable. 1 2 ! To prevent errors during installation: 1 Close all open programs. 2 Temporarily disable any anti-virus software. For help, refer to your program documentation, or contact the software manufacturer for support. Important: After installation is complete, remember to enable your anti-virus software. 3 Insert CD1. 4 Double-click: 1 2 www.lexmark.com
-
 1
1 -
 2
2
 |
 |
