Lexmark X782e Quick Reference - Page 3
Copying - printer scanner
 |
View all Lexmark X782e manuals
Add to My Manuals
Save this manual to your list of manuals |
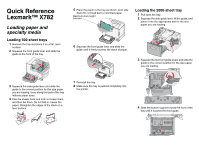
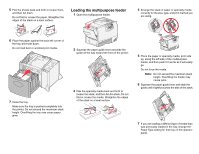
Page 3 highlights
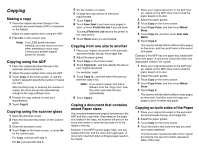
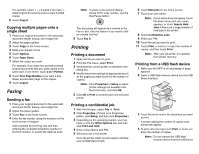
Copying Making a copy 1 Place the original document faceup in the automatic document feeder (ADF) or facedown on the flatbed. Adjust the paper guides when using the ADF. 2 Press Go on the numeric pad. Note: If an LDSS profile has been installed, you may receive an error when attempting a quick copy. Contact your system support person for access. Copying using the ADF 1 Place the original document faceup in the automatic document feeder. 2 Adjust the paper guides when using the ADF. 3 Touch Copy on the home screen, or use the numeric keypad to specify the number of copies you want. After touching Copy or entering the number of copies, the touch screen will automatically change to the copy settings menu. 4 Change the copy options to meet your requirements. 5 Touch Copy It. Copying using the scanner glass 1 Open the document cover. 2 Place the document facedown on the scanner glass. 3 Close the document cover. 4 Touch Copy on the home screen, or press Go on the numeric pad. For Copy, continue with step 5. For Go, proceed with step 8. 5 Set the number of copies. 6 Change the copy options to meet your requirements. 7 Touch Copy It. 8 Touch Scan Next if you have more pages to scan, or touch Finish the Job if you are done. Touching Finish the Job returns the printer to the copy screen. 9 Touch Home when you are finished. Copying from one size to another 1 Place your original document in the automatic document feeder faceup, short-edge first. 2 Adjust the paper guides. 3 Touch Copy on the home screen. 4 Touch Copy from:, and then identify the size of your original document. For example, Legal. 5 Touch Copy to:, and then select the size you want the copy to be. Note: If you select a paper size that is different from the "Copy from" size, the printer will scale the size automatically. 6 Touch Copy It. Coping a document that contains mixed Paper sizes You can place mixed-sized original documents in the ADF and then copy them. Depending on the paper size loaded in the trays, the scanner will print on the same size media or scale the document to fit the media in the tray. Example 1: the MFP has two paper trays, one tray loaded with letter and the other with legal paper. A document mixed with letter and legal pages needs to be copied. 1 Place your original document in the ADF face up. Labels on the ADF show how to load the paper based on its size. 2 Adjust the paper guides. 3 Touch Copy on the home screen. 4 Touch Copy From, and then touch Mixed Sizes. 5 Touch Copy To, and then touch Auto Size Match. 6 Touch Copy It. The scanner will identify the different size pages as they scan, and then print them on the correct size paper. Example 2: the MFP has one paper tray, loaded with letter-size paper. A document mixed with letter and legal pages needs to be copied. 1 Place your original document in the ADF face up. Labels on the ADF show how to load the paper based on its size. 2 Adjust the paper guides. 3 Touch Copy on the home screen. 4 Touch Copy From, and then touch Mixed Sizes. 5 Touch Copy It. The scanner will identify the different size pages as they scan, and then scale the legal size pages to print on letter size paper. Copying on both sides of the Paper 1 Place your original document in the automatic document feeder faceup, short-edge first. 2 Adjust the paper guides. 3 Touch Copy on the home screen. 4 Touch the button that looks the way you want your copies duplexed. The first number represents sides of the original documents; the second number represents sides of the copy.
-
 1
1 -
 2
2 -
 3
3 -
 4
4 -
 5
5
 |
 |
