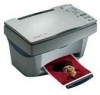
Lexmark X83 Getting Started
Lexmark X83 - X 83 Color Inkjet Manual
 |
UPC - 734646595384
View all Lexmark X83 manuals
Add to My Manuals
Save this manual to your list of manuals |
Lexmark X83 manual content summary:
- Lexmark X83 | Getting Started - Page 1
X83 Scan/Print/Copy Getting Started March 2001 www.lexmark.com - Lexmark X83 | Getting Started - Page 2
Lexmark International Ltd., Marketing and Services Department, Westhorpe House, Westhorpe, Marlow Bucks SL7 3RQ. Lexmark may use or distribute any of the information you supply 2001 Lexmark International, Inc. All rights reserved. UNITED STATES GOVERNMENT RESTRICTED RIGHTS This software and - Lexmark X83 | Getting Started - Page 3
Lexmark or a Lexmark authorized servicer • Operation of a product beyond the limit of its duty cycle • Failure to have installed a maintenance kit as specified (if applicable) • Use of printing media outside of Lexmark specifications • Use of other than Lexmark supplies (such as toner cartridges - Lexmark X83 | Getting Started - Page 4
-Use only the Lexmark power supply provided with this product or an authorized Lexmark replacement power supply. -Connect the power cord to an electrical outlet that is near the product and easily accessible. -Refer service or repairs, other than those described in this manual, to a professional - Lexmark X83 | Getting Started - Page 5
up your printer 2 Using the operator panel 9 Copying 13 Scanning 14 Printing 15 Creating projects 16 Troubleshooting 18 For more information This book provides basic information about copying, scanning, printing, troubleshooting, and creating fun projects. The online User's Guide provides - Lexmark X83 | Getting Started - Page 6
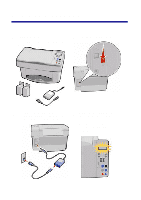
Setting up your printer 1 Unpack the printer. Your power supply may be different than the one shown. 2 Unlock the scanner bed. 3 Connect the power supply. You are prompted to connect a USB cable during software installation. 4 Wait for text to appear on the display indicating the printer is on. - Lexmark X83 | Getting Started - Page 7
5 Raise the paper support. 6 Load the paper. Do not push the paper down into the printer. 7 Squeeze and slide the paper guide to the left edge of the paper. 8 Extend the paper exit tray. 3 - Lexmark X83 | Getting Started - Page 8
9 Open the cartridge door. 10 Remove the sticker and The cartridge carrier moves to the transparent tape from the load position. cartridges. Warning: Do not touch the gold contacts. 11 Place the cartridges into the carrier. Push back on the cartridges until they snap into place. SNAP SNAP - Lexmark X83 | Getting Started - Page 9
12 Close the cartridge door. 13 Press the arrow buttons and the Select button to choose Standard or High Yield cartridges. Your printer shipped with Standard cartridges. 14 Wait for the alignment page to print. 15 Follow the instructions on the display to enter alignment values. 5 - Lexmark X83 | Getting Started - Page 10
CD-ROM drive. 2 Click Install Now for Windows installation. Click Install and Agree for Macintosh installation. 3 Follow the instructions on your computer screen to complete software installation. To install additional software, click the button on the Lexmark printer screen. Note: To copy - Lexmark X83 | Getting Started - Page 11
Using the operator panel Your printer has buttons that let you copy, scan, print, and customize your documents, a liquid crystal display (LCD) that displays messages and menus, and three Quality lights. 1 9 2 10 3 3 4 11 5 6 12 7 13 8 14 7 - Lexmark X83 | Getting Started - Page 12
/ Make the copy lighter or darker than the original. Darker 10 Paper Type Select a paper type. 11 Select Choose the displayed selection. 12 Black Copy Make a black and white copy. 13 Scan Initiate a scan to your currently selected scan destination. 14 Power Turn your printer on or off. 8 - Lexmark X83 | Getting Started - Page 13
Introducing the printer menus • Language • Color Intensity • Maintenance • Reduce/Enlarge Timeout • Copy Source Type • Set Defaults • Power Saver Timeout • Copy Source Size • Factory Defaults • Copy Count Timeout • Mono Collate • Poster • Ink Levels • Clone Selecting a language for the display 1 - Lexmark X83 | Getting Started - Page 14
. Original 4 images 9 images 16 images Use the Copy Source Size menu and select Autofit to enlarge a small image to cover an entire page. Original Autofit 10 - Lexmark X83 | Getting Started - Page 15
Copying Use these instructions to copy without using a computer. You can also copy with a computer. For help, see page 6. 1 Make sure your printer is turned on. 2 Open the top cover. 3 Place your document face down on the scanner bed in the bottom, right corner. 4 Close the top cover. 5 Press - Lexmark X83 | Getting Started - Page 16
Scanning 1 Make sure you have installed the printer software for Windows or Macintosh. For help, see page 6. 2 Make sure your computer and your printer are turned on. 3 Open the top cover. 4 Place your document face down on the scanner bed in the bottom, right corner. 5 Close the top cover. 6 Press - Lexmark X83 | Getting Started - Page 17
Windows 1 Make sure you have installed the printer software for Windows. For help, see page 6. 2 From your software application File menu, select Print. 3 To customize print settings, click Properties or Printer Preferences. 4 From the Print dialog box, click OK or Print (depending on the software - Lexmark X83 | Getting Started - Page 18
, print, and copy features of your printer. Use the instructions on this page to create a wedding program. See page 15 for more creative ideas. Create a wedding program 1 Place a fresh flower or another object on the scanner bed and cover it with a sheet of paper. 2 Scan the flower or object into - Lexmark X83 | Getting Started - Page 19
a photograph and e-mail it to a friend. • Create personalized recipe cards. • Enlarge or reduce needlepoint or woodworking patterns. • Print refrigerator magnets. Refer to the online User's Guide instructions to create these projects and much, much more. 15 - Lexmark X83 | Getting Started - Page 20
a problem, refer to the online User's Guide for detailed troubleshooting information. To access the online User's Guide, see page 1. If the printer has a paper jam: Remove the paper from the printer. If the paper is lodged too far into the printer and cannot be removed: 1 Press the Power button
-
 1
1 -
 2
2 -
 3
3 -
 4
4 -
 5
5 -
 6
6 -
 7
7 -
8
-
9
-
10
-
11
-
12
-
13
-
14
-
15
-
16
-
17
-
18
-
19
-
20
 |
 |

www.lexmark.com
Getting Started
March 2001
X83 Scan/Print/Copy