Lexmark Z738 User's Guide for Mac OS 9 - Page 25
Step 3: Print your cards, Printing envelopes
 |
View all Lexmark Z738 manuals
Add to My Manuals
Save this manual to your list of manuals |
Page 25 highlights
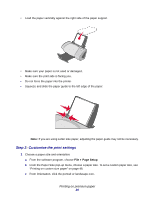
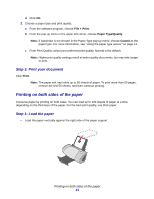
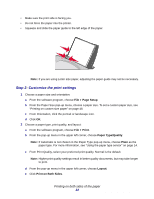
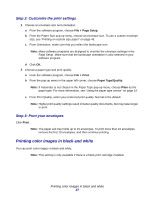
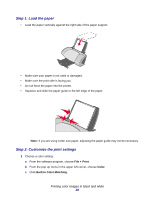
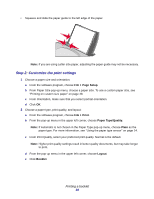
c From Orientation, click the portrait or landscape icon. d Click OK. 2 Choose a paper type and print quality: a From the software program, choose File Print. b From the pop-up menu in the upper left corner, choose Paper Type/Quality. Note: If Automatic is not chosen in the Paper Type pop-up menu, choose Glossy/Photo Paper for photo cards and Plain for other types of cards. For more information, see "Using the paper type sensor" on page 14. c From Print Quality, click Better or Best for photo and greeting cards and Normal for other types of cards. Note: Higher print quality settings result in better quality documents, but may take longer to print. 3 To print borderless photos on your cards: a Make sure you choose one of the supported card sizes for borderless printing from Paper Size in the Page Setup dialog box. b From the software program, set the margins to zero. Note: Disregard this step if your program does not support margin setting. c On the screen, make sure that the image covers the entire page. d Choose File Print. e From the pop-up menu in the upper left corner, choose Layout. f Click Borderless. Step 3: Print your cards Click Print. Note: To prevent smudging, remove each card as it exits the printer and let it dry before stacking, or you can set extra time between pages as they exit the printer. For help, see the entry on "Wait for pages to dry" on page 11. Printing envelopes You can load up to 10 envelopes, depending on the thickness of the envelopes. Printing envelopes 25
-
 1
1 -
2
-
3
-
4
-
5
-
6
-
7
-
8
-
9
-
10
-
11
-
12
-
13
-
14
-
15
-
16
-
17
-
18
-
19
-
 20
20 -
 21
21 -
 22
22 -
 23
23 -
 24
24 -
 25
25 -
 26
26 -
 27
27 -
 28
28 -
 29
29 -
 30
30 -
31
-
32
-
33
-
34
-
35
-
36
-
37
-
38
-
39
-
40
-
41
-
42
-
43
-
44
-
45
-
46
-
47
-
48
-
49
-
50
-
51
-
52
-
53
-
54
-
55
-
56
-
57
-
58
-
59
-
60
-
61
-
62
-
63
-
64
-
65
-
66
-
67
-
68
-
69
-
70
-
71
-
72
-
73
-
74
-
75
-
76
-
77
-
78
-
79
-
80
-
81
 |
 |
