LiftMaster 3265 3265M Manual - Page 23
ADJUSTMENT, STEP 1 Adjust the UP and DOWN Travel Limits
 |
View all LiftMaster 3265 manuals
Add to My Manuals
Save this manual to your list of manuals |
Page 23 highlights
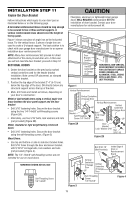
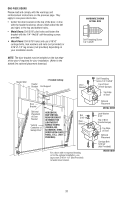
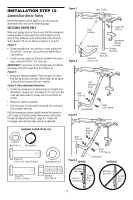
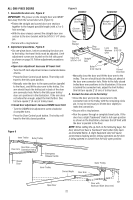
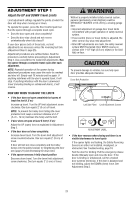
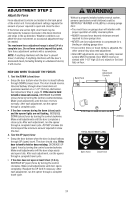
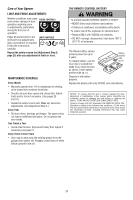
ADJUSTMENT STEP 1 Adjust the UP and DOWN Travel Limits Limit adjustment settings regulate the points at which the door will stop when moving up or down. To operate the opener, press the Door Control push bar. Run the opener through a complete travel cycle. • Does the door open and close completely? • Does the door stay closed and not reverse unintentionally when fully closed? If your door passes both of these tests, no limit adjustments are necessary unless the reversing test fails (Adjustment Step 3, page 25). Adjustment procedures are outlined below. Read the procedures carefully before proceeding to Adjustment Step 2. Use a screwdriver to make limit adjustments. Run the opener through a complete travel cycle after each adjustment. NOTE: Repeated operation of the opener during adjustment procedures may cause the motor to overheat and shut off. Simply wait 15 minutes and try again. If anything interferes with the door's upward travel, it will stop. If anything interferes with the door's downward travel (including binding or unbalanced doors), it will reverse. HOW AND WHEN TO ADJUST THE LIMITS • If the door does not open completely but opens at least five feet (1.5 m): Increase up travel. Turn the UP limit adjustment screw clockwise. One turn equals 2" (5 cm) of travel. NOTE: To prevent the trolley from hitting the cover protection bolt, keep a minimum distance of 2-4" (5 cm - 10 cm) between the trolley and the bolt. • If door does not open at least 5 feet (1.5 m): Adjust the UP (open) force as explained in Adjustment Step 2. • If the door does not close completely: Increase down travel. Turn the down limit adjustment screw counterclockwise. One turn equals 2" (5 cm) of travel. If door still will not close completely and the trolley bumps into the pulley bracket, try lengthening the door arm (page 21) and decreasing the down limit. • If the opener reverses in fully closed position: Decrease down travel. Turn the down limit adjustment screw clockwise. One turn equals 2" (5 cm) of travel. Without a properly installed safety reversal system, persons (particularly small children) could be SERIOUSLY INJURED or KILLED by a closing garage door. • Incorrect adjustment of garage door travel limits will interfere with proper operation of safety reversal system. • If one control (force or travel limits) is adjusted, the other control may also need adjustment. • After ANY adjustments are made, the safety reversal system MUST be tested. Door MUST reverse on contact with 1-1/2" high (3.8 cm) object (or 2x4 laid flat) on floor. To prevent damage to vehicles, be sure fully open door provides adequate clearance. Cover Bolt Protection 2-4" (5-10 cm) Left Side Panel Limit Adjustment Screws ADJUSTMENT LABEL • If the door reverses when closing and there is no visible interference to travel cycle: If the opener lights are flashing, the Safety Reversing Sensors are either not installed, misaligned, or obstructed. See Troubleshooting, page 18. Test the door for binding: Pull the emergency release handle. Manually open and close the door. If the door is binding or unbalanced, call for a trained door systems technician. If the door is balanced and not binding, adjust the DOWN (close) force. See Adjustment Step 2. 23
-
 1
1 -
2
-
3
-
4
-
5
-
6
-
7
-
8
-
9
-
10
-
11
-
12
-
13
-
14
-
15
-
16
-
17
-
 18
18 -
 19
19 -
 20
20 -
 21
21 -
 22
22 -
 23
23 -
 24
24 -
 25
25 -
 26
26 -
 27
27 -
 28
28 -
29
-
30
-
31
-
32
-
33
-
34
-
35
-
36
 |
 |