LiftMaster 3800 3800 Manual
LiftMaster 3800 Manual
 |
UPC - 012381308002
View all LiftMaster 3800 manuals
Add to My Manuals
Save this manual to your list of manuals |
LiftMaster 3800 manual content summary:
- LiftMaster 3800 | 3800 Manual - Page 1
for Owner's Manual ■ Please read this manual and the enclosed safety materials carefully! ■ Fasten the manual near the garage door after installation. ■ The door WILL NOT CLOSE unless The Protector System® and cable tension monitor are connected and properly aligned. ■ Periodic checks of the opener - LiftMaster 3800 | 3800 Manual - Page 2
19 Test cable tension monitor 20 Test power door lock 20 To open door manually 20 Operation 21-25 Operation safety instructions 21 Using your garage door opener 21 Using the wall-mounted control console 22 Care of your opener 23 Having a problem? (Troubleshooting 23-25 Programming 26-28 - LiftMaster 3800 | 3800 Manual - Page 3
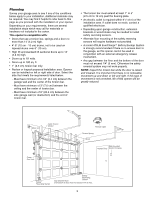
. If this type of movement is not corrected, life of this opener will be greatly reduced. Motor unit Cable Tension Monitor Power Door Lock Remote Light Torsion Spring Drum Wall-mounted Access Door Control Console Safety Reversing Sensor Safety Reversing Gap between floor Sensor and bottom - LiftMaster 3800 | 3800 Manual - Page 4
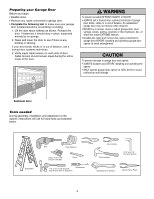
try to loosen, move or adjust garage door, door springs, cables, pulleys, brackets or their hardware, ALL of which are under EXTREME tension. • Disable ALL locks and remove ALL ropes connected to garage door BEFORE installing and operating garage door WARNING opener to avoid entanglement. CAUTION To - LiftMaster 3800 | 3800 Manual - Page 5
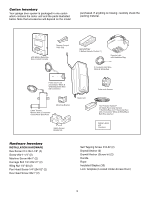
Remote Control Visor Clip SECURITY✚® 3-Button Remote Control (1) Remote Light with Hardware Bag 2-Conductor Bell Wire White & White/Red Power Door Lock 2-Conductor White & White/Black Bell Wire with Connector Cable Tension Monitor with 2-Conductor Green/White Bell Wires Mounting Bracket Motor - LiftMaster 3800 | 3800 Manual - Page 6
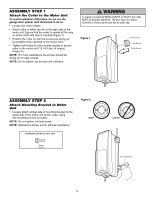
ASSEMBLY STEP 1 Attach the Collar to the Motor Unit To avoid installation difficulties, do not run the garage door opener until instructed to do so. • Loosen the collar screws. • Attach collar to either the left or the right side of the motor unit. Ensure that the collar is seated all the way on - LiftMaster 3800 | 3800 Manual - Page 7
or DEATH. 3. ALL repairs to cables, spring assemblies and other hardware MUST be made by a trained door systems technician BEFORE installing opener. 4. Disable ALL locks and remove ALL ropes connected to garage door BEFORE installing opener to avoid entanglement. 5 Mount emergency release handle no - LiftMaster 3800 | 3800 Manual - Page 8
. INSTALLATION STEP 3 Install Power Door Lock The lock is used to prevent the garage door from being manually opened once the door is fully closed. 1. Select a door roller to mount the lock above. Check for clearance. If possible select a roller on the same side of the door as the motor unit - LiftMaster 3800 | 3800 Manual - Page 9
garage door opener will move in the down direction. NOTE: The cable tension monitor is shipped for left side installation. NOTE: It is preferred that the cable tension monitor be installed on the same side of the door as the opener. If required, it can be mounted on the opposite side of door. Remove - LiftMaster 3800 | 3800 Manual - Page 10
a closing garage door: • Install control console within sight of garage door, out of reach of children at a minimum height of 5 feet (1.5 m) and away from ALL moving parts of door. • NEVER permit children to operate or play with control console push buttons or remote controls. • Activate door ONLY - LiftMaster 3800 | 3800 Manual - Page 11
outlet so that the cord and light are away from moving parts. 3. Install the ceiling mount plate with the screws provided. Leave 1/8" (3.1 mm) of the thread exposed between the ceiling and the screw head (Figure 2). NOTE: If installing remote light on drywall and a ceiling joist can not be located - LiftMaster 3800 | 3800 Manual - Page 12
from WARNING electrocution or fire: • Be sure power is not connected to the opener, and disconnect power to circuit BEFORE removing cover to establish permanent wiring connection. • Garage door installation and wiring MUST be in compliance with ALL local electrical and building codes. • NEVER use - LiftMaster 3800 | 3800 Manual - Page 13
) If the optional 475LM battery backup unit is part of this installation it should be installed at this time. • The BBU can be mounted to either the ceiling or a wall within 3' (.9 m) of the motor unit. • Position the BBU as desired to a structural support (ceiling joist or wall stud). • Attach the - LiftMaster 3800 | 3800 Manual - Page 14
shines directly into the receiving eye lens. The mounting brackets are designed to clip onto the track of sectional garage doors without additional hardware. WARNING Be sure power is not connected to the garage door opener CAUTION BEFORE installing the safety reversing sensor. To prevent SERIOUS - LiftMaster 3800 | 3800 Manual - Page 15
INSTALLING THE BRACKETS Be sure power to the opener is disconnected. Install and align the brackets so the safety reversing sensors will face each other across the garage door, with the beam no higher than 6" (15 cm) above the floor. They may be installed in one of three ways,as follows. Garage door - LiftMaster 3800 | 3800 Manual - Page 16
while the door is closing, the door will reverse. If the door is already open, it will not close. The opener lights will blink 10 times. (If bulbs are not installed, 10 clicks can be heard.) See page 11. Figure 6 To CableTension Monitor Bell Wire Motor unit Bell Wire To Power Door Lock Connect - LiftMaster 3800 | 3800 Manual - Page 17
a properly installed safety reversal system, persons CAUTION (particularly small children) could be SERIOUSLY INJURED or KILLED by a closing garage door. • NEVER learn forces or limits when door is binding or sticking. Repair door first. • Incorrect adjustment of garage door travel limits will - LiftMaster 3800 | 3800 Manual - Page 18
garage door." WARNING Without a properly installed safety reversal system, persons CAUTION (particularly small children) could be SERIOUSLY INJURED or KILLED by a closing garage door. • NEVER learn forces or limits when door is binding or sticking. Repair door first • Too much force on garage door - LiftMaster 3800 | 3800 Manual - Page 19
or adjustment of the garage door (including springs and hardware). • Any repair to or buckling of the garage floor. • Any repair to or adjustment of the opener. ADJUSTMENT STEP 4 Test The Protector System® • Press the remote control push button to open the door. • Place the opener carton in the path - LiftMaster 3800 | 3800 Manual - Page 20
STEP 5 Test Cable Tension Monitor If your cable tension monitor has been activated the LED will blink 9 times. ADJUSTMENT STEP 6 Test Power Door Lock TEST • With the door fully closed, the power door lock bolt should be protruding through the track. • Operate the door in the open direction. The - LiftMaster 3800 | 3800 Manual - Page 21
. 12. ALWAYS disconnect electric power to garage door opener BEFORE making any repairs or removing covers. 13. SAVE THESE INSTRUCTIONS. Using Your Garage Door Opener Your LiftMaster Security✚® opener and hand-held remote control have been factory programmed to a matching code which changes with - LiftMaster 3800 | 3800 Manual - Page 22
open and close from the Door Control, the Outdoor Key Switch and the Keyless Entry Accessories. To activate, press and hold the Lock button for 2 seconds. To turn off, press and hold the Lock button again for 2 seconds. The Lock feature will also turn off whenever the "learn" button on the motor - LiftMaster 3800 | 3800 Manual - Page 23
door locks? Review installation instruction warnings on page 7. • Is there a build-up of ice or snow under the door? The door may be frozen to the ground. Remove any restriction. • The garage door spring may be broken. Have it replaced. 2. Opener operates from the remote, but not from the Control - LiftMaster 3800 | 3800 Manual - Page 24
push buttons are off. • Remove the bell wire from the door control terminals and operate from the remote only. If this solves the problem, the door control is faulty (replace), or there is an intermittent short on the wire between the control console and the motor unit. • Clear memory and re-program - LiftMaster 3800 | 3800 Manual - Page 25
dim or flashing LED). 5 FLASHES Motor overheated or possible RPM sensor failure. Unplug to reset. 9 FLASHES Cable tension monitor reversal. Installed Safety Reversing Sensor Your garage door opener is programmed with selfdiagnostic capabilities. The "Learn" button/diagnostic LED will flash a number - LiftMaster 3800 | 3800 Manual - Page 26
hold the "learn" button on motor unit until the learn indicator light goes out (approximately 6-9 seconds). All previous codes are now erased. Reprogram each remote or keyless entry you wish to use. *3-Button Remote If provided with your garage door opener, the large button is factory programmed to - LiftMaster 3800 | 3800 Manual - Page 27
Entry PIN NOTE: Your new Keyless Entry must be programmed to operate your garage door opener. USING THE "LEARN" BUTTON USING THE LCD CONTROL CONSOLE LOCK LOCK LIGLHIGTHT 1. Press and release the purple "learn" button on motor unit. The learn indicator light will glow steadily for 30 seconds - LiftMaster 3800 | 3800 Manual - Page 28
Light Your garage door opener remote work light has already been programmed at the factory to operate with your opener. Any additional or replacement remote work lights will need to be programmed. 1. Press the "learn button" on light until LED comes ON. 2. Activate the garage door using the - LiftMaster 3800 | 3800 Manual - Page 29
9 41A5034 DESCRIPTION LCD motion detecting door control console 3-Button remote control 3V2032 lithium battery Remote control visor clip Emergency release rope & handle assembly 2-Conductor bell wire - white & white/red Cable tension monitor Mounting bracket Safety sensor kit (receiving and - LiftMaster 3800 | 3800 Manual - Page 30
Motor Unit Assembly Parts 1 6 5 2 3 4 KEY NO. 1 2 3 PART NO. 41DJ001 41A6118 41C168 DESCRIPTION Logic board complete with plate Absolute Encoder System Transformer KEY NO. 4 5 6 PART NO. 41A6095 41B122 41A6348 DESCRIPTION Motor with bracket Power cord Cover 30 - LiftMaster 3800 | 3800 Manual - Page 31
accessory sensor for homes with multiple garage doors. Remote Work Light: Enables homeowner to turn on a work light from their car with their garage door opener remote or from anywhere in their home with an additional LiftMaster Security✚® remote. 475LM EverCharge™ Battery Backup System - LiftMaster 3800 | 3800 Manual - Page 32
NUMBER • PART NAME • MODEL NUMBER ADDRESS ORDERS TO: THE CHAMBERLAIN GROUP, INC. Technical Support Group 6020 S. Country Club Road Tucson, Arizona 85706 SERVICE INFORMATION TOLL FREE NUMBER: 1-800-528-9131 LIFTMASTER® GARAGE DOOR OPENER FIVE-YEAR LIMITED WARRANTY LIFETIME MOTOR LIMITED WARRANTY The
-
 1
1 -
 2
2 -
 3
3 -
 4
4 -
 5
5 -
 6
6 -
 7
7 -
8
-
9
-
10
-
11
-
12
-
13
-
14
-
15
-
16
-
17
-
18
-
19
-
20
-
21
-
22
-
23
-
24
-
25
-
26
-
27
-
28
-
29
-
30
-
31
-
32
 |
 |
Owner’s Manual
■
Please read this manual and the enclosed safety materials carefully!
■
Fasten the manual near the garage door after installation.
■
The door WILL NOT CLOSE unless The Protector System
®
and cable tension monitor are
connected and properly aligned.
■
Periodic checks of the opener are required to ensure safe operation.
■
The model number label is located behind the hinged door of your opener.
GARAGE DOOR OPENER
Model 3800
For Residential Sectional Doors With
Torsion Assemblies Only
The Chamberlain Group, Inc.
845 Larch Avenue
Elmhurst, Illinois 60126-1196
www.liftmaster.com
®
C
o
m
p
a
t
i
b
l
e
w
i
t
h
S
e
e
P
a
g
e
1
3
f
o
r
D
e
t
a
i
l
s