LiftMaster 3800 3800 Manual - Page 6
Warning - instructions
 |
UPC - 012381308002
View all LiftMaster 3800 manuals
Add to My Manuals
Save this manual to your list of manuals |
Page 6 highlights
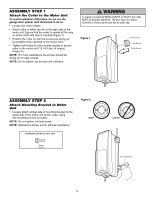
ASSEMBLY STEP 1 Attach the Collar to the Motor Unit To avoid installation difficulties, do not run the garage door opener until instructed to do so. • Loosen the collar screws. • Attach collar to either the left or the right side of the motor unit. Ensure that the collar is seated all the way on motor shaft until stop is reached (Figure 1). • Position the collar so that the screws are facing up (accessible when attached to the torsion bar). • Tighten both sides of collar screws equally to secure collar to the motor unit (12-14 ft./lbs. of torque) (Figure 2). NOTE: For most installations the screws should be facing up for easy access. NOTE: Do not tighten set screws until indicated. WARNING To prevent possible SERIOUS INJURY or DEATH, the collar CAUTION MUST be properly tightened. The door may not reverse correctly or limits may be lost due to collar slip. Figure 1 Collar Screw Set Screw Collar Screw ASSEMBLY STEP 2 Attach Mounting Bracket to Motor Unit • Loosely attach slotted side of mounting bracket to the same side of the motor unit as the collar, using self-threading screws provided. NOTE: Do not tighten until instructed. NOTE: Illustrations shown are for left side installation. HARDWARE SHOWN ACTUAL SIZE Figure 2 RIGHT Screw #10-32 WRONG Socket Wrench 6
-
 1
1 -
 2
2 -
 3
3 -
 4
4 -
 5
5 -
 6
6 -
 7
7 -
 8
8 -
 9
9 -
 10
10 -
 11
11 -
 12
12 -
13
-
14
-
15
-
16
-
17
-
18
-
19
-
20
-
21
-
22
-
23
-
24
-
25
-
26
-
27
-
28
-
29
-
30
-
31
-
32
 |
 |
