LiftMaster 98032 LiftMaster Model 98032 Heavy Duty Shaft Collar Instruction Sh - Page 2
Warning
 |
View all LiftMaster 98032 manuals
Add to My Manuals
Save this manual to your list of manuals |
Page 2 highlights
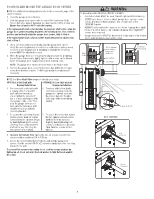
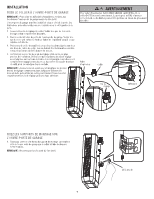
INSTALLATION ATTACH THE COLLAR TO THE GARAGE DOOR OPENER NOTE: To avoid installation difficulties, do not run the garage door garage door opener until instructed to do so. The garage door opener can be installed on either side of the door. The illustrations shown are for installation on the left side of the door. 1. Loosen the set screws on the collar. Ensure that the lock nuts are fully loosened. 2. Attach the collar to the garage door opener output shaft. Ensure the collar is seated all the way on the operator shaft until it reaches the stop. 3. Position the collar so the screws align with two of the holes in the output shaft. These screws should be easily accessible when the operator is attached to the torsion bar. 4. Begin to tighten the two square head set screws closest to the operator. Ensure that the tips of the set screws are aligned with the holes in the shaft, and tighten until fully engaged with the holes. It may be necessary to use a tool, but DO NOT overtighten at this time. NOTE: Make sure to feel with a finger that the set screw tips are just starting to protrude through the holes of the tube, then stop tightening for now. You will not fully tighten the set screws until a later step. WARNING To prevent possible SERIOUS INJURY or DEATH, the collar MUST be properly tightened. The door may NOT reverse correctly or limits may be lost due to collar slip. Operator Shaft Collar Flush Set SScert eSwcresws ATTACH MOUNTING BRACKET TO GARAGE DOOR OPENER 1. Loosely attach slotted side of mounting bracket to the same side of the garage door opener as the collar, using two #10-32 screws provided. NOTE: Do not tighten screws until instructed. 2 Socket Wrench
-
 1
1 -
 2
2 -
 3
3 -
 4
4 -
 5
5 -
 6
6 -
 7
7 -
 8
8
 |
 |
