Linksys WIP300 User Guide
Linksys WIP300 - iPhone Wireless VoIP Phone Manual
 |
UPC - 745883569335
View all Linksys WIP300 manuals
Add to My Manuals
Save this manual to your list of manuals |
Linksys WIP300 manual content summary:
- Linksys WIP300 | User Guide - Page 1
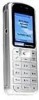
Wireless-G IP Phone Voice Model No. WIP300 User Guide - Linksys WIP300 | User Guide - Page 2
- Linksys WIP300 | User Guide - Page 3
Wireless-G IP Phone Copyright and Trademarks Specifications are subject to change without notice. Linksys is a registered trademark or trademark of Cisco . How to Use this Guide This User Guide has been designed to make understanding networking with the Wireless-G IP Phone easier than ever. Look - Linksys WIP300 | User Guide - Page 4
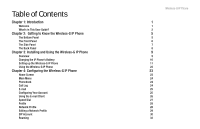
IP Phone's Battery Setting up the Wireless-G IP Phone Using the Wireless-G IP Phone Chapter 4: Configuring the Wireless-G IP Phone Home Screen Main Menu Phonebook Call Log E-mail Configuring Your Account Using the E-mail Client Speed Dial Profile Network Profile Editing a Network Profile SIP Account - Linksys WIP300 | User Guide - Page 5
Wireless-G IP Phone Profile Password 32 Secure Setup 33 Settings 33 Language 33 Clock 34 Alarm Clock 34 Call Settings 35 cSpeed Dial 35 Sound Settings 36 Display Settings 36 Keypad 37 Tools 38 Chapter 5: Using the Web-based Utility 39 Overview 39 How to Access the Web- - Linksys WIP300 | User Guide - Page 6
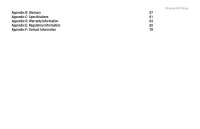
Appendix B: Glossary Appendix C: Specifications Appendix D: Warranty Information Appendix E: Regulatory Information Appendix F: Contact Information Wireless-G IP Phone 57 61 63 65 79 - Linksys WIP300 | User Guide - Page 7
Wireless-G IP Phone List of Figures Figure 2-1: Bottom Panel 3 Figure 3-21: Save Phone Number 17 Figure 2-2: Front Panel 4 Figure 3-22: Save User Name 17 Figure 2-3: Side Panel 5 Figure 3-23: Save Password 18 Figure 2-4: Back Panel 6 Figure 3-24: Save SIP Settings 18 Figure 3-1: Press - Linksys WIP300 | User Guide - Page 8
4-38: Language Figure 4-39: Phone Password Figure 4-40: Change Power Saving Wireless-G IP Phone 31 Figure 4-41: Select Upgrade 39 31 Figure 4-42: Upgrade 39 32 Figure 4-43: Upgrade in Progress 39 32 Figure 4-44: Upgrade Successful 39 33 Figure 4-45: Wireless 40 33 Figure 4-46: Scanning - Linksys WIP300 | User Guide - Page 9
5-1: Wireless Network Status screen 40 Figure 5-2: Phone Book Edit screen 41 Figure 5-3: E-mail screen 42 Figure 5-4: Network Profile screen 43 Figure 5-5: SIP screen 44 Figure 5-6: Settings screen 45 Figure 5-7: Software screen 48 Figure 5-8: Bootcode screen 49 Figure 5-9: Password - Linksys WIP300 | User Guide - Page 10
can be fun. Use the instructions in this User Guide to help you set up and configure the IP Phone after you have created an account with your Internet phone service provider. These instructions should be all you need to get the most out of the Wireless-G IP Phone. Note: For information about your - Linksys WIP300 | User Guide - Page 11
of the IP Phone. • Chapter 3: Installing and Using the Wireless-G IP Phone Explains how to install the IP Phone and use it. • Chapter 4: Configuring the Wireless-G IP Phone Discusses how to configure the IP Phone's settings. • Appendix A: Troubleshooting Describes potential problems and solutions - Linksys WIP300 | User Guide - Page 12
• Appendix E: Regulatory Information Provides regulatory information regarding the IP Phone. • Appendix F: Contact Information Provides contact information for a variety of Linksys resources, including Technical Support. Wireless-G IP Phone Chapter 1: Introduction 3 What's in This User Guide? - Linksys WIP300 | User Guide - Page 13
Wireless-G IP Phone 4 Chapter 1: Introduction What's in This User Guide? - Linksys WIP300 | User Guide - Page 14
to Know the Wireless-G IP Phone The Bottom Panel The IP Phone's USB mini-B port is located on the bottom panel of the Phone. Use the USB mini-B port to connect the included AC adapter to the IP Phone to charge its battery. USB mini-B Port Chapter 2: Getting to Know the Wireless-G IP Phone 5 The - Linksys WIP300 | User Guide - Page 15
Wireless-G IP Phone The Front Panel The IP Phone's buttons and their functions are described in the table button up or down to scroll through menus and settings. You can also press the Navigation button to select a highlighted menu item or setting. Place/Receive Call Button Power/ End Call Button - Linksys WIP300 | User Guide - Page 16
The Side Panel The IP Phone's Headset jack is located on the side panel of the Phone. Use it to connect a headset for hands-free operation. Wireless-G IP Phone Headset Jack Chapter 2: Getting to Know the Wireless-G IP Phone 7 The Side Panel - Linksys WIP300 | User Guide - Page 17
Wireless-G IP Phone The Back Panel The IP Phone's battery compartment is located on the back panel of the IP Phone. For directions on how to insert the battery, refer to "Chapter 3: Installing and Using the Wireless-G IP Phone". Battery compartment 8 Chapter 2: Getting to Know the Wireless-G IP - Linksys WIP300 | User Guide - Page 18
contacts at the bottom of the battery compartment. 3. Replace the battery cover by sliding it upwards until it clicks into place. Metal Contacts Battery Proceed to the next section, "Charging the IP Phone's Battery" on page 10. Chapter 3: Installing and Using the Wireless-G IP Phone 9 Overview - Linksys WIP300 | User Guide - Page 19
use. When the Battery charging indicator remains solid blue, the battery is fully charged and ready for use. When the battery is fully charged, proceed to "Setting up the Wireless-G IP Phone" on page 9. 10 Chapter 3: Installing and Using the Wireless-G IP Phone Charging the IP Phone's Battery - Linksys WIP300 | User Guide - Page 20
Setting up the Wireless-G IP Phone Wireless-G IP Phone Before you begin, make sure you have an active Internet connection and the account information provided by your Internet phone service provider. Note: The Phone automatically dims and turns off the LCD display when the Phone is not in use. If - Linksys WIP300 | User Guide - Page 21
the Profile menu. 6. Scroll to SIP Account, then press the Select Soft Key to enter the SIP Account menu. 7. Press the Option Soft Key, then press the Select Soft Key to edit the default SIP account. 12 Chapter 3: Installing and Using the Wireless-G IP Phone Setting up the Wireless-G IP Phone - Linksys WIP300 | User Guide - Page 22
setting your service provider requires you to change, then press the Select Soft Key to change the setting. When you are finished changing the setting, press the Navigation button to save your changes. Chapter 3: Installing and Using the Wireless-G IP Phone 13 Setting up the Wireless-G IP Phone - Linksys WIP300 | User Guide - Page 23
changes in the advanced settings menu, press the Back Soft Key until you return to the Profile menu. 11. Highlight Network Profile, then press the Select Soft key to enter the Network Profile menu. 14 Chapter 3: Installing and Using the Wireless-G IP Phone Setting up the Wireless-G IP Phone - Linksys WIP300 | User Guide - Page 24
. If you don't have security enabled on your wireless network, highlight OPEN. 13. Press the Option Soft Key to enter the Profile Options menu, then press the Select Soft Key to edit the network profile. Chapter 3: Installing and Using the Wireless-G IP Phone 15 Setting up the Wireless-G IP Phone - Linksys WIP300 | User Guide - Page 25
the Wireless Settings menu. 15. Highlight ESSID, then press the Select Soft Key to enter the ESSID menu. 16. Highlight Site Survey, then press the Navigation button to scan for your wireless network. 16 Chapter 3: Installing and Using the Wireless-G IP Phone Setting up the Wireless-G IP Phone - Linksys WIP300 | User Guide - Page 26
manually, press the Back Soft Key to return to the ESSID menu, highlight New ESSID, then press the Navigation button to edit the ESSID name. When you are finished entering the ESSID name, press the Navigation button to save it. Chapter 3: Installing and Using the Wireless-G IP Phone 17 Setting - Linksys WIP300 | User Guide - Page 27
Wireless-G IP Phone 18. Press the Back Soft Key until you return to the Wireless Settings menu. 19. Highlight Security, then press the Navigation button to enter the Security menu. 18 Chapter 3: Installing and Using the Wireless-G IP Phone Setting up the Wireless-G IP Phone - Linksys WIP300 | User Guide - Page 28
. If you don't have security enabled on your wireless network, select OPEN. 21. When you are finished selecting wireless security settings, press the Back Soft Key until you return to the Edit menu. Chapter 3: Installing and Using the Wireless-G IP Phone 19 Setting up the Wireless-G IP Phone - Linksys WIP300 | User Guide - Page 29
IP Phone 22. Highlight Account Choice and press the Navigation button to enter the Account Choice menu. 23. Press the Navigation button to assign the default SIP account to the current network profile. 20 Chapter 3: Installing and Using the Wireless-G IP Phone Setting up the Wireless-G IP Phone - Linksys WIP300 | User Guide - Page 30
the SIP Account. 25. Press the Back Soft Key until you return to the Phone's home screen. Wireless-G IP Phone Installation is complete. Proceed to the next section, "Using the Wireless-G IP Phone." Chapter 3: Installing and Using the Wireless-G IP Phone 21 Setting up the Wireless-G IP Phone - Linksys WIP300 | User Guide - Page 31
the Navigation button to save the new volume level or the Back Soft Key to cancel. For additional information about your Wireless-G IP Phone, proceed to "Chapter 4: Configuring the Wireless-G IP Phone." 22 Chapter 3: Installing and Using the Wireless-G IP Phone Using the Wireless-G IP Phone - Linksys WIP300 | User Guide - Page 32
enabled. Alarm: Indicates that the alarm you set is going off. Battery Level: Indicates the amount of battery power you have remaining. You can also display a summary of the phone's current status by pressing the Status Soft Key. Chapter 4: Configuring the Wireless-G IP Phone 23 Home Screen - Linksys WIP300 | User Guide - Page 33
Wireless-G IP Phone Main Menu Press the Menu Soft Key on the Phone's home screen to enter the Main menu. Refer to the sections below for information dialed. Displays a list of calls you've recently received. Clears all call lists. 24 Chapter 4: Configuring the Wireless-G IP Phone Main Menu - Linksys WIP300 | User Guide - Page 34
/Received E-mail The IP Phone's built-in e-mail client allows you to send and receive messages using your POP3 e-mail account. Note: Not all e-mail services support POP3. Contact your e-mail service for more information about POP3 settings and support. Configuring Your Account 1. If necessary - Linksys WIP300 | User Guide - Page 35
Wireless-G IP Phone Using the E-mail Client Refer to the table below for a list of options availbe in the E-mail menu: from your Outbox. • Clear Outbox: Allows you to delete all of the e-mail messages in your Outbox. 26 Chapter 4: Configuring the Wireless-G IP Phone Using the E-mail Client - Linksys WIP300 | User Guide - Page 36
your e-mail account settings. Wireless-G IP Phone Speed Dial The Speed Dial menu allows you to assign up to nine phone numbers you frequently call to the number keys on the phone. Follow the steps return to the main Speed Dial menu. Chapter 4: Configuring the Wireless-G IP Phone 27 Speed Dial - Linksys WIP300 | User Guide - Page 37
Wireless-G IP Phone Profile The Profile menu allows you to make changes to your SIP accounts, network profiles, roaming options, profile password, or configure your IP phone using SecureEasySetup. Refer to the sections below for the options available in the Profile menu. Note: The first time you - Linksys WIP300 | User Guide - Page 38
IP settings for your network. Assign a SIP account to a network profile. Set STUN server options. Press the Select Soft Key to select from the following options: • NAT Solution: Allows you to enable or disable STUN services. • NAT Timer: Allows you to change the interval of time the phone waits - Linksys WIP300 | User Guide - Page 39
your Internet phone service account's authorization password. SIP Domain Enter the address of your Intenet phone service provider's SIP domain. Proxy Address Enter the address of your Internet phone service provider's proxy server. 30 Chapter 4: Configuring the Wireless-G IP Phone SIP Account - Linksys WIP300 | User Guide - Page 40
Key, highlight Rename, then press the Select Soft Key to rename the SIP account. To delete a SIP account, highlight the account you would like to delete, press the Select Soft Key, then press the OK Soft Key to delete the SIP account. Chapter 4: Configuring the Wireless-G IP Phone 31 SIP Account - Linksys WIP300 | User Guide - Page 41
Key. 4. Enter the old password, then press the Navigation button. 5. When you see the New Password screen, enter a new password for the Profile menu. 6. When you are finished entering the password, press the Navigation button to save it. 32 Chapter 4: Configuring the Wireless-G IP Phone Roaming - Linksys WIP300 | User Guide - Page 42
Wireless-G IP Phone The Secure Setup menu allows you to configure your IP Phone's wireless network settings with the push of a button. If you have a Linksys wireless router or access point that supports SecureEasySetup, you can use the Secure Setup feature to quickly and easily configure your IP - Linksys WIP300 | User Guide - Page 43
off once, daily, or weekly. Refer to the table below for a list of options available in the Alarm Clock menu. Option Alarm Time Mode Description Set the time you want the alarm to go off at. Set the alarm to go off once, daily, or weekly. 34 Chapter 4: Configuring the Wireless-G IP Phone Clock - Linksys WIP300 | User Guide - Page 44
Dial menu allows you to change the way the phone's speed dial function works. You can select Disable to disable speed dial, Ask to see a confirmation screen before the phone dials a contact, or Dial to immediately dial a contact. Chapter 4: Configuring the Wireless-G IP Phone 35 Call Settings - Linksys WIP300 | User Guide - Page 45
. Change the message displayed on the home screen. Change the amount of time it takes for the IP Phone to turn off its LCD when the phone is not in use. Change the brightness of the LCD screen. Enable or disable configuration tips. 36 Chapter 4: Configuring the Wireless-G IP Phone Sound Settings - Linksys WIP300 | User Guide - Page 46
Keypad Wireless-G IP Phone The Keypad menu allows you to customize the IP Phone's keypad settings. Refer to the table below for a list of options available in the Keypad menu. Option Keypad Lock Key Tone Key Backlight Description Lock the IP Phone's keypad. To unlock the keypad, press the Left - Linksys WIP300 | User Guide - Page 47
the IP Phone's battery status. Ping an IP address or domain. View the IP Phone's software version information. Upgrade the IP Phone's firmware. Reset all of the IP Phone's settings back to their factory defaults. Soft reset the IP Phone. 38 Chapter 4: Configuring the Wireless-G IP Phone Tools - Linksys WIP300 | User Guide - Page 48
WiFi Phone's IP address that you obtained in step 1. Press Enter. 3. You will see the Wi-Fi Phone login screen. Enter the IP Phone's Username and Password. Click Submit. You will log in to the Status screen and can select any of the tabs to add or change phone setting information. The default User - Linksys WIP300 | User Guide - Page 49
Wireless-G IP Phone Note: To make a selection or confirm an entry, you must click on the option at the bottom of the screen. Pressing the Enter key will not confirm your selection(s). Status Click on the Status tab to view the IP phone's IP Address, Mac address, ESSID and BSSID. Figure 5-1: - Linksys WIP300 | User Guide - Page 50
Phonebook Wireless-G IP Phone The Phonebook can store and display up to 200 contacts. Use this option to add, edit or delete a contact. 1. Click on the Phonebook tab. To add a contact, click New. The Phone Book Edit screen will display. On this screen, you can enter the contact's name, email - Linksys WIP300 | User Guide - Page 51
Wireless-G IP Phone E-mail The IP Phone's built-in e-mail client allows you to send and receive messages using your POP3 e-mail account. Click on the E-mail tab. You can choose to Configure a new e-mail contact, Remove an existing contact, or make a contact Active. To Configure a new account, select - Linksys WIP300 | User Guide - Page 52
, Remove or Turn Off any of these accounts. Click Configure. For the Wireless Network Settings, Enter the Profile Name, ESSID and select the Data rate. For IP Settings, you can select DHCP, Fixed IP or PPPoE. For the NAT Settings you can Disable the NAT Solution or select STUN server options. You - Linksys WIP300 | User Guide - Page 53
Wireless-G IP Phone SIP You can use SIP to Configure or Remove the SIP Account Settings. You can assign up to six SIP accounts to your IP Phone. To view the SIP settings, select the SIP tab. You will see the Account List. This list shows the configured accounts and which ones are active. To edit a - Linksys WIP300 | User Guide - Page 54
Settings Wireless-G IP Phone Click the Settings tab to make changes to Call, Sound and Display Settings and the Clock. Refer to the table below for a list of options in the Settings Menu. Figure 5-6: Settings screen Chapter 5: Using the Web-based Utility 45 Settings - Linksys WIP300 | User Guide - Page 55
Choose one of the available ring tone melodies Ring Volume Set the IP Phone's ring volume Ring Mode Set the IP Phone's ring mode to Silent, Ring, Vibrate, or Ring + Vibrate Warning Tone Check to enable the IP Phone's warning tones, such as low battery 46 Chapter 5: Using the Web-based Utility - Linksys WIP300 | User Guide - Page 56
Display Settings Wireless-G IP Phone Click the Display Settings tab to customize the IP Phone's display. Refer to the table below for a list of options available in the Display Settings menu. Option LCD Off Time Wallpaper Description Change the amount of time it takes for the IP Phone to turn - Linksys WIP300 | User Guide - Page 57
Wireless-G IP Phone Software Select the Software tab. You can view the Software Information for your Wi-Fi phone. Click on Upgrade to confirm the settings, or click on Cancel Settings if you do not want to upgrade. Software Information Figure 5-7: Software screen Option Active Inactive New Image - Linksys WIP300 | User Guide - Page 58
Bootcode Wireless-G IP Phone Select the Bootcode tab. You can view the Current Version of the Wi-Fi phone's Bootcode Information. You can update the Bootcode Image by entering the Bootcode Image information, selecting it by clicking on Choose. Click on Upgrade to confirm the settings, or select - Linksys WIP300 | User Guide - Page 59
Wireless-G IP Phone Password This screen allows you to change the password information of the Wi-Fi phone. Select the Password tab. Enter the new Username and/or Password for the IP Phone. Select Save Settings to immediately change the password, or select Cancel Settings to cancel. Reboot Figure - Linksys WIP300 | User Guide - Page 60
to the IP address of the IP Phone. These four port ranges are as follows: 5060-5061 (UDP), 53-53 (UDP), 69-69 (UDP), and 10000-20000 (UDP). If you have a non-Linksys router, refer to its documentation for instructions. Appendix A: Troubleshooting Common Problems and Solutions Wireless-G IP Phone 51 - Linksys WIP300 | User Guide - Page 61
of IP Phone) (IP address of IP Phone) (IP address of IP Phone) (IP address of IP Phone) Enable X X X X 9. Check the Enable option for the port services you want to use. 10. When you have completed the configuration, click the Save Settings button. 52 Appendix A: Troubleshooting Common Problems - Linksys WIP300 | User Guide - Page 62
your problem is solved: • Check the ringer volume on the IP Phone, and make sure it is set to an audible level. • Follow these instructions to reboot your cable or DSL modem, IP Phone, adapter into an electrical outlet. Appendix A: Troubleshooting Common Problems and Solutions Wireless-G IP Phone 53 - Linksys WIP300 | User Guide - Page 63
By default, the IP Phone uses a dynamic IP address assigned by your router. For port forwarding, you may need to assign a static IP address to the IP Phone. Contact your Internet phone service provider for assistance. If you have a non-Linksys router, refer to its documentation for instructions. If - Linksys WIP300 | User Guide - Page 64
port services you want to use. 10. When you have completed the configuration, click the Save Settings button. 4. The power LED does not light up. Go through this checklist until your problem is solved: • Remove the IP Phone's battery from its compartment. Wait five seconds while the IP Phone resets - Linksys WIP300 | User Guide - Page 65
Wireless-G IP Phone Frequently Asked Questions Can I make calls if my Internet connection is down? No. Your high-speed Internet connection must be active when you make Internet phone calls. Can I use the IP Phone to make a call and browse the Internet at the same time? No. The IP Phone supports - Linksys WIP300 | User Guide - Page 66
(Dynamic Host Configuration Protocol) - A networking protocol that allows administrators to assign temporary IP addresses to network computers by "leasing" an IP address to a user for a limited amount of time, instead of assigning permanent IP addresses. Appendix B: Glossary Wireless-G IP Phone 57 - Linksys WIP300 | User Guide - Page 67
Wireless-G IP Phone DMZ (Demilitarized Zone) - Removes the Router's firewall protection from one PC, allowing it to be "seen" from the Internet. DNS (Domain Name Server) - The IP address of your ISP's server, which translates the names of websites into IP addresses. Domain - A specific name for a - Linksys WIP300 | User Guide - Page 68
Any computer whose function in a network is to provide user access to files, printing, communications, and other services. SSID (Service Set IDentifier) - Your wireless network's name. Static IP Address - A fixed address assigned to a computer or device that is connected to a network. Static Routing - Linksys WIP300 | User Guide - Page 69
the TCP/IP FTP protocol that has no directory or password capability. Throughput - The amount of data moved successfully from one node to another in a given time period. Topology - The physical layout of a network. TX Rate - Transmission Rate. Upgrade - To replace existing software or firmware with - Linksys WIP300 | User Guide - Page 70
and 802.11g @ Normal Temp Range One Mini USB 1.1 Port, One Stereo Ear Phone Jack 2.2 inch (55.9 mm) (240 x 320 pixels) TCP/IP WEP (64/128), WPA-PSK Encryption ToS SIP v2 Session Initiation Protocol (RFC3261), SDP (RFC2327) G.711 u/A-law, G.729a/b Appendix C: Specifications Wireless-G IP Phone 61 - Linksys WIP300 | User Guide - Page 71
Wireless-G IP Phone DTMF Transmission Voice Quality Dimensions (W x H x D) Unit Weight Power Certifications 5.32" x 0.74" (46.7 mm x 135.2 mm x 18.8 mm) 4.20 oz. (0.12 kg) 3.7V, 1250mAh Lithium Battery, 5V, 1A AC Adapter FCC, cUL, CE 32ºF to 113ºF (0ºC to 45ºC) -4ºF to 131ºF (-20ºC to 55ºC) 10 - Linksys WIP300 | User Guide - Page 72
Appendix D: Warranty Information Wireless-G IP Phone LIMITED WARRANTY Your Internet phone service provider warrants to You that, for a period of one year (the "Warranty Period"), your Linksys Product will be substantially free of defects in materials and workmanship under normal use. Your - Linksys WIP300 | User Guide - Page 73
Wireless-G IP Phone 64 Appendix D: Warranty Information - Linksys WIP300 | User Guide - Page 74
Regulatory Information Wireless-G IP Phone FCC Statement set forth for an uncontrolled environment. End users must follow the specific operating instructions 836 W/kg. Linksys declares that WIP300 (FCC ID: Q87-WIP300) is limited in CH1~CH11 for 2.4 GHz by specified firmware controlled in U.S.A. - Linksys WIP300 | User Guide - Page 75
Wireless-G IP Phone Safety Notices Caution: To reduce the risk of fire, use only No. 26 AWG or larger telecommunication line cord. Do not use this product near - Linksys WIP300 | User Guide - Page 76
WEEE) This document contains important information for users with regards to the proper disposal and recycling of Linksys products. Consumers are required to comply with this notice for all electronic products bearing the following symbol: Wireless-G IP Phone Appendix E: Regulatory Information 67 - Linksys WIP300 | User Guide - Page 77
Wireless-G IP Phone 68 Appendix E: Regulatory Information - Linksys WIP300 | User Guide - Page 78
Appendix E: Regulatory Information Wireless-G IP Phone 69 - Linksys WIP300 | User Guide - Page 79
Wireless-G IP Phone 70 Appendix E: Regulatory Information - Linksys WIP300 | User Guide - Page 80
Appendix E: Regulatory Information Wireless-G IP Phone 71 - Linksys WIP300 | User Guide - Page 81
Wireless-G IP Phone 72 Appendix E: Regulatory Information - Linksys WIP300 | User Guide - Page 82
Appendix E: Regulatory Information Wireless-G IP Phone 73 - Linksys WIP300 | User Guide - Page 83
Wireless-G IP Phone 74 Appendix E: Regulatory Information - Linksys WIP300 | User Guide - Page 84
Appendix E: Regulatory Information Wireless-G IP Phone 75 - Linksys WIP300 | User Guide - Page 85
Wireless-G IP Phone 76 Appendix E: Regulatory Information - Linksys WIP300 | User Guide - Page 86
Appendix E: Regulatory Information Wireless-G IP Phone 77 - Linksys WIP300 | User Guide - Page 87
Wireless-G IP Phone For more information, visit www.linksys.com. 78 Appendix E: Regulatory Information - Linksys WIP300 | User Guide - Page 88
request in to: If you experience problems with any Linksys product, you can call us at: Don't wish to call? You can e-mail us at: http://www.linksys.com or ftp.linksys.com 800-546-5797 (LINKSYS) 949-823-3002 800-326-7114 [email protected] Wireless-G IP Phone Appendix F: Contact Information 79 - Linksys WIP300 | User Guide - Page 89
Wireless-G IP Phone 80 Appendix F: Contact Information - Linksys WIP300 | User Guide - Page 90
www.linksys.com
-
 1
1 -
 2
2 -
 3
3 -
 4
4 -
 5
5 -
 6
6 -
 7
7 -
8
-
9
-
10
-
11
-
12
-
13
-
14
-
15
-
16
-
17
-
18
-
19
-
20
-
21
-
22
-
23
-
24
-
25
-
26
-
27
-
28
-
29
-
30
-
31
-
32
-
33
-
34
-
35
-
36
-
37
-
38
-
39
-
40
-
41
-
42
-
43
-
44
-
45
-
46
-
47
-
48
-
49
-
50
-
51
-
52
-
53
-
54
-
55
-
56
-
57
-
58
-
59
-
60
-
61
-
62
-
63
-
64
-
65
-
66
-
67
-
68
-
69
-
70
-
71
-
72
-
73
-
74
-
75
-
76
-
77
-
78
-
79
-
80
-
81
-
82
-
83
-
84
-
85
-
86
-
87
-
88
-
89
-
90
 |
 |

User Guide
Model No.
WIP300
IP Phone
Wireless-
G
Voice