Linksys WMP300N-RM User Guide - Page 13
Connecting the Adapter, Setting up the Adapter, Connect, Refresh, Advanced Setup - wireless
 |
UPC - 745883588336
View all Linksys WMP300N-RM manuals
Add to My Manuals
Save this manual to your list of manuals |
Page 13 highlights
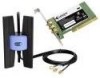
Wireless-N PCI Adapter 4. The Setup Wizard will now prompt you to install the Adapter into your PC. Click Next and power off your PC. After installing the Adapter, as shown below, and restarting your PC, the Setup Wizard will continue. Connecting the Adapter 1. If you haven't already done so, power off your desktop PC before installing the Adapter. 2. Open your PC case and locate an available PCI slot on the motherboard. Check with your computer manufacturer for instructions. 3. Slide the Adapter into the PCI slot. Make sure that all of its pins are touching the slot's contacts. You may have to apply a bit of pressure to slide the Adapter all the way in. After the Adapter is firmly in place, secure its fastening tab to your PC's chassis with a mounting screw. Then, close your PC. 4. Connect the antenna stand's cables to the PCI card of the Adapter. Plug the cable with the blue connector into the blue CENTER ANT port. Then attach the remaining cables to the other ANT ports. NOTE: The antenna cable with the blue connector must plug into the blue CENTER ANT port. The other antenna cables plug into the rest of the Adapter's ANT ports. 5. Power on your desktop PC. Setting up the Adapter The next screen to appear will be the Available Wireless Networks screen. It provides two options for setting up the Adapter. • Available Wireless Networks (for most users). Use this option if you already have a network configured. The networks available to this Adapter will be listed on-screen. You can choose one of these networks and click the Connect button to connect to it. Click the Refresh button to update the Available Wireless Network list. • Advanced Setup. If your network is not listed on this screen, select Advanced Setup to set up the Adapter manually. This method of setting up the Adapter is intended for advanced users only. The setup for each option is described, step by step, under the appropriate heading on the following pages. Click Back to close the Setup Wizard, if you wish to set up the Adapter later. Chapter 4: Setting up and Connecting the Wireless-N PCI Adapter Connecting the Adapter Figure 4-3: Installing the Adapter Figure 4-4: Available Wireless Networks 7
-
 1
1 -
2
-
3
-
4
-
5
-
6
-
7
-
 8
8 -
 9
9 -
 10
10 -
 11
11 -
 12
12 -
 13
13 -
 14
14 -
 15
15 -
 16
16 -
 17
17 -
 18
18 -
19
-
20
-
21
-
22
-
23
-
24
-
25
-
26
-
27
-
28
-
29
-
30
-
31
-
32
-
33
-
34
-
35
-
36
-
37
-
38
-
39
-
40
-
41
-
42
-
43
-
44
-
45
-
46
-
47
-
48
-
49
-
50
-
51
-
52
-
53
-
54
-
55
-
56
-
57
-
58
-
59
-
60
-
61
-
62
-
63
-
64
-
65
 |
 |
