Linksys WVC54G User Guide - Page 20
Power on the Camera Screen, Check the LED Screen
 |
UPC - 745883559305
View all Linksys WVC54G manuals
Add to My Manuals
Save this manual to your list of manuals |
Page 20 highlights
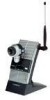
Compact Wireless-G Internet Video Camera 6. Plug the included power adapter into the Camera's Power port. Plug the other end into an electrical outlet. Click the Next button. 7. Make sure the LED is lit on the Camera's front panel. If it is not lit, make sure the cables are properly connected to the Camera. Click the Next button. Figure 5-5: Power on the Camera Screen Chapter 5: Setting up and Mounting the Compact Wireless-G Internet Video Camera Setup Wizard Figure 5-6: Check the LED Screen 12
-
 1
1 -
2
-
3
-
4
-
5
-
6
-
7
-
8
-
9
-
10
-
11
-
12
-
13
-
14
-
 15
15 -
 16
16 -
 17
17 -
 18
18 -
 19
19 -
 20
20 -
 21
21 -
 22
22 -
 23
23 -
 24
24 -
 25
25 -
26
-
27
-
28
-
29
-
30
-
31
-
32
-
33
-
34
-
35
-
36
-
37
-
38
-
39
-
40
-
41
-
42
-
43
-
44
-
45
-
46
-
47
-
48
-
49
-
50
-
51
-
52
-
53
-
54
-
55
-
56
-
57
-
58
-
59
-
60
-
61
-
62
-
63
-
64
-
65
-
66
-
67
-
68
-
69
-
70
-
71
-
72
-
73
-
74
-
75
-
76
-
77
-
78
-
79
-
80
-
81
-
82
-
83
-
84
-
85
-
86
-
87
-
88
-
89
-
90
-
91
 |
 |

12
Chapter 5: Setting up and Mounting the Compact Wireless-G Internet Video Camera
Setup Wizard
Compact Wireless-G Internet Video Camera
6.
Plug the included power adapter into the Camera’s Power port. Plug the other end into an electrical outlet.
Click the
Next
button.
7.
Make sure the LED is lit on the Camera’s front panel. If it is not lit, make sure the cables are properly
connected to the Camera. Click the
Next
button.
Figure 5-5: Power on the Camera Screen
Figure 5-6: Check the LED Screen