Logitech 966193-0403 Harmony 890 User Guide - Page 15
Setting Up the Harmony 890 Remote
 |
UPC - 097855036889
View all Logitech 966193-0403 manuals
Add to My Manuals
Save this manual to your list of manuals |
Page 15 highlights
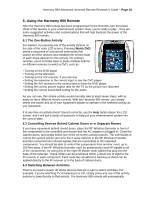
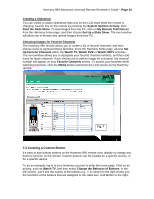
Harmony 890 Advanced Universal Remote Reviewer's Guide - Page 15 5. Setting Up the Harmony 890 Remote The Harmony 890 remote control setup is a six-step process, estimated to take approximately 45 minutes to 1½ hours, depending on the complexity of the system being controlled and the user's familiarity with the system. First, install the software and drivers from the CD, and follow the onscreen instructions. The software will then connect you with the Harmony Web site. You will first be prompted to set up a user account. Your progress will be shown on screen throughout the setup process in the form of a grey and green status bar. Step 1: Creating a Harmony Account At the end of software installation, you will be taken automatically to the Harmony Web site (if not, please visit logitech.com/harmony and click on New User Login). You will be asked to enter your User ID and password, which you will use to log in each time you want to update your Harmony remote control (fig. 1). Step 2: Testing the Connection At this point, the Web interface will ask you to plug in the Harmony 890 remote with the provided mini-USB cable. This is simply to make certain the hardware is functioning properly and is able to upload and download information. When you've arrived at Step 5 of the process - updating the remote - you will plug the USB cable into the rear of the RF Wireless Extender (fig. 2). Step 3: Setting Up the Devices During this step, the wizard helps identify the various entertainment components you want to control with the Harmony 890 remote. First, you'll be asked to select the kinds of components you are using (fig. 3), and then choose brand names by using the pull-down Fig. 1 Fig. 2 Fig. 3
-
 1
1 -
2
-
3
-
4
-
5
-
6
-
7
-
8
-
9
-
 10
10 -
 11
11 -
 12
12 -
 13
13 -
 14
14 -
 15
15 -
 16
16 -
 17
17 -
 18
18 -
 19
19 -
 20
20 -
21
-
22
-
23
-
24
-
25
 |
 |
