Lowrance HDS-5 Gen2 Installation Manual - Page 22
Make a test run to determine the results
 |
View all Lowrance HDS-5 Gen2 manuals
Add to My Manuals
Save this manual to your list of manuals |
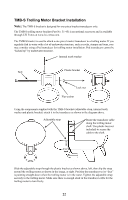
Page 22 highlights
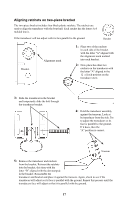
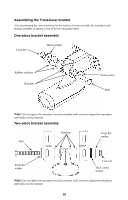
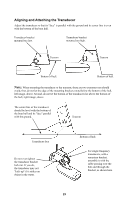
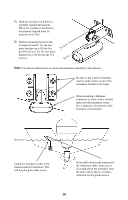
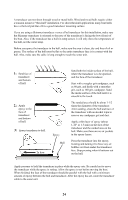
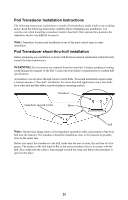
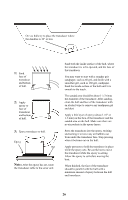
If you drill a hole in the transom for the transducer cable, make sure it is located above the waterline. Seal the hole with an above or below waterline marine grade sealant. Route the transducer cable to the sonar unit. Make sure to leave some slack in the cable near the transducer. Use caution when routing the transducer cable near other wiring and cables. If you need to drill a hole in the transom to pass the connector through, the hole size will depend on the connector on the end of the transducer's cable. Make a test run to determine the results At times you may need to adjust the transducer higher or lower. The slots in the mounting brackets allow you to loosen the screws and slide the transducer up or down. Improper transducer angles Partial sonar fish arches Full sonar fish arch Transducer face parallel with the bottom. If the sonar screen is displaying partial fish arches, as shown in the previous top two images, the transducer could be at an improper angle. Check the transducer and make sure its face is parallel with the bottom, as shown in the bottom example. If you frequently lose bottom signal lock the transducer may be coming out of the water as the boat crosses waves or wakes. Move the transducer a little lower in the water to see if that improves sonar performance. When fishing around underwater structure the transducer may be kicked up from object strikes. If the transducer is being kicked up too often, try moving it a little higher for more protection. 21
-
 1
1 -
2
-
3
-
4
-
5
-
6
-
7
-
8
-
9
-
10
-
11
-
12
-
13
-
14
-
15
-
16
-
 17
17 -
 18
18 -
 19
19 -
 20
20 -
 21
21 -
 22
22 -
 23
23 -
 24
24 -
 25
25 -
 26
26 -
 27
27 -
28
-
29
-
30
-
31
-
32
-
33
-
34
-
35
-
36
-
37
-
38
-
39
-
40
-
41
-
42
-
43
-
44
-
45
-
46
-
47
-
48
-
49
-
50
-
51
-
52
 |
 |
