Lowrance HDS-7 Gen2 Touch Operation Manual - Page 36
Routes - review
 |
View all Lowrance HDS-7 Gen2 Touch manuals
Add to My Manuals
Save this manual to your list of manuals |
Page 36 highlights
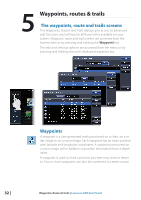
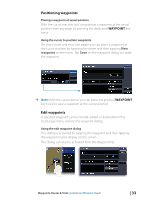
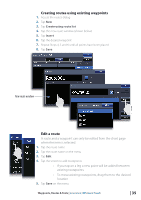
Moving a waypoint by tapping the screen 1. Tap the waypoint -- The waypoint name will appear on the page menu 2. Tap the waypoint name 3. Tap Move on the menu -- The waypoint icon will change to indicate moving mode 4. Drag the waypoint to its new position 5. Confirm the new position by tapping Save on the menu Waypoint alarm settings You can set an alarm radius for each waypoint you create. ¼¼ Note: The waypoint radius alarm must be toggled ON in the alarm screen to activate an alarm when your vessel comes within the defined radius. Exporting waypoints You can export all waypoints or only waypoints from a selected region to a SD card. Refer to "Export region" on page 126. ¼¼ Note: Review the User data format compatibility table "One or more functions do not operate as normal" on page 124 to select the best data format for legacy units. Routes A route consists of a series of routepoints entered in the order that you want to navigate them. When you tap on an existing route the route name will be displayed. Creating new route from chart page Routes can be created directly from the chart or by inserting waypoints from the routes dialog. 1. Tap the chart screen to activate the cursor 2. Tap New on the page menu 3. Tap New route 4. Tap the screen to position routepoints 5. Tap Save on the menu 34 | Waypoints, Routes & Trails | Lowrance HDS Gen2 Touch
-
 1
1 -
2
-
3
-
4
-
5
-
6
-
7
-
8
-
9
-
10
-
11
-
12
-
13
-
14
-
15
-
16
-
17
-
18
-
19
-
20
-
21
-
22
-
23
-
24
-
25
-
26
-
27
-
28
-
29
-
30
-
 31
31 -
 32
32 -
 33
33 -
 34
34 -
 35
35 -
 36
36 -
 37
37 -
 38
38 -
 39
39 -
 40
40 -
 41
41 -
42
-
43
-
44
-
45
-
46
-
47
-
48
-
49
-
50
-
51
-
52
-
53
-
54
-
55
-
56
-
57
-
58
-
59
-
60
-
61
-
62
-
63
-
64
-
65
-
66
-
67
-
68
-
69
-
70
-
71
-
72
-
73
-
74
-
75
-
76
-
77
-
78
-
79
-
80
-
81
-
82
-
83
-
84
-
85
-
86
-
87
-
88
-
89
-
90
-
91
-
92
-
93
-
94
-
95
-
96
-
97
-
98
-
99
-
100
-
101
-
102
-
103
-
104
-
105
-
106
-
107
-
108
-
109
-
110
-
111
-
112
-
113
-
114
-
115
-
116
-
117
-
118
-
119
-
120
-
121
-
122
-
123
-
124
-
125
-
126
-
127
-
128
-
129
-
130
-
131
-
132
-
133
-
134
-
135
-
136
-
137
 |
 |
