MSI 915P COMBO-FR User Guide - Page 86
KB - Good general purpose strip size
 |
UPC - 816909005899
View all MSI 915P COMBO-FR manuals
Add to My Manuals
Save this manual to your list of manuals |
Page 86 highlights
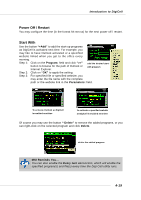
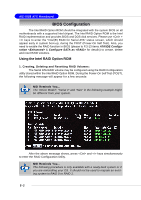
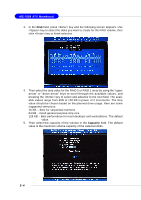
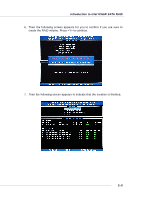
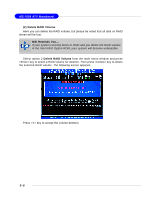
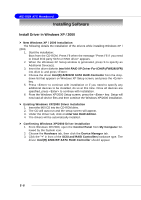
MS-7058 ATX Mainboard 3. In the Disk field, press key and the following screen appears. Use key to select the disks you want to create for the RAID volume, then click key to finish selection. 4. Then select the strip value for the RAID 0 or RAID 1 array by using the "upper arrow" or "down arrow" keys to scroll through the available values, and pressing the key to select and advance to the next field. The available values range from 4KB to 128 KB in power of 2 increments. The strip value should be chosen based on the planned drive usage. Here are some suggested selections: 16 KB - Best for sequential transfers 64 KB - Good general purpose strip size 128 KB - Best performance for most desktops and workstations. The default value. 5. Then select the capacity of the volume in the Capacity field. The default value is the maximum volume capacity of the selected disks. 5-4
-
 1
1 -
2
-
3
-
4
-
5
-
6
-
7
-
8
-
9
-
10
-
11
-
12
-
13
-
14
-
15
-
16
-
17
-
18
-
19
-
20
-
21
-
22
-
23
-
24
-
25
-
26
-
27
-
28
-
29
-
30
-
31
-
32
-
33
-
34
-
35
-
36
-
37
-
38
-
39
-
40
-
41
-
42
-
43
-
44
-
45
-
46
-
47
-
48
-
49
-
50
-
51
-
52
-
53
-
54
-
55
-
56
-
57
-
58
-
59
-
60
-
61
-
62
-
63
-
64
-
65
-
66
-
67
-
68
-
69
-
70
-
71
-
72
-
73
-
74
-
75
-
76
-
77
-
78
-
79
-
80
-
 81
81 -
 82
82 -
 83
83 -
 84
84 -
 85
85 -
 86
86 -
 87
87 -
 88
88 -
 89
89 -
 90
90 -
 91
91 -
92
-
93
-
94
-
95
-
96
-
97
-
98
-
99
-
100
-
101
-
102
-
103
-
104
-
105
-
106
-
107
-
108
-
109
-
110
-
111
-
112
-
113
-
114
-
115
-
116
-
117
-
118
-
119
-
120
-
121
-
122
-
123
-
124
-
125
-
126
-
127
-
128
-
129
-
130
-
131
-
132
-
133
 |
 |
