MSI Creator 17 User Manual
MSI Creator 17 Manual
 |
View all MSI Creator 17 manuals
Add to My Manuals
Save this manual to your list of manuals |
MSI Creator 17 manual content summary:
- MSI Creator 17 | User Manual - Page 1
User's Manual NOTEBOOK - MSI Creator 17 | User Manual - Page 2
India RoHS...1-7 Turkey EEE regulation 1-7 Ukraine restriction of hazardous substances 1-7 Vietnam RoHS...1-7 Upgrade and Warranty 1-8 Acquisition of Replaceable Parts 1-8 Safety Instructions...1-9 MSI Use Multiple Monitors 2-16 Application: True Color (optional 2-17 Specifications...2-18 1-2 - MSI Creator 17 | User Manual - Page 3
User's Manual How to Get Started 3-1 Begin to Use 3-13 How to Set Up Windows Hello Face Login 3-15 Create a Password 3-15 Set up a PIN...3-17 Set up a Facial Login with IR Camera 3-18 How to Use the Touchpad 3-20 About HDD and Windows 10 Operating System on MSI Notebooks 3-35 Video: How to Use - MSI Creator 17 | User Manual - Page 4
© Micro-Star Int'l Co., Ltd. All rights reserved. The MSI logo used is a registered trademark of Micro-Star Int'l Co respective owners. No warranty as to accuracy or completeness is expressed or implied. MSI reserves the right to make changes to this document without prior notice. Revision History ▶ - MSI Creator 17 | User Manual - Page 5
User's Manual FCC-B Radio , if not installed and used in accordance with the instructions, may cause harmful interference to radio communications. However, received, including interference that may cause undesired operation. MSI Computer Corp. 901 Canada Court, City of Industry, CA 91748, - MSI Creator 17 | User Manual - Page 6
. Replace only with the same or equivalent type recommended by the equipment manufacturer. Discard used batteries according to manufacturer's instructions. WEEE Statement European Union: Under the European Union ("EU") Directive on Waste Electrical and Electronic Equipment, Directive 2002/96 - MSI Creator 17 | User Manual - Page 7
categories of electronic products offered for sale after July 1, 2006. http://www.msi.com/html/popup/csr/cemm_jp.html http://tw.msi.com/html/popup/csr_tw/cemm_jp.html India RoHS This product complies with the "India E-waste (Management and Handling) Rule 2011" and prohibits use of lead, mercury - MSI Creator 17 | User Manual - Page 8
. It is recommended that you contact the authorized dealer or service center for product service information. Acquisition of Replaceable Parts Please be noticed that the contact the manufacturer via http:// www.msi.com/support/ for the detailed information about the acquisition of spare parts. 1-8 - MSI Creator 17 | User Manual - Page 9
Safety Instructions User's Manual Read the safety instructions carefully and thoroughly. All cautions and warnings on the equipment or user's manual should be use the AC/DC adapter and power cord approved by MSI, or a compatible one purchased from MSI. • Place the power cord in a way that people - MSI Creator 17 | User Manual - Page 10
case. If any of the following situations arises, get the equipment checked by a service personnel: • The power cord or plug is damaged. • Liquid has penetrated into the get it work according to User's Manual. • The equipment was dropped and damaged. • The equipment has obvious signs of breakage. - MSI Creator 17 | User Manual - Page 11
User's Manual Green Product Features • Reduced energy consumption during use and stand-by • Limited use for recycling and disposing of their end-of-life products. • Visit the MSI website and locate a nearby distributor for further recycling information. • Users may also reach us at gpcontdev - MSI Creator 17 | User Manual - Page 12
. SteelSeries Engine 3 is the Apps to combine frequently used functions for gamers in multiple devices management. Sound by Dynaudio on MSI Gaming Notebooks MSI partners with Dynaudio, the Danish sound specialists, in its gaming notebooks to present you an authentic fidelity audio performance. Color - MSI Creator 17 | User Manual - Page 13
Introductions User's Manual NOTEBOOK - MSI Creator 17 | User Manual - Page 14
box and packing materials in case you need to ship the unit in the future. The package should contain the following items: ▶ Notebook ▶ Quick Start Guide ▶ AC/DC adapter and AC power cord ▶ Optional carry bag 2-2 - MSI Creator 17 | User Manual - Page 15
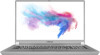
User's Manual Product Overview This section provides the description of basic aspects of the notebook. It will help you to know more about the appearance of this notebook before using it. Please be aware that the figures shown here are for reference only. Top-open View 2-3 - MSI Creator 17 | User Manual - Page 16
LED/ GPU Mode LED • Glowing white when the notebook power is turned on, and the UMA GPU mode is selected. • Glowing amber when the optionally supported discrete GPU mode is selected. • LED flashes when the notebook goes to the sleep state. • LED goes off when the notebook is turned off. 2. Keyboard - MSI Creator 17 | User Manual - Page 17
User's Manual 6. Webcam/ Webcam LED/ Internal Microphone • This built-in webcam can be used for picture taking, video recording or conferencing, and so on. • The built-in webcam may work as an IR Camera, which optionally supports infrared facial recognition function. Refer to How to Set Up Windows - MSI Creator 17 | User Manual - Page 18
. • LED turns amber while the battery is in low capacity status. • Continuously blinking if the battery fails. If the problem persists, please contact your local authorized retailer or service center. • Battery LED goes out when the battery is fully charged or when the AC/DC adapter is disconnected - MSI Creator 17 | User Manual - Page 19
Right Side View User's Manual 1. USB 3.2 Gen 2 Port (Type-C) USB 3.2 Gen 2, the SuperSpeed the notebook and charge the battery pack. Contact the local dealer for further and correct information. • Supports using a power bank to supply power to the notebook and charge the battery pack. Make sure - MSI Creator 17 | User Manual - Page 20
Introductions 4. USB 3.2 Gen1/ Gen 2 Port (optional) USB 3.2 Gen 1/ Gen 2, the SuperSpeed USB/ SuperSpeed USB 10Gbps, delivers the higher interface speeds for connecting various devices, such as storage devices, hard drives, or video cameras, and offers more advantages over high-speed data - MSI Creator 17 | User Manual - Page 21
Left Side View User's Manual 1. Power Connector This connector is to connect the AC/DC adapter and supply power for the notebook. 2. USB 3.2 Gen1/ Gen 2 Port (optional) USB 3.2 Gen 1/ Gen 2, - MSI Creator 17 | User Manual - Page 22
Introductions 5. RJ-45 Connector The Ethernet connector, with optionally supported transmitting rate of 10/100/1000 megabits per second, is used to connect a LAN cable for network connection. 6. Card Reader The built-in card reader supports various types of memory cards. Check the Specifications for - MSI Creator 17 | User Manual - Page 23
Rear Side View User's Manual 1. Ventilator The ventilator is designed to cool the system. DO NOT block the ventilator for air circulation. 2-11 - MSI Creator 17 | User Manual - Page 24
block the ventilator for air circulation. 3. Stereo Speakers This notebook may be equipped with built-in stereo speakers which deliver the high quality sound, and supports the HD audio technology. 2-12 - MSI Creator 17 | User Manual - Page 25
's Manual 4. SSD Slot 1 This notebook is equipped with a SSD M.2 slot that supports the SSD device with PCIe or SATA interface. It is always suggested to contact the authorized dealer or service center for product service. 5. SSD Slot 2 This notebook is equipped with a SSD M.2 slot that supports the - MSI Creator 17 | User Manual - Page 26
Introductions How to Use the Keyboard This notebook provides a full functioned keyboard. To ensure that the keyboard will be functioning properly, it is a must to install the necessary applications before using the keyboard function keys. Use the FN keys on the keyboard to activate the specific - MSI Creator 17 | User Manual - Page 27
User's Manual Enable Quick Fn Launch Keys • This notebook is equipped a set function on. • Webcam is turned off under default settings. Creator Center • This notebook may be pre-installing with a versatile utility, Creator Center, providing users an astonished and efficient solution in multitasking - MSI Creator 17 | User Manual - Page 28
Introductions Keyboard Backlight LED Settings Press repeatedly to select a keyboard backlight LED level according to your preference. LCD Settings • f9: Decrease the LCD brightness. • f10: Increase the LCD brightness. Switch Display Switch the display output mode between the LCD, external monitor - MSI Creator 17 | User Manual - Page 29
User's Manual Application: True Color (optional) This notebook may be pre-installed the True Color application. With this application, users can select various color Color application. + True Color Selections Press and hold the Fn key, and then press the A key to change different view modes. 2-17 - MSI Creator 17 | User Manual - Page 30
listed here is reference only, and may change without notice. The actual products sold are different from areas. Visit MSI official website at www.msi.com, or contact the local retailers to learn the correct specifications of the product user purchased. Physical Characteristic Dimension 396 - MSI Creator 17 | User Manual - Page 31
Manual Battery RTC Battery Storage SSD I/O Port USB (optional) USB ThunderboltTM 3 Audio Video LAN Card Reader Communication Port LAN Wireless LAN Bluetooth Display LCD Type 4-cell Yes 2 x M.2 slot, supports 1 x HDMI 1 x RJ-45 1 x SD6.0 Supported Supported Supported 17.3" FHD/ UHD LED panel 2-19 - MSI Creator 17 | User Manual - Page 32
Introductions Video Graphics VRAM Webcam Type (optional) Resolution Audio Internal Speakers • NVIDIA® GeForce® discrete graphics with NVIDIA® Optimus™ supported • Intel HD UMA graphics GDDR6, based on GPU structure IR camera HD 2 x stereo speakers 2-20 - MSI Creator 17 | User Manual - Page 33
How to Get Started User's Manual NOTEBOOK - MSI Creator 17 | User Manual - Page 34
How to Get Started Begin to Use the Notebook For a new user of this notebook, we would like to suggest you follow the illustrations below to begin to use the notebook. 1 2 3 4 3-2 - MSI Creator 17 | User Manual - Page 35
the following instructions to assure your own safety, and make yourself comfortable during the operations. ▶▶ Good illumination is essential in the work area. ▶▶ Choose a chair and desk with good ergonomics and adjust their heights according to your posture. ▶▶ Adjust the backrest to support your - MSI Creator 17 | User Manual - Page 36
How to Get Started How to Manage Power Supply This section provides users basic safety precautions to take when using an AC/DC adapter and battery power properly. AC/DC Adapter Ensure that your notebook is connected to an AC power source via the AC adapter before turning it on for the first time. If - MSI Creator 17 | User Manual - Page 37
User's Manual ▶▶ Battery type • This notebook may be equipped with a high-capacity Li-ion or Li-polymer battery pack depending on the model you have. • The rechargeable - MSI Creator 17 | User Manual - Page 38
power plan to meet your needs 8. To restore the selected power plan back to its default settings, click on [Restore plan defaults]. 9. Follow on-screen instructions to finish the configurations. 3-6 - MSI Creator 17 | User Manual - Page 39
User's Manual 3-7 - MSI Creator 17 | User Manual - Page 40
How to Get Started Create Your Own Power Plan You are allowed to create your own Power Plan and customize it to meet personal requirements. 1. Click [Create a power plan] in Power Options. 2. Select an existing plan that meets your needs most, and give the new power plan a name. Click [Next] to - MSI Creator 17 | User Manual - Page 41
User's Manual 3-9 - MSI Creator 17 | User Manual - Page 42
using fingerprint or facial recognition. The feature requires fingerprint reader or a infrared camera that supports it. Once you're set up, you'll be able to sign in with a quick swipe or glance. Follow below instructions to login with a touch. You need to set up a password and PIN code before - MSI Creator 17 | User Manual - Page 43
User's Manual 3-11 - MSI Creator 17 | User Manual - Page 44
How to Get Started Set up a PIN 1. In Sign-in options, click [Windows Hello PIN]. 2. Click [Add] to continue. 3. You may be asked to verify in your account with the password. Set up a PIN and then re-enter to confirm, click [OK] to close. 3-12 - MSI Creator 17 | User Manual - Page 45
User's Manual Set up a Fingerprint 1. In Sign-in options, click [Windows Hello Fingerprint]. 2. Click [Set up]. 3. Follow the Windows Hello setup wizards; click [Get started] button. 4. Place - MSI Creator 17 | User Manual - Page 46
How to Get Started 3-14 - MSI Creator 17 | User Manual - Page 47
10 devices using fingerprint or facial recognition. The feature requires fingerprint reader or a infrared camera that supports it. Once you're set up, you'll be able to sign in with a quick swipe or glance. Follow the instructions as below to login with a look. You need to set up a password and PIN - MSI Creator 17 | User Manual - Page 48
How to Get Started 3-16 - MSI Creator 17 | User Manual - Page 49
User's Manual Set up a PIN 1. In Sign-in options, click [Windows Hello PIN]. 2. Click [Add] to continue. 3. You may be asked to verify in your account with the password. Set up a PIN and then re-enter to confirm, click [OK] to close. 3-17 - MSI Creator 17 | User Manual - Page 50
How to Get Started Set up a Facial Login with IR Camera 1. In Sign-in options, click the [Set up] button under [Windows Hello Face]. 2. Follow the Windows Hello setup wizards; Click [Get started] button. 3. Position your face in the center of the frame that appears on screen. The camera will - MSI Creator 17 | User Manual - Page 51
User's Manual 3-19 - MSI Creator 17 | User Manual - Page 52
How to Get Started How to Use the Touchpad The touchpad integrated in your notebook is a pointing device that is compatible with standard mouse, allowing you to control the notebook by pointing the location of the cursor on the screen. ▶▶ Configure the Touchpad You can customize the pointing device - MSI Creator 17 | User Manual - Page 53
User's Manual ▶▶ Point and Click When you have moved and placed the cursor over remove or install the HDD and SSD when the notebook is powered on. Please consult an authorized retailer or service center for the replacement of the HDDs and SSDs. About M.2 SSD Slot The notebook may be equipped with - MSI Creator 17 | User Manual - Page 54
Wireless LAN Wireless LAN is a wireless broadband connection that allows you to connect to the Internet without using any cables. Follow the instructions as below to set up a Wireless LAN connection. 1. Open up Settings, find and click [Network & Internet]. 2. Select [Wi-Fi] within the Network - MSI Creator 17 | User Manual - Page 55
User's Manual 3-23 - MSI Creator 17 | User Manual - Page 56
connect to the Internet. Before setting up the connection of Dynamic IP/PPPoE or Broadband (PPPoE) or Static IP, contact your Internet Service Provider (ISP) or network administrator for assistance of setting up Internet connection. ▶▶ Dynamic IP/PPPoE Connection 1. Open up Settings, find and click - MSI Creator 17 | User Manual - Page 57
User's Manual 3-25 - MSI Creator 17 | User Manual - Page 58
How to Get Started 3-26 - MSI Creator 17 | User Manual - Page 59
User's Manual ▶▶ Broadband (PPPoE) Connection 1. Open up Settings, find and click [Network & Internet]. 2. Select [Ethernet] within the Network & Internet selection menu. 3. Select [Network and Sharing Center] to - MSI Creator 17 | User Manual - Page 60
How to Get Started 3-28 - MSI Creator 17 | User Manual - Page 61
User's Manual How to Set Up Bluetooth Connection Bluetooth pairing is a process in . 5. Select [Bluetooth]. 6. Choose and select a device to start pairing. 7. Give the passcode as instructed by the device waiting to be connected, and then click on [Connect] to continue and complete pairing. 3-29 - MSI Creator 17 | User Manual - Page 62
How to Get Started 3-30 - MSI Creator 17 | User Manual - Page 63
User's Manual 3-31 - MSI Creator 17 | User Manual - Page 64
, and mini DisplayPort. Users will be able to connect diverse peripheral devices to the notebook. To connect these devices, refer to the instruction manuals of each device first, and then connect the device to the notebook. This notebook is capable to auto detect the connected devices, and - MSI Creator 17 | User Manual - Page 65
data on multiple hard disk drives or solid state drives. Contact the local dealer for further and correct information and be noted that the supported RAID functions may vary depending on the models users purchased. Watch the instruction video at: https://youtu.be/u2C35-ctFbw YouTube Youku 3-33 - MSI Creator 17 | User Manual - Page 66
2. Move the cursor to [Boot] tab, and select [Boot mode select] in Boot Configuration. 3. For operating system supports UEFI-based BIOS (Windows 10), it is suggested to select [UEFI]. 4. Refer to MSI FAQ for further information about installing Windows operating system on the notebook at https://www - MSI Creator 17 | User Manual - Page 67
User's Manual Video: How to Restore Windows 10 Operating System on MSI Notebooks Watch the instruction video at: https://www.youtube.com/watch?v=hSrK6xAQooU, to restore the Windows 10 operating system by using [F3 Recovery] and [Windows 10 Settings] when it is needed. YouTube Youku 3-35 - MSI Creator 17 | User Manual - Page 68
Touch Install", the one-click installer application, allows users to efficiently install all needed drivers on MSI notebooks with single click. Watch the instruction video at: Windows 10/ 8.1: https://www.youtube.com/watch?v=ERItRaJUKQs Windows 7: https://www.youtube.com/watch?v=43lnM4m-500 YouTube - MSI Creator 17 | User Manual - Page 69
User's Manual 3-37 - MSI Creator 17 | User Manual - Page 70
-
 1
1 -
 2
2 -
 3
3 -
 4
4 -
 5
5 -
 6
6 -
 7
7 -
8
-
9
-
10
-
11
-
12
-
13
-
14
-
15
-
16
-
17
-
18
-
19
-
20
-
21
-
22
-
23
-
24
-
25
-
26
-
27
-
28
-
29
-
30
-
31
-
32
-
33
-
34
-
35
-
36
-
37
-
38
-
39
-
40
-
41
-
42
-
43
-
44
-
45
-
46
-
47
-
48
-
49
-
50
-
51
-
52
-
53
-
54
-
55
-
56
-
57
-
58
-
59
-
60
-
61
-
62
-
63
-
64
-
65
-
66
-
67
-
68
-
69
-
70
 |
 |

User's Manual
NOTEBOOK