Mackie FR800/FR1400/FR2500 FR Series Owner's Manual - Page 10
Fr Series Amplifiers
 |
View all Mackie FR800/FR1400/FR2500 manuals
Add to My Manuals
Save this manual to your list of manuals |
Page 10 highlights
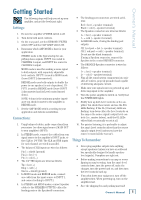
FR SERIES AMPLIFIERS 11. FAN VENTS Do not obstruct the ventilation openings of the amplifier. 12. SPEAKER OUTPUTS There are two options for connecting your speakers: binding posts and Speakon connectors. Normally, you would use either the binding posts or the Speakon connectors. Since the connectors are wired in parallel (e.g., CHANNEL 1 binding post and Speakon are in parallel, and CHANNEL 2 binding post and Speakon are in parallel), you can connect a speaker to each connector, as long as the total impedance per channel is two ohms or more. • There are no user-serviceable parts inside. Please refer to the "Repair" section on page 13 for instructions on how to proceed. 14. POWER CORD SOCKET Here is where you connect the detachable power cord included with your amplifier. Plug the other end of the power cord into an AC outlet properly configured with the voltage required for your particular model. Be sure the AC outlet can supply enough current to allow full power operation of all the amplifiers plugged into it. The outlet should be a three-prong socket that matches the power cord. • Two 8 ohm speakers in parallel equals 4 ohms. • Two 4 ohm speakers in parallel equals 2 ohms. When the amplifier is used in bridged mono mode, use either the center Speakon, or the two red binding posts to connect your single speaker. 13. BREAKER This is a resettable circuit breaker that monitors the amount of current being drawn by the amplifier. Under normal operating conditions, this should never pop. An unusual condition may cause the breaker to pop, such as a mains voltage surge occurring at the same time as a peak amplifier output. Turn the POWER switch off, and push the BREAKER button in to reset the circuit breaker. Turn the POWER switch back on and the amplifier should resume normal operation. If the circuit breaker pops again, something probably isn't right. • Make sure that the total impedance of the speakers connected to the outputs is 2 ohms or greater (per channel) in stereo mode, or 4 ohms or greater in bridged mode. • If the breaker pops right away, even with the Level controls turned down and the speakers disconnected, there may be something wrong inside the amplifier. 11 12 13 14 10 FR SERIES AMPLIFIERS
-
 1
1 -
2
-
3
-
4
-
 5
5 -
 6
6 -
 7
7 -
 8
8 -
 9
9 -
 10
10 -
 11
11 -
 12
12 -
 13
13 -
 14
14 -
 15
15 -
16
-
17
-
18
-
19
-
20
 |
 |
