Mackie Serial9 Installation Guide - Page 3
socket on the board.
 |
View all Mackie Serial9 manuals
Add to My Manuals
Save this manual to your list of manuals |
Page 3 highlights
Installation Guide 4) Remove the Phillips-head screw securing the MIDI card. Save the screw for installing the Serial•9 card. 4) Remove Screw from MIDI card bracket 6) Install the Serial•9 card in the MIDI slot. Secure it into place with the Phillips-head screw. RREEAARR PPAANNEELL 6a) Gently press the Serial•9 card into the slot 6b) Install Screw into Serial•9 card bracket ® MACKIE DESIGNS. ™ © 2000 ® MACKIE DESIGNS. ™ © 2000 FRONT PANEL 7) Replace the cover, reinstall the screws, and you're ready to go! 5) Remove the MIDI card by gently lifting up on the card and bracket to remove it from the socket on the board. 5) Remove MIDI card RREEAARR PPAANNEELL FRONT PANEL Installation Guide 3
-
 1
1 -
 2
2 -
 3
3 -
 4
4
 |
 |

3
Installation Guide
Installation Guide
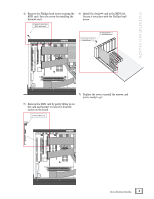
4)
Remove the Phillips-head screw securing the
MIDI card. Save the screw for installing the
Serial•9 card.
FRONT PANEL
REAR PANEL
®
4) Remove Screw from
MIDI card bracket
5)
Remove the MIDI card by gently lifting up on
the card and bracket to remove it from the
socket on the board.
FRONT PANEL
REAR PANEL
®
5) Remove MIDI card
6b) Install Screw into
Serial•9 card bracket
6a) Gently press the Serial•9
card into the slot
6)
Install the Serial•9 card in the MIDI slot.
Secure it into place with the Phillips-head
screw.
7)
Replace the cover, reinstall the screws, and
you’re ready to go!