Magellan Maestro 4000 Manual - English - Page 23
Accessing the Map Screen, Setting the Map Modes (2D or 3D), Panning on the Map
 |
UPC - 763357116939
View all Magellan Maestro 4000 manuals
Add to My Manuals
Save this manual to your list of manuals |
Page 23 highlights
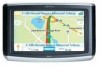
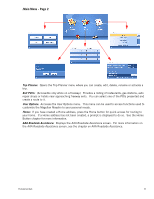
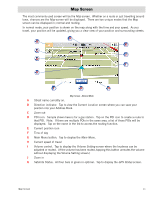
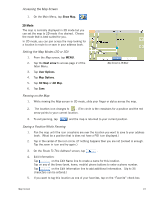
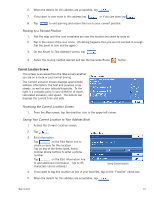
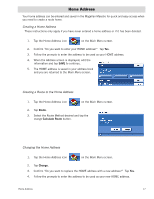
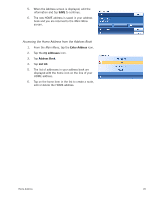
Accessing the Map Screen 1. On the Main Menu, tap Show Map. 2D Mode The map is normally displayed in 3D mode but you can set the map to 2D mode if so desired. Choose the mode that is best suited for you. In 2D mode, you can pan across the map looking for a location to route to or save in your address book. Setting the Map Modes (2D or 3D) 1. From the Map screen, tap MENU. 2. Tap the Next arrow to access page 2 of the Main Menu. 3. Tap User Options. 4. Tap Map Options. 5. Tap 3D Map or 2D Map. 6. Tap Save. Map Screen in 2D Mode Panning on the Map 1. While viewing the Map screen in 2D mode, slide your finger or stylus across the map. 2. The location icon changes to . (The circle is the crosshairs for a position and the red arrow points to your current location. 3. To exit panning, tap and the map is returned to your current position. Saving a Position While Panning 1. Pan the map until the icon crosshairs are over the location you want to save to your address book. (Must be a position that is does not have a POI icon displayed.) 2. Tap in the center of the icon circle. (If nothing happens then you are not zoomed in enough. Tap the zoom in icon and try again.) 3. On the Route To This Address? screen, tap . 4. Edit Information: Tap on the Edit Name line to create a name for this location. Tap on any of the three (work, home, mobile) phone buttons to enter a phone number. Tap on the Edit Information line to add additional information. (Up to 35 characters can be entered.) 5. If you want to tag this location as one of your favorites, tap on the "Favorite" check box. Map Screen 13
-
 1
1 -
2
-
3
-
4
-
5
-
6
-
7
-
8
-
9
-
10
-
11
-
12
-
13
-
14
-
15
-
16
-
17
-
 18
18 -
 19
19 -
 20
20 -
 21
21 -
 22
22 -
 23
23 -
 24
24 -
 25
25 -
 26
26 -
 27
27 -
 28
28 -
29
-
30
-
31
-
32
-
33
-
34
-
35
-
36
-
37
-
38
-
39
-
40
-
41
-
42
-
43
-
44
-
45
-
46
-
47
-
48
-
49
-
50
-
51
-
52
-
53
-
54
-
55
-
56
-
57
-
58
-
59
-
60
-
61
-
62
-
63
-
64
-
65
-
66
-
67
-
68
-
69
-
70
-
71
-
72
-
73
-
74
-
75
 |
 |