Magellan RoadMate 2200T Reference Manual
Magellan RoadMate 2200T - Automotive GPS Receiver Manual
 |
UPC - 763357116014
View all Magellan RoadMate 2200T manuals
Add to My Manuals
Save this manual to your list of manuals |
Magellan RoadMate 2200T manual content summary:
- Magellan RoadMate 2200T | Reference Manual - Page 1
Magellan® RoadMate™ Reference Manual Instructions for Operating the Magellan RoadMate 2200T - Magellan RoadMate 2200T | Reference Manual - Page 2
your state's Department of Motor Vehicles for information. • The battery in the Magellan RoadMate 2200T is rechargeable and should not be removed. In the event it should need to be replaced, please contact Magellan Technical Support. About Charging the Magellan RoadMate 2200T • Use only the AC - Magellan RoadMate 2200T | Reference Manual - Page 3
serviceable parts inside. Replace the Magellan RoadMate 2200T if it is damaged or exposed to excess moisture. About the Battery • Do not attempt to replace the battery. Please contact Magellan Technical Support for issues related to the battery. • Use the charger approved for your Magellan RoadMate - Magellan RoadMate 2200T | Reference Manual - Page 4
environment. End users must follow the specific operating instructions for satisfying RF exposure compliance. This transmitter must not manufacturer could void the user's authority to operate this equipment. The Magellan RoadMate 2200T must be installed and operated at a distance no closer then - Magellan RoadMate 2200T | Reference Manual - Page 5
the specific operating instructions for satisfying RF exposure compliance. This transmitter must not be co-located or operating in conjunction with any other antenna or transmitter. © 2006 Magellan Navigation, Inc. All rights reserved. The Magellan Logo, Magellan, Magellan RoadMate 2200T, Turn it on - Magellan RoadMate 2200T | Reference Manual - Page 6
Magellan RoadMate 2200T 1 What the Magellan RoadMate can do for you... 1 Magellan RoadMate Reference Manual 1 Magellan RoadMate 2200T 2 Magellan RoadMate 2200T Right Side View 3 Magellan RoadMate 2200T Left Side View 3 Magellan RoadMate 2200T Screens 4 Map Screen 4 Main Menu Screens 5 Main Menu - - Magellan RoadMate 2200T | Reference Manual - Page 7
26 Navigation Instruction 26 GPS Options 26 Backup and Restore 27 System Settings 28 Overview 28 Volume 28 Brightness 28 Power 28 Language 28 Time Zone 28 Unit of Measure 29 Product Information 29 Diagnosis 29 Additional Items 29 Battery Life 29 Contact Us 29 Magellan RoadMate Tools Installation - Magellan RoadMate 2200T | Reference Manual - Page 8
Longitude 31 Altitude 32 Opening a POI File 32 Creating a New POI FIle 33 Adding Individual POI's 33 Importing a Data FIle 35 Magellan RoadMate Music Manager 36 Magellan RoadMate Photo Manager 37 Music Player 38 Single Song Play 38 Multiple Song Play 39 Play 39 Create 39 Modify 39 Delete 39 Rename - Magellan RoadMate 2200T | Reference Manual - Page 9
the first time you are using the Magellan RoadMate you must follow the instructions provided in the Getting Started document to set the reset switch in the up position. Thank you for your purchase of the Magellan RoadMate 2200T. The Magellan RoadMate 2200T will be your perfect driving companion for - Magellan RoadMate 2200T | Reference Manual - Page 10
Magellan RoadMate can be turned on.] All connections to the Magellan RoadMate are located on the left and right sides of the unit, protected by a rubber covering to keep out moisture. When you need to access the connectors, simply lift the protective cover from the bottom. Magellan RoadMate 2200T - Magellan RoadMate 2200T | Reference Manual - Page 11
Magellan RoadMate 2200T Right Side View Power - Press and hold to turn the Magellan RoadMate on or off. (Note: The reset switch MUST be in the up position.) USB Connection - (under protective cover) Used for connecting to a personal computer to upgrade the firmware. Headphone Connector - (under - Magellan RoadMate 2200T | Reference Manual - Page 12
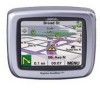
Magellan RoadMate 2200T Screens Map Screen The Map Screen is the most commonly used screen on the Magellan RoadMate. Whether you are getting directions or just driving around town, the Map screen will give you . When tapped repeats the last verbal instruction. Magellan RoadMate 2200T Screens 4 - Magellan RoadMate 2200T | Reference Manual - Page 13
indicating satellite signal strength. When tapped, zooms in the map display. When tapped displays the Satellite Status screen. Main Menu Screens The Main Menu has two modes; active route and Main Menu - Active Route 2 3 4 1 12 11 10 10 5 6 7 8 9 Magellan RoadMate 2200T Screens 5 - Magellan RoadMate 2200T | Reference Manual - Page 14
Menu for additional applications and system settings. Functional only when travelling on a multidestination trip. Provides access to tools to modify the trip you are on. Accesses the trip computer feature providing information about the trip that can be saved. Magellan RoadMate 2200T Screens 6 - Magellan RoadMate 2200T | Reference Manual - Page 15
route to a previous destination. Create a route to an intersection. Accesses the second page of the route main menu. Used to access additional map regions stored in the Magellan RoadMate. Accesses the options menu. Accesses the first page of the route main menu. Magellan RoadMate 2200T Screens 7 - Magellan RoadMate 2200T | Reference Manual - Page 16
and system settings. Used to access personal POIs created with the Magellan PC Toolkit screen displays the heading, distance to next maneuver, time to next maneuver and distance for the entire route. Tap the "X" in the upper right corner to return to the Map screen. Magellan RoadMate 2200T Screens - Magellan RoadMate 2200T | Reference Manual - Page 17
bar indicating the battery life available. (All green indicates a fully charged battery.) indicates that the Magellan RoadMate is connected to external power (optional AC adapter or +12vdc from the cigarette lighter adapter) and the battery is being charged. Magellan RoadMate 2200T Screens 9 - Magellan RoadMate 2200T | Reference Manual - Page 18
is done, the Magellan RoadMate will calculate the route using the guidelines you provide and displays the Map screen with information guiding you to your enter the closest possible address.) If using Search by Zip Code: Enter the zip code for the address and select the city from the list of - Magellan RoadMate 2200T | Reference Manual - Page 19
to select W. Main from the list of available streets. Creating a route using POIs POIs (points of interest) have been preloaded into the Magellan RoadMate for commonly used categories such as banks, restaurants, gas stations, etc. Following the steps provided you will be able to create a route to - Magellan RoadMate 2200T | Reference Manual - Page 20
you wish to go to. 7. Once the POI has been selected from the available list, select the routing method you want to use and the Magellan RoadMate will begin calculating the route. This is a sample list of POIs that meet the criteria set. The address and phone number is displayed to help - Magellan RoadMate 2200T | Reference Manual - Page 21
enter the address number for the street (it must fall within the street number range displayed at the top of the screen). If using Search by Zip Code: Enter the zip code for the address and select the city from the list of available cities. Spell the name of the street and select - Magellan RoadMate 2200T | Reference Manual - Page 22
at the top of the screen). If using Search by Zip Code: Enter the zip code for the address and screen). 6. Tap Save to store the home address. Create a route to the home address 1. From the Main Menu, tap Home. 2. Tap Route. 3. Select the routing method you want to use and the Magellan RoadMate - Magellan RoadMate 2200T | Reference Manual - Page 23
3. Select the desired destination from the list of previous destinations. 4. Tap Edit. 5. (Optional) Edit the name of the address by tapping on top line of the address. 6. (Optional) Tap the Favorite check box to add this address to your list of favorite addresses. 7. Tap Save. 8. Tap Route to begin - Magellan RoadMate 2200T | Reference Manual - Page 24
to the Main Menu if you are done. Creating a new address 1. From the Main Menu, tap Address Book. 2. Tap Create New Entry 3. Select Select on Map, Select Address, Dining, ATM, Gas.. or Intersection. Creating Routes 16 - Magellan RoadMate 2200T | Reference Manual - Page 25
map you want, tap on the crosshair cursor. Select Address: Follow the instuctions for selecting an address, either by city, zip code or previous cities. Dining, ATM, Gas...: Follow the instructions the street number range displayed at the top of the screen). 4. With the city selected, enter the name - Magellan RoadMate 2200T | Reference Manual - Page 26
5. Enter the name of the second street. When given the list of streets, select the desired one from the list of available streets. 6. Select the desired route method. Creating Routes 18 - Magellan RoadMate 2200T | Reference Manual - Page 27
screen. 8. The first destination has been added to the trip. To add more destinations, tap on the destination in the Trip List and select Add. Using the instructions the Menu. 2. Select Trip Planner. 3. Select Guide Me. 4. Select the Trip to be activated from the list of saved trips. Using the - Magellan RoadMate 2200T | Reference Manual - Page 28
5. A list of the individual destinations is displayed. Tap on the first destination on the list to activate the trip. 6. Select the routing method to compute the trip. Editing a multiple destination trip You can also pick which destination to begin the trip on, skipping over destinations prior to - Magellan RoadMate 2200T | Reference Manual - Page 29
Deleting a multiple destination trip 1. From the Main Menu, tap to go to page 2 of the Menu. 2. Select Trip Planner. 3. Select Delete, Rename. 4. Select Delete. 5. Select the Trip to be deleted from the list of saved trips. 6. Confirm the deletion by tapping Yes. Renaming a multiple destination - Magellan RoadMate 2200T | Reference Manual - Page 30
Enhanced POIs Overview Personal POIs can be created using the Magellan RoadMate PC Toolkit and loaded into your Magellan RoadMate using an optional SD card. The Enhanced POI option Parameters. 3. Tap on the category you want set the parameters for. Magellan RoadMate 2200T Enhanced POIs 22 - Magellan RoadMate 2200T | Reference Manual - Page 31
the Favoitie checkbox. 9. Tap Save. 10. You can now route to this POI by tapping Route or return to the main menu by tapping Cancel. Magellan RoadMate 2200T Enhanced POIs 23 - Magellan RoadMate 2200T | Reference Manual - Page 32
Portions of the Magellan RoadMate are customizable to your needs. To access the User Options menu, select Options from page 2 of the Main Menu and select the option you want to change. POI Selection In POI Selection you can select which POI icons will be displayed on the Map screen Check the POI - Magellan RoadMate 2200T | Reference Manual - Page 33
-routing is on. Detour Options The Magellan RoadMate detects when you are on a route and you are moving slowly or not moving at all on a freeway. It then provides you with the option of detouring around the problem area. It can alert you visually on the map by displaying the detour icon or you - Magellan RoadMate 2200T | Reference Manual - Page 34
it is having problems getting GPS signals. You will be prompted to enter an address for your present location that the Magellan RoadMate can base its satellite search from. (It is extremely unlikely that you will ever need to use this option unless instructed to do so by a service technician if you - Magellan RoadMate 2200T | Reference Manual - Page 35
and Restore Backup and Restore will save (backup) all of your address, trips, and option settings to an SD card installed in the Magellan RoadMate. You can then upload (restore) this information in the future should you lose the information or accidently clear the addresses. Setting User Options - Magellan RoadMate 2200T | Reference Manual - Page 36
Magellan RoadMate. The following is a listing of the accessible settings. From the Main Menu screen, tap on the Application Menu icon and then the System internal battery only. This will lengthen the usable battery life between battery charging. Power This setting tells the Magellan RoadMate how - Magellan RoadMate 2200T | Reference Manual - Page 37
information about the software and firmware installed in the Magellan RoadMate. Also shown is the unique serial number for the receiver. Diagnosis Provides a way to diagnose the audio, touchscreen or video portions of the Magellan RoadMate. Additional Items Battery Life A battery charge indicator is - Magellan RoadMate 2200T | Reference Manual - Page 38
Tools application enables you to create custom POI's and load them onto the SD card in your Magellan RoadMate 2200T. Installing the Software 1. Insert the Magellan RoadMate Tools PC Application CD into your PC's CD drive. 2. The setup application will begin automatically. If it does not, browse - Magellan RoadMate 2200T | Reference Manual - Page 39
POI Manager enables you to transfer custom points of interest files from your computer to your Magellan RoadMate 2200T. Before we add any custom POI's to the Magellan RoadMate 2200T, you should understand how the POI Manager plots POIs. Latitude Latitude can be expressed by dividing Earth - Magellan RoadMate 2200T | Reference Manual - Page 40
small end of the USB cable into the USB port on your Magellan RoadMate 2200T, and the large end into an available USB port on your computer. Launch the Magellan RoadMate PC Tools application. From the Magellan RoadMate Tools screen, click on POI. The left side of the window shows the contents of - Magellan RoadMate 2200T | Reference Manual - Page 41
a file, the Copy To Unit arrow will turn green. Click on the arrow to copy the file to your Magellan RoadMate 2200T. When you have finished copying files, remove the USB cable from the Magellan RoadMate 2200T. Creating a New POI FIle There are two ways to create a POI file. You can either add POI - Magellan RoadMate 2200T | Reference Manual - Page 42
range of alert in degrees from the POI. Select Activate alert for this category to enable the alert settings. When you have finished, select OK. Magellan RoadMate POI Manager 34 - Magellan RoadMate 2200T | Reference Manual - Page 43
Importing a Data FIle The POI Manager software supports ASCII file format (.ASC,.CSV,.TXT); GPS Exchange file format (.GPS,.XML); Magellan Waypoint file format (.WPT,.RTE); and Garmin PCX5 Waypoint (right arrow) to upload the file to your Magellan RoadMate 2200T. Magellan RoadMate POI Manager 35 - Magellan RoadMate 2200T | Reference Manual - Page 44
the small end of the USB cable into the USB port on your Magellan RoadMate 2200T and the large end into an available USB port on your computer. Launch the Magellan RoadMate Tools application. From the Magellan RoadMate Tools screen, click on Music. The left side of the window shows the contents of - Magellan RoadMate 2200T | Reference Manual - Page 45
the small end of the USB cable into the USB port on your Magellan RoadMate 2200T, and the large end into an available USB port on your computer. Launch the Magellan RoadMate Tools application. From the Magellan RoadMate Tools screen, click on Photo. The left side of the window shows the contents of - Magellan RoadMate 2200T | Reference Manual - Page 46
Toolkit to load music files onto the SD Card. Press the MENU key on the Magellan RoadMate 2200T and select the Music Player. . The Music Player control pad will appear. Single Song Play Select Browse Music Use the Navigation key or the Down arrow wish to play and press OK. to select the song - Magellan RoadMate 2200T | Reference Manual - Page 47
the keypad to enter a new name for your playlist. When you have finished, select OK. The next screen to appear shows the song files stored on the memory card on the left side, and the playlist on asking to confirm your selection. Select Yes to delete the playlist. Magellan RoadMate Music Player 39 - Magellan RoadMate 2200T | Reference Manual - Page 48
Equalizer Select the equalizer preset by pressing the button at the top of the screen . When you are satisfied with your selection, select OK. To exit without setting the equalizer, select ESC. Help Select Help for descriptions of the Music Player buttons. Magellan RoadMate Music Player 40 - Magellan RoadMate 2200T | Reference Manual - Page 49
Photo viewer will show the contents of the SD or MMC card installed in your Magellan RoadMate 2200T. View Single Photo The next screen to appear shows the file structure of the memory card. Select List Files . Use the Navigation key or the Down arrow to highlight the photo you wish to view and - Magellan RoadMate 2200T | Reference Manual - Page 50
through all the photos in the Pictures folder automatically. Pan If you enlarge an image beyond the screen boundaries, press the Pan button to enable image scrolling. While enabled, you can drag the image the width and height in pixels, the size, and the format Magellan RoadMate Photo Viewer 42 - Magellan RoadMate 2200T | Reference Manual - Page 51
will appear asking to confirm your selection. Select Yes to delete the file. About This option will display the current version of the Photo Viewer software. Magellan RoadMate Photo Viewer 43 - Magellan RoadMate 2200T | Reference Manual - Page 52
-5000 (outside the United States) You may also reach Technical Support by Fax: (909) 494-7777 [Attn: Tech. Support]; or E-Mail: [email protected] Warranty Service To obtain warranty service on your Magellan RoadMate 2200T, you must contact us for a return authorization (RA) before you
-
 1
1 -
 2
2 -
 3
3 -
 4
4 -
 5
5 -
 6
6 -
 7
7 -
8
-
9
-
10
-
11
-
12
-
13
-
14
-
15
-
16
-
17
-
18
-
19
-
20
-
21
-
22
-
23
-
24
-
25
-
26
-
27
-
28
-
29
-
30
-
31
-
32
-
33
-
34
-
35
-
36
-
37
-
38
-
39
-
40
-
41
-
42
-
43
-
44
-
45
-
46
-
47
-
48
-
49
-
50
-
51
-
52
 |
 |

Magellan
®
RoadMate
™
Reference Manual
Instructions for Operating the
Magellan RoadMate 2200T