Magnavox MCR140 User Manual - Page 6
Set Time/alarm Off - alarm clock radio
 |
UPC - 609585109124
View all Magnavox MCR140 manuals
Add to My Manuals
Save this manual to your list of manuals |
Page 6 highlights
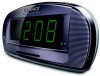
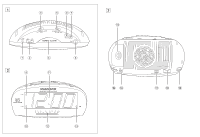
CLOCK MEMORY BACKUP The clock memory backup allows your alarm and clock time settings to be stored for up to a day when there is a power interruption e.g. power failure. The complete clock radio and display illumination will be switched off. As soon as the power supply returns, the display will indicate the correct time. 1 Remove the battery door to insert a 9 volts 6F22 type battery (not included) for backup. 2 Replace the battery door. NOTE: If no backup battery is installed or the power interruption is prolonged, you will need to set the clock and alarm times again. Batteries contain chemical substances so they should be disposed of properly. Standby power consumption 2W RADIO You can use this set solely as a radio! 1 Adjust OFF/ ON/ AUTO/ BUZZ to ON to switch on the radio. 2 Select your waveband by adjusting the FM/AM switch. 3 Adjust TUNING to tune to your desired station. 4 Turn the VOLUME control to adjust the volume level. 5 Adjust OFF/ ON/ AUTO/ BUZZ to OFF to switch off the radio. To improve reception: FM: use the antenna built in the power cord. Adjust the position of the power cord for optimum reception. AM: uses a built-in antenna inside the set. Direct the antenna by adjust- ing the position of your set. SETTING THE CLOCK TIME The time is displayed using the 12-hour clock with PM indicator (PM off = AM). 1 Hold down SET TIME/ALARM OFF. 2 Press TIME SET 3 or 4 repeatedly, or hold down TIME SET 3 or 4 to adjust minute and/or hour. - TIME SET 3 : to adjust time fast forward - TIME SET 4 : to adjsut time back 3 Release SET TIME/ALARM OFF and TIME SET 3 or 4 when you reach the correct setting. ™ The set clock time will show on the display and start to run. USING THE ALARM This set allows you to set one alarm (alarm 1 or alarm 2), or set two alarms simultaneously. This set also offers you two alarm modes: Auto (radio) and Buzz. SETTING THE ALARM TIME 1 Hold down SET ALARM 1 or SET ALARM 2 2 Press TIME SET 3 or 4 repeatedly, or hold down TIME SET 3 or 4 to adjust minute and/or hour. 3 Release SET ALARM 1 or SET ALARM 2, and TIME SET 3 or 4 when you reach the desired time setting. The display will return to the clock time. SELECTING THE ALARM MODE 1 Adjust AL1/AL2/AL1+2 to AL1 (alarm 1), or AL2 (alarm 2), or AL1+2 (alarm 1 + alarm 2) . 2 Select your choice of alarm mode by adjusting OFF/ ON/ AUTO/ BUZZ to AUTO or BUZZ. ™ The corresponding alarm indicator(s) will light up. Helpful Hint: • If you have selected the radio mode, make sure you have adjusted the volume loud enough to wake you. • The buzzer is set at a fixed volume and cannot be adjusted.
-
 1
1 -
 2
2 -
 3
3 -
 4
4 -
 5
5 -
 6
6 -
 7
7 -
 8
8
 |
 |
