Magnavox MDV453 Quick Start Guide - Page 1
Magnavox MDV453 Manual
 |
UPC - 037849937457
View all Magnavox MDV453 manuals
Add to My Manuals
Save this manual to your list of manuals |
Page 1 highlights
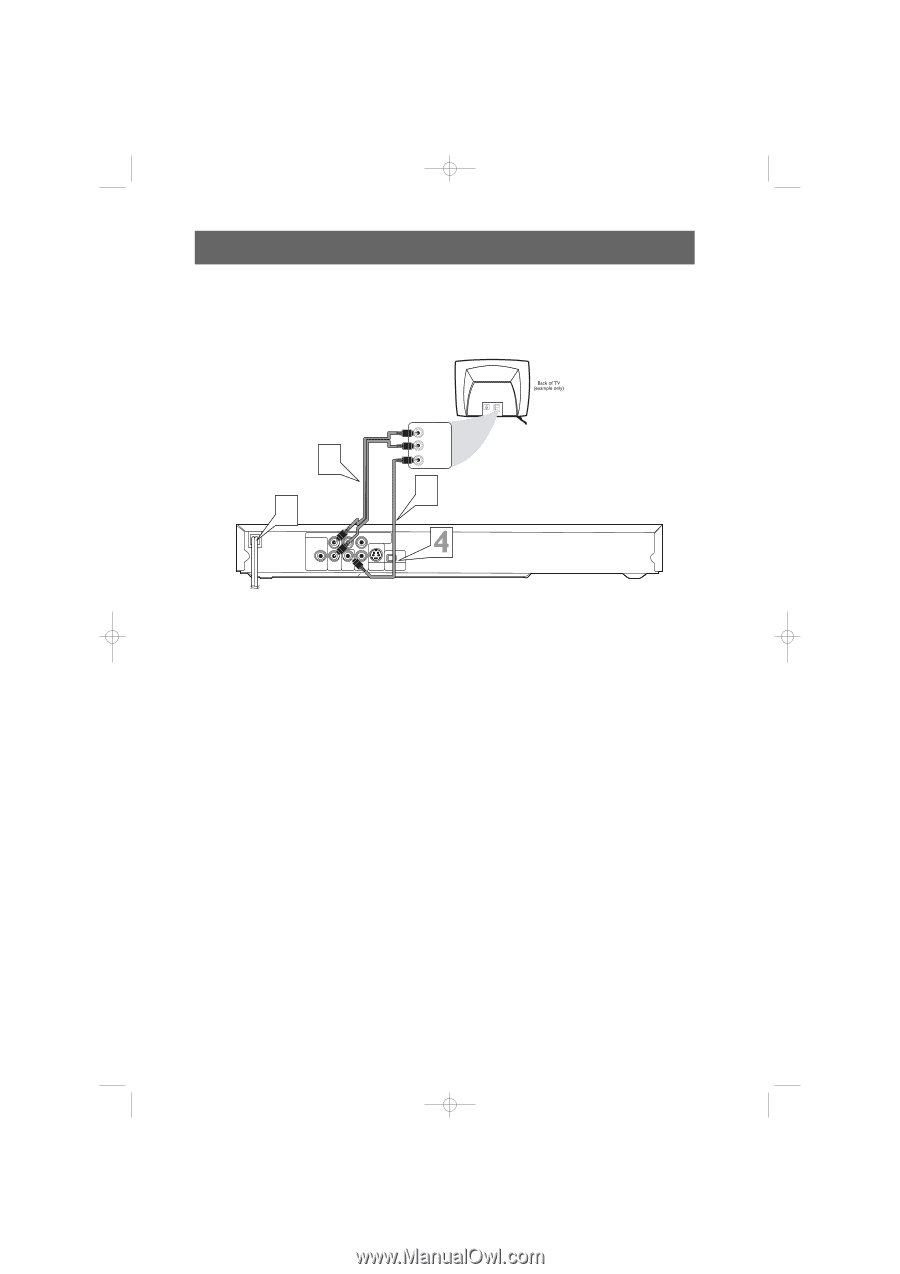
453qug 15/04/2003 6:01 PM Page 1 Quick-Use Guide There are many ways to connect your new DVD Player to your Television and other equipment. This Quick-Use Guide shows the easiest, most common connection between the DVD Player and a TV using the supplied audio and video cables. Higher quality connections are explained in the accompanying owner's manual and will provide better sound or picture if your TV and/or audio system is compatible. 3 5 LEFT AUDIO IN RIGHT AUDIO IN VIDEO IN 2 AUDIO OUT L DIGITAL AUDIO OUT PCM / BITSTREAM Y Pr/Cr COMPONENT VIDEO OUT IP COAXIAL R VIDEO Pb/Cb S-VIDEO PROGRESSIVE OUT OUT 1 Disconnect all equipment from the power outlets. Connect the equipment to the power outlets only after you have finished hooking up everything. Never make or change connections with equipment connected to the power outlet. 2 Connect the yellow VIDEO OUT jack on the rear of the DVD Player to the corresponding VIDEO IN jack on your TV. Use the supplied video cable, which has yellow ends. On the TV, the VIDEO IN jack is usually yellow and might be labeled video, CVBS, composite, or baseband. 3 Connect the supplied audio cable to the red and white AUDIO OUT (right and left) jacks on the rear of the DVD Player and to the right/left AUDIO IN jacks on the TV. The supplied audio cable has red and white ends. Match the cable colors to the jack colors. On the TV, the AUDIO IN jacks are usually labeled Audio.The red jack is the right (stereo channel) and the white jack is the left (stereo channel). 4 Set the INTERLACE/PROGRESSIVE SCAN switch to INTERLACE (I). 5 Plug the power cords of the DVD Player and the TV into an active power outlet. Press the STANDBY-ON 2 button on the front of the DVD Player or the remote control to turn on the DVD Player. 6 Turn on the TV power. Set the TV to the correct Video In channel. Such channels may be called AUX or AUXILIARY IN, AUDIO/VIDEO or A/V IN, EXT1 or EXT2 or External In, etc.These channels are often near channel 00. Or, your TV's remote control may have a switch or button that lets you select a VIDEO setting. See your TV manual for details. Or, go to your lowest TV channel and change TV channels down until you see the DVD logo on the TV screen. Remember... q Connect the Player directly to the TV. For example, do not connect the DVD Player to a VCR, then connect the VCR to a TV.This type of connection may distort the picture and sound or give you a black and white picture. Also, your VCR might have the copy protection system, which could distort the DVD image or prevent playback of some Discs. q If your TV does not have red, white, and yellow Audio and Video In jacks, refer to the DVD Player's owner's manual for other hookup options. If your TV only has a single Antenna In or RF In jack, you will need an RF modulator. See the owner's manual for connection details.
-
 1
1 -
 2
2
 |
 |