Magnavox MRD210 User Manual - Page 12
Functional Overview - subwoofer
 |
UPC - 037849935385
View all Magnavox MRD210 manuals
Add to My Manuals
Save this manual to your list of manuals |
Page 12 highlights
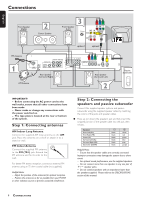
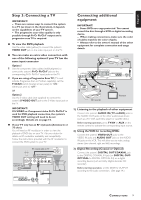
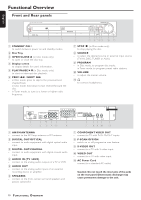
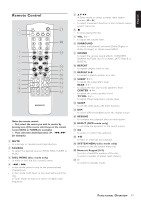
English Functional Overview Front and Rear panels DVD VIDEO DIGITAL SURROUND SYSTEM STANDBY ON OPEN•CLOSE 1 2 3 1 STANDBY ON y - to switch between power on and standby modes. 2 Disc Tray 3 OPEN•CLOSE 0 (in Disc mode only) - to open or close the disc tray. 4 Display screen - to display details for user's information. 5 PLAY/PAUSEÉÅ (in Disc mode only) - to start or interrupt disc playback. 6 PREV S / NEXT T - in Disc mode, press to skip to the previous/next chapter/track. - in Disc mode, hold down to fast reverse/forward the disc. - in Tuner mode, to tune to a lower or higher radio frequency. PROGRESSIVE SCAN PLAY•PAUSE STOP PROGRAM PREV NEXT SOURCE VOLUME 4 5 6789 0 ! 7 STOP Ç (in Disc mode only) - to stop playing the disc. 8 SOURCE - to select the desired source or external input source (TV/AV, DISC, TUNER or AUX.) 9 PROGRAM - in Disc mode, to program disc tracks. - in Tuner mode, to program preset radio stations. 0 VOLUME - to adjust the master volume. !n - to connect headphones. AM/FM ANTENNA DIGITAL OUT AUDIO IN AUDIO OUT L FR FL C SR SL SUBW + + R OPTICAL COAXIAL AUX TV SPEAKERS (8 ) COMPONENT VIDEO OUT Pr/Cr Pb/Cb Y P-SCAN OFF ON S-VIDEO VIDEO OUT OUT 1 2 3 45 6 7 8 90 ! 1 AM/FM ANTENNA - connect to the AM loop antenna or FM antenna. 2 DIGITAL OUT-OPTICAL - connect to audio equipment with digital-optical audio input. 3 DIGITAL OUT-COAXIAL - connect to audio equipment with digital-coaxial audio input. 4 AUDIO IN (TV / AUX) - connect to the analog audio outputs of a TV or VCR. 5 AUDIO OUT - connect to the analog audio inputs of an external recording device or amplifier. 6 SPEAKERS - connect to the front, center, surround speakers and passive subwoofer. 7 COMPONENT VIDEO OUT - connect to TV with Pr/Cr Pb/Cb Y inputs. 8 P-SCAN OFF/ON - switch on or off progressive scan feature. 9 S-VIDEO OUT - connect to a TV with S-video input. 0 VIDEO OUT - connect to a TV with video input. ! AC Power Cord - connect to a standard AC outlet. Caution: Do not touch the inner pins of the jacks on the rear panel. Electrostatic discharge may cause permanent damage to the unit. 10 FUNCTIONAL OVERVIEW
-
 1
1 -
2
-
3
-
4
-
5
-
6
-
 7
7 -
 8
8 -
 9
9 -
 10
10 -
 11
11 -
 12
12 -
 13
13 -
 14
14 -
 15
15 -
 16
16 -
 17
17 -
18
-
19
-
20
-
21
-
22
-
23
-
24
-
25
-
26
-
27
-
28
-
29
 |
 |
