Makita 5740NB Owners Manual - Page 9
Functional, Description
 |
View all Makita 5740NB manuals
Add to My Manuals
Save this manual to your list of manuals |
Page 9 highlights
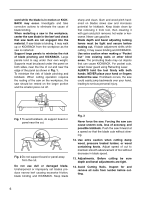
FUNCTIONAL DESCRIPTION CAUTION: • Always be sure that the tool is switched off and unplugged before adjusting or checking function on the tool. 1 1. Clamping screw 2. Depth guide 001343 Adjusting depth of cut CAUTION: • After adjusting the depth of cut, always tighten the clamping screw securely. Loosen the clamping screw on the depth guide and move the 2 base up or down. At the desired depth of cut, secure the base by tightening the clamping screw. For cleaner, safer cuts, set cut depth so that no more than one blade tooth projects below workpiece. Using proper cut depth helps to reduce potential for dangerous KICKBACKS which can cause personal injury. 001361 1 Bevel cutting Loosen the clamping screw on the bevel scale plate on the front of the base. Set for the desired angle (0° - 45°) by tilting accordingly, then tighten the clamping screw securely. 2 1. Clamping screw 2. Bevel scale plate B 3 2 1 45 001378 A 1 0 1 Sighting For straight cuts, align the A position on the front of the base with your cutting line. For 45° bevel cuts, align the B position with it. 1. Base 9
-
 1
1 -
2
-
3
-
 4
4 -
 5
5 -
 6
6 -
 7
7 -
 8
8 -
 9
9 -
 10
10 -
 11
11 -
 12
12 -
 13
13 -
 14
14 -
15
-
16
 |
 |
