Makita BCS550Z Owners Manual - Page 8
Maintenance - metal cutter
 |
View all Makita BCS550Z manuals
Add to My Manuals
Save this manual to your list of manuals |
Page 8 highlights
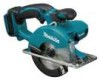
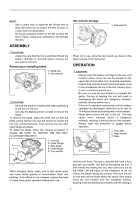
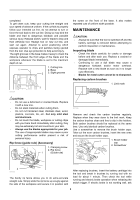
completed. To get clean cuts, keep your cutting line straight and your speed of advance uniform. If the cut fails to properly follow your intended cut line, do not attempt to turn or force the tool back to the cut line. Doing so may bind the blade and lead to dangerous kickback and possible serious injury. Release switch, wait for blade to stop and then withdraw tool. Realign tool on new cut line, and start cut again. Attempt to avoid positioning which exposes operator to chips and particles being ejected from the tool. Use eye protection to help avoid injury. The sight grooves in the base makes it easy to check the distance between the front edge of the blade and the workpiece whenever the blade is set to the maximum depth of cut. 1. Cutting line 1 2. Base 2 3. Sight grooves 3 007534 the screw on the front of the base. It also makes repeated cuts of uniform width possible. MAINTENANCE CAUTION: • Always be sure that the tool is switched off and the battery cartridge is removed before attempting to perform inspection or maintenance. Inspecting blade • Check the blade carefully for cracks or damage before and after each use. Replace a cracked or damaged blade immediately. • Continuing to use a dull blade may cause a dangerous kickback and/or motor overload. Replace with a new blade as soon as it no longer cuts effectively. • Blades for metal cutter cannot be re-sharpened. Replacing carbon brushes 1. Limit mark CAUTION: • Do not use a deformed or cracked blade. Replace it with a new one. • Do not stack materials when cutting them. • Do not cut hardened steel, stainless steel, wood, plastics, concrete, tile, etc. Cut only mild steel and aluminum. • Do not touch the blade, workpiece or cutting chips with your bare hand immediately after cutting, they may be extremely hot and could burn your skin. • Always use the blades appropriate for your job. The use of inappropriate blades may cause a poor cutting performance and/or present a risk of personal injury. Rip fence (guide rule) (Accessory) 1. Clamping screw 2. Rip fence 1 (Guide rule) 1 001145 Remove and check the carbon brushes regularly. Replace when they wear down to the limit mark. Keep the carbon brushes clean and free to slip in the holders. Both carbon brushes should be replaced at the same time. Use only identical carbon brushes. Use a screwdriver to remove the brush holder caps. Take out the worn carbon brushes, insert the new ones and secure the brush holder caps. 1 1. Brush holder cap 2. Screwdriver 2 2 007532 The handy rip fence allows you to do extra-accurate straight cuts. Simply slide the rip fence up snugly against the side of the workpiece and secure it in position with 007533 After replacing brushes, insert the battery cartridge into the tool and break in brushes by running tool with no load for about 1 minute. Then check the tool while running and electric brake operation when releasing the switch trigger. If electric brake is not working well, ask 8
-
 1
1 -
2
-
 3
3 -
 4
4 -
 5
5 -
 6
6 -
 7
7 -
 8
8 -
 9
9 -
 10
10 -
 11
11 -
 12
12 -
 13
13 -
14
-
15
-
16
-
17
-
18
-
19
-
20
-
21
-
22
-
23
-
24
-
25
-
26
-
27
-
28
-
29
-
30
-
31
-
32
 |
 |