Makita BTL063Z Owners Manual - Page 6
Operation
 |
View all Makita BTL063Z manuals
Add to My Manuals
Save this manual to your list of manuals |
Page 6 highlights
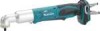
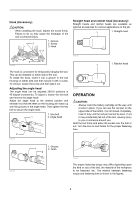
Hook (Accessory) CAUTION: • When installing the hook, tighten the screw firmly. Failure to do so may cause the breakage of the tool or personal injury. 1. Groove 1 2. Screw 3. Hook 2 Straight head and ratchet head (Accessory) Straight heads and ratchet heads are available as optional accessories for various applications on the job. 1 1. Straight head 002828 3 008338 1 1. Ratchet head The hook is convenient for temporarily hanging the tool. This can be installed on either side of the tool. To install the hook, insert it into a groove in the tool housing on either side and then secure it with a screw. To remove, loosen the screw and then take it out. Adjusting the angle head The angle head can be adjusted 360°(8 positions in 45-degree increments). To adjust it, loosen the hex bolt and remove the angle head. Adjust the angle head to the desired position and reinstall it so that the teeth on the housing will match up with the grooves in the angle head. Then tighten the hex bolt to secure the angle head. 1. Hex bolt 1 2. Angle head 2 008335 002829 OPERATION CAUTION: • Always insert the battery cartridge all the way until it locks in place. If you can see the red part on the upper side of the button, it is not locked completely. Insert it fully until the red part cannot be seen. If not, it may accidentally fall out of the tool, causing injury to you or someone around you. Hold the tool firmly and place the socket over the bolt or nut. Turn the tool on and fasten for the proper fastening time. 008336 1. Groove 1 2. Tooth 2 008497 The proper fastening torque may differ depending upon the kind or size of the bolt, the material of the workpiece to be fastened, etc. The relation between fastening torque and fastening time is shown in the figures. 6
-
 1
1 -
 2
2 -
 3
3 -
 4
4 -
 5
5 -
 6
6 -
 7
7 -
 8
8 -
 9
9 -
 10
10 -
 11
11 -
 12
12 -
13
-
14
-
15
-
16
-
17
-
18
-
19
-
20
-
21
-
22
-
23
-
24
-
25
-
26
-
27
-
28
 |
 |
