Makita CT233R SH02 Instruction Manual - Page 10
Maintenance, Optional, Accessories
 |
View all Makita CT233R manuals
Add to My Manuals
Save this manual to your list of manuals |
Page 10 highlights
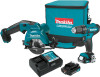
NOTE: When the battery cartridge temperature is low, the tool may not work to its full capacity. At this time, for example, use the tool for a light-duty cut for a while until the battery cartridge warms up as high as room temperature. Then, the tool can work to its full capacity. Hold the tool firmly. The tool is provided with both a front grip (motor housing) and rear handle. Use both to best grasp the tool. If both hands are holding saw, they cannot be cut by the circular saw blade. Set the base on the workpiece to be cut without the circular saw blade making any contact. Then turn the tool on and wait until the circular saw blade attains full speed. Now simply move the tool forward over the workpiece surface, keeping it flat and advancing smoothly until the sawing is completed. To get clean cuts, keep your sawing line straight and your speed of advance uniform. If the cut fails to properly follow your intended cut line, do not attempt to turn or force the tool back to the cut line. Doing so may bind the circular saw blade and lead to dangerous kickback and possible serious injury. Release switch, wait for circular saw blade to stop and then withdraw tool. Realign tool on new cut line, and start cut again. Attempt to avoid positioning which exposes operator to chips and wood dust being ejected from saw. Use eye protection to help avoid injury. Rip fence (Guide rule) Optional accessory The handy rip fence allows you to do extra-accurate straight cuts. Simply slide the rip fence up snugly against the side of the workpiece and secure it in position with the screw on the front of the base. It also makes repeated cuts of uniform width possible. 10 ENGLISH MAINTENANCE CAUTION: Always be sure that the tool is switched off and the battery cartridge is removed before attempting to perform inspection or maintenance. CAUTION: Clean out the upper and lower guards to ensure there is no accumulated sawdust which may impede the operation of the lower guarding system. A dirty guarding system may limit the proper operation which could result in serious personal injury. The most effective way to accomplish this cleaning is with compressed air. If the dust is being blown out of the guards be sure the proper eye and breathing protection is used. NOTICE: Never use gasoline, benzine, thinner, alcohol or the like. Discoloration, deformation or cracks may result. To maintain product SAFETY and RELIABILITY, repairs, any other maintenance or adjustment should be performed by Makita Authorized or Factory Service Centers, always using Makita replacement parts. OPTIONAL ACCESSORIES CAUTION: These accessories or attachments are recommended for use with your Makita tool specified in this manual. The use of any other accessories or attachments might present a risk of injury to persons. Only use accessory or attachment for its stated purpose. If you need any assistance for more details regarding these accessories, ask your local Makita Service Center. • Circular saw blade • Rip fence (Guide rule) • Hex wrench • Dust nozzle • Makita genuine battery and charger NOTE: Some items in the list may be included in the tool package as standard accessories. They may differ from country to country. MAKITA LIMITED ONE YEAR WARRANTY Warranty Policy Every Makita tool is thoroughly inspected and tested before leaving the factory. It is warranted to be free of defects from workmanship and materials for the period of ONE YEAR from the date of original purchase. Should any trouble develop during this one year period, return the COMPLETE tool, freight prepaid, to one of Makita's Factory or Authorized Service Centers. If inspection shows the trouble is caused by defective
-
 1
1 -
2
-
3
-
4
-
 5
5 -
 6
6 -
 7
7 -
 8
8 -
 9
9 -
 10
10 -
 11
11 -
 12
12 -
 13
13 -
 14
14 -
 15
15 -
16
-
17
-
18
-
19
-
20
-
21
-
22
-
23
-
24
-
25
-
26
-
27
-
28
-
29
-
30
-
31
-
32
-
33
-
34
-
35
-
36
 |
 |
