Makita LXMT025 Owners Manual - Page 6
Battery protection system, Lithium-ion battery with star marking, Switch action, Adjusting
 |
View all Makita LXMT025 manuals
Add to My Manuals
Save this manual to your list of manuals |
Page 6 highlights
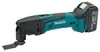
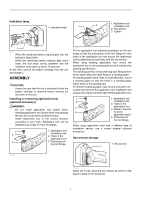
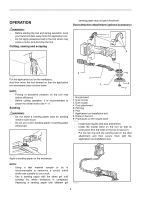
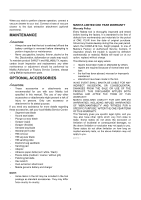
Battery protection system (Lithium-ion battery with star marking) 1 1. Star marking Adjusting the orbital stroke rate 1. Dial 012128 Lithium-ion batteries with a star marking are equipped with a protection system. This system automatically cuts off power to the tool to extend battery life. The tool will automatically stop during operation if the tool and/or battery are placed under one of the following conditions: • Overloaded: The tool is operated in a manner that causes it to draw an abnormally high current. In this situation, slide the slide switch on the tool toward the "O (OFF)" position and stop the application that caused the tool to become overloaded. Then slide the slide switch toward the "I (ON)" position again to restart. If the tool does not start, the battery is overheated. In this situation, let the battery cool before sliding the slide switch toward the "I (ON)" position again. • Low battery voltage: The remaining battery capacity is too low and the tool will not operate. In this situation, remove and recharge the battery. Switch action 1. Slide switch 1 012768 CAUTION: • Before installing the battery cartridge into the tool, always check to see that the tool is switched off. To start the tool, slide the slide switch toward the "I (ON)" position. To stop the tool, slide the slide switch toward the "O (OFF)" position. 1 012770 The orbital stroke rate is adjustable. To change the orbital stroke rate, turn the dial between 1 and 6. The higher the number is, the higher the orbital stroke rate is. Preset the dial to the number suitable for your workpiece. NOTE: • The dial cannot be turned directly from 1 to 6 or from 6 to 1. Forcing the dial may damage the tool. When changing the dial direction, always turn the dial moving it through each intermediate number. Lighting up the front lamp WARNING: • Never look into the light directly. Direct light causes damage to your eyes. 1. Front lamp 1 012779 Slide the slide switch toward the "I (ON)" position to light up the front lamp. The lamp keeps on lighting while the switch is the "I (ON)" position. The light automatically goes out after pressing the rear of the slide switch, and then sliding the slide switch toward the "O (OFF)" position. Overload protection When the tool is overloaded and the tool temperature reaches a certain level, the front lamp blinks and the tool automatically stops. Remove a cause of overload to restart. 6
-
 1
1 -
 2
2 -
 3
3 -
 4
4 -
 5
5 -
 6
6 -
 7
7 -
 8
8 -
 9
9 -
 10
10 -
 11
11 -
 12
12 -
13
-
14
-
15
-
16
-
17
-
18
-
19
-
20
-
21
-
22
-
23
-
24
-
25
-
26
-
27
-
28
-
29
-
30
-
31
-
32
 |
 |