Makita TD090DW Owners Manual - Page 6
Assembly, Operation
 |
View all Makita TD090DW manuals
Add to My Manuals
Save this manual to your list of manuals |
Page 6 highlights
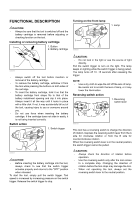
ASSEMBLY CAUTION: • Always be sure that the tool is switched off and the battery cartridge is removed before carrying out any work on the tool. Installing or removing driver bit or socket bit 1 2 008815 1. Bit 2. Sleeve 004521 Use only bits that has inserting portion shown in the figure. For European and North & South American countries, Australia and New Zealand 2. To install the bit, pull the sleeve in the direction of the arrow and insert the bit-piece and bit into the sleeve as far as it will go. The bit-piece should be inserted into the sleeve with its pointed end facing in. Then release the sleeve to secure the bit. 1. Bit 2. Bit-piece 3. Sleeve 1 2 3 A=12mm Use only these type of bit. Follow the B=9mm procedure (1). (Note) Bit-piece is not necessary. 006348 For other countries A=17mm To install these types of bits, follow the procedure (1). B=14mm (Note) Makita bits are these types. A=12mm B=9mm 006349 To install these types of bits, follow the procedure (2). (Note) Bit-piece is necessary for installing the bit. 008816 To remove the bit, pull the sleeve in the direction of the arrow and pull the bit out firmly. NOTE: • If the bit is not inserted deep enough into the sleeve, the sleeve will not return to its original position and the bit will not be secured. In this case, try re-inserting the bit according to the instructions above. OPERATION 1. To install the bit, pull the sleeve in the direction of the arrow and insert the bit into the sleeve as far as it will go. Then release the sleeve to secure the bit. 008819 The proper fastening torque may differ depending upon the kind or size of the screw/bolt, the material of the workpiece to be fastened, etc. The relation between fastening torque and fastening time is shown in the figures. 6
-
 1
1 -
 2
2 -
 3
3 -
 4
4 -
 5
5 -
 6
6 -
 7
7 -
 8
8 -
 9
9 -
 10
10 -
 11
11 -
 12
12
 |
 |
